Advertisement
Attaching the CU-1 to the XK-3/3C
For your safety, please operate your Hammond prod-
uct on a level, stable surface.
1. Attaching the CU-1 unit.
Remove the protective paper from the adhesive tape on the spacer,
and attach the spacer to the CU-1 unit as shown above.
No spacer is needed for mounting the CU-1 Unit on the Lower Key-
board Unit XLK-3.
Th e CU-1 can be mounted to the front rail of the XK-3/3C is two dif-
ferent locations. Chose the location that is most comfortable to you.
Line up the screws attached to the CU-1 unit with the pair of chosen
holes located on the bottom side of the XK-3/3C's front rail and se-
curely tighten these screws.
NOTE: Do not place the XK-3/3C with the CU-1 unit attached onto a fl at
desk type surface. Since the CU-1 extends past the bottom of the
XK-3/3C, the CU-1 unit and front rail of the XK-3/3C could be seri-
ously damaged.
NOTE: Before placing your XK-3/3C into an ATA keyboard type case, make
sure you remove the CU-1 unit fi rst.
2. Connecting to XK-3/3C
Insert the plug on the CU-1 unit into the jack located on the rear of the
XK-3/3C labeled "Foot Switch 1".
For other compatible model, see owner's manual of your instrument
which attach the CU-1 for detail.
All manuals and user guides at all-guides.com
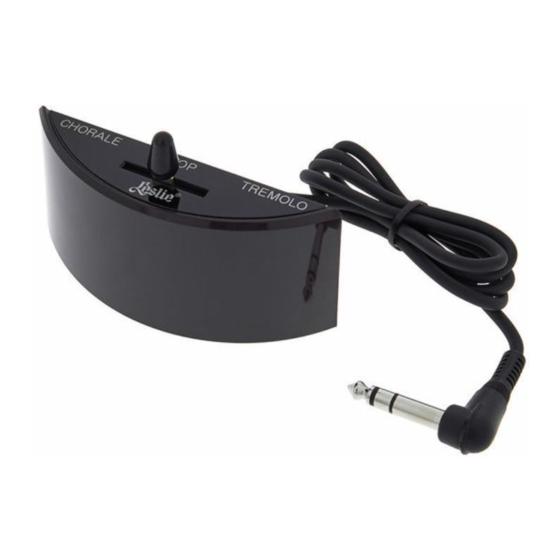
LESLIE SWITCH
Th ank you and congratulations on your purchase of the
Hammond CU-1 Leslie switch. Th e lever switch on the
"Half-Moon" shaped CU-1 unit is used to control the Leslie
eff ects just like on the original B-3. Please read the installa-
tions instructions carefully before you install the CU-1.
1. Go to the foot switch page.
2. Set the device for CU-1.
Owner's Manual
Setting up the XK-3/3C
Turn on the XK-3/3C, touch the [MENU], [4]Control and choice the
"FOOT SW" page using [PAGE] buttons.
Select "CU-1" using [VALUE] buttons.
Th is setting is memorized when you turn off the power.
For other compatible model, see owner's manual of your instrument
how to set up the CU-1.
Playing with your CU-1 Switch
CHORALE:
Th e Leslie' s rotation speed is slow.
TREMOLO:
Th e Leslie' s rotation speed is fast.
STOP:
In this position, the Leslie is not rotating, It takes a few seconds for
the Leslie to completely stop rotating when switched from either the
Chorale or Tremolo positions. You can choose the Brake button while
the Leslie is in the Off position. Th e "Brake" eff ect gets the sound of
a stopped rotor or you make select "Th rough" which by-passes the
Leslie eff ect.
NOTE: On newer Hammond products, the speeds of the Leslie can also
be selected by means of a kick switch on the expression pedal or a
switch button on the product itself. Thus the selected speed on the
CU-1 unit may occasionally not match the action speed (slow-fast-
off ) of the Leslie. If this occurs, simply move the lever switch on the
CU-1 to the adjacent position and the actual rotor speed will then
mach the CU-1 selection.
Manufacturer:
SUZUKI MUSICAL INSTRUMENT MFG. CO., LTD.
25-12, Ryoke 2 Chome, Naka-ku,
Hamamatsu 430-0852 (Shizuoka)
Purchased items:
CU-1 unit
(w/2 Thumb screws) ................. 1
Spacer ............................................ 1
JAPAN
Advertisement
Table of Contents

Related Manuals for Hammond CU-1

Summary of Contents for Hammond CU-1
- Page 1 No spacer is needed for mounting the CU-1 Unit on the Lower Key- board Unit XLK-3. Th e CU-1 can be mounted to the front rail of the XK-3/3C is two dif- ferent locations. Chose the location that is most comfortable to you.
- Page 2 を直接机などの上に置くことはできません。机を傷つけたり、本体が破損す る恐れがあります。 T REMOLO NOTE: XK-3/3C を専用ハードケース HC-300 へ収納される場合は、必ず本機を レスリーオン、ファースト状態になります。 取り外してください。 S TOP 2. XK-3/3C への接続 レスリーオフ状態になります。 スロー←→ファースト状態の移行をスムー CU-1 本体から出ているコードを XK-3/3C の「FOOT SWITCH 1」 ズに行うため、この位置にしてから実際にレスリーオフになるには約1 ジャックへ差し込みます。 秒かかります。 また、 この状態でブレイ ク (停止したローターのサウンドを得る) か、 スルー (レスリー効果をバイパスする)かは、XK-3/3C の [BRAKE] ボタン で選びます。 NOTE: レスリー効果は CU-1 の操作以外にも様々な方法で状態を変化させられるた め、実際の状態と CU-1 のレバー位置とが異なってしまうことがあります。こ...
Need help?
Do you have a question about the CU-1 and is the answer not in the manual?
Questions and answers