Table of Contents
Advertisement
Quick Links
Canopy Fan Quick Start Guide Model CB101
Canopy Breeze
®
Congratulations on choosing the Canopy Breeze® canopy fan, the next level of tailgating comfort! To ensure maximum enjoyment and years of trouble-
free service from this product, please read these instructions thoroughly and store them in a safe place. Please visit www.mekooutdoors.com for further
information and instructional videos.
One-Year Limited Warranty
Meko Outdoors, Inc warranties this product to be free from defects in material or workmanship for a period of one (1) year following the date of purchase,
provided the product is used in a non-commercial manner. This limited warranty does not cover failures as a result of abuse, droppage, or using this
product in a manner contrary to its intent. Damage caused by collapsed/toppled canopies as a result of wind or other acts of nature are excluded from
this warranty. For warranty inquiries or claims, please do not return the unit to your retailer. To file a warranty claim, please visit
www.mekooutdoors.com/warranty and complete the online form, or email us at service@mekooutdoors.com.
What's Included
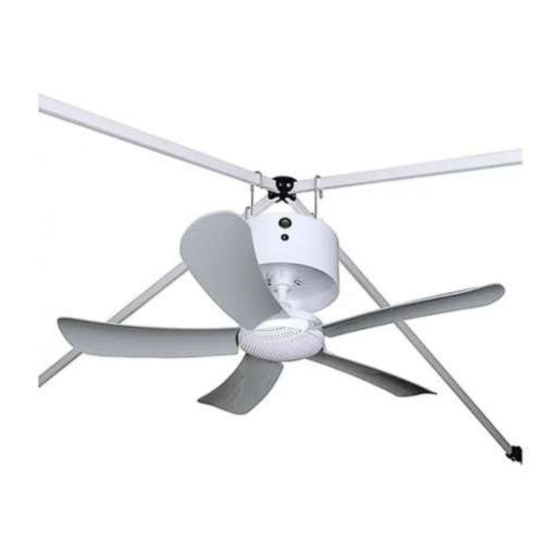
Canopy Breeze fits on perpendicular roof and "Push-up" style frames
Compatible Frames
Standard or vented 10' and 12' canopies with
perpendicular roof joists, available in most
sporting, hardware and discount stores.
Before First Use
Installation
⚠
"
# IMPORTANT:
CANOPY BREEZE IS NOT INTENDED FOR PERMANENT OUTDOOR INSTALLATION. PLEASE STORE CANOPY BREEZE IN CASE AFTER EACH USE. PERMANENT
CONNECTION OF THE CHARGER TO AN OUTLET WILL VOID WARRANTY.
⚠
# WARNING: Do not install or operate the fan if rain, windy or inclement conditions are expected.
"
# WARNING: Be sure to secure the canopy with stakes, weights or rope when operating the fan.
"
⚠
X
W
V
U
T
��
VENTED CANOPIES will pull more air than enclosed canopies, creating a more comfortable environment.
T
��
U
V
W
X
If sustained winds are expected to be 10 mph or higher, the breeze from the fan will be largely ineffective.
① Unfold canopy; only raise it halfway
up.
For PUSH-UP style canopies
⑤ Once all four hooks are resting on the
canopy frame, the fan will sit level, and the fan
blades can be inserted.
Push-up frames, (also known as "One Push," or
"Quick Lift") where a single user can raise the
canopy roof by pushing up a knob in the center
of the frame.
1. Ensure fan motor (the lower part of the motor assembly that the fan blades snap into) is free from obstruction by gently
rotating it clockwise while holding the fan. You will feel slight resistance approximately every ¾", and the motor will make a
quiet clicking sound when spinning continuously. Should you rotate the motor
inside the fan will turn the motor clockwise back to its original position. Never spin the fan motor counter-clockwise more than
¼ turn. If the motor does not spin clockwise with minimal effort, do not attempt to use the fan. Contact us at
service@mekooutdoors.com
2. Charge the battery approximately 6 hours (or until the LED on the charger changes from RED to GREEN) before using.
② Raise the four hooks on top of the fan.
⑥ Insert each of the five fan blades into the slots
on the fan motor assembly and push firmly.
Copyright ã 2023 Meko Outdoors Incorporated. U.S.A. All rights reserved. HTGA
NON-Compatible Frames
Offset roof joist members are not
compatible.
for guidance.
For STANDARD Canopies
③ Center the hooks between the four roof joists of
the canopy frame apex with the hooks over the top of
the frame. Rotate the fan ¼ turn counterclockwise,
then lower each hook onto a roof joist.
⑦ The inner curve, or concave side of fan
blade must face downward (toward the
ground) when installed.
�� Master power switch
�� Charging port
�� 5 fan blades
�� Motor Assembly
�� Fan remote control
�� Case
�� Battery Housing
�� Battery charger
�� Downrod Extension accessory
Canopy Breeze will not fit on these type frames
Canopies with a center pole, or cross-truss frame
whereby the roof fabric is raised via a center
pole held by truss supports at the top of the legs
are not compatible.
counter-clockwise
and release, a spring clutch
For PUSH-UP style canopies
④ Depending on the size of the push-up knob on
the canopy, it may be necessary to angle the fan
slightly so the hooks on the fan can clear the
knob.
⑧ You will hear a "click" once the fan blade snaps
into place.
Advertisement
Table of Contents

Related Manuals for Canopy Breeze CB101

Summary of Contents for Canopy Breeze CB101
- Page 1 ® Congratulations on choosing the Canopy Breeze® canopy fan, the next level of tailgating comfort! To ensure maximum enjoyment and years of trouble- free service from this product, please read these instructions thoroughly and store them in a safe place. Please visit www.mekooutdoors.com for further information and instructional videos.
- Page 2 Down Rod Extension Due to the height and roof pitch of certain canopy frames, air flow created by Canopy Breeze may need to be closer to the occupants. The included down rod extension allows the fan to hang an additional 10” lower than using the four hooks on top of the fan.
Need help?
Do you have a question about the CB101 and is the answer not in the manual?
Questions and answers