Advertisement
- 1 MODELS
- 2 PRODUCT BEST PRACTISE
- 3 IMPORTANT PRODUCT INFORMATION
- 4 WHERE TO INSTALL THE UNIT
- 5 WHERE NOT TO INSTALL THE UNIT
- 6 INSTALLATION OF YOUR PRODUCT
- 7 ACTIVATING THE UNIT
- 8 OPERATING AND TESTING YOUR PRODUCT
- 9 MAINTENANCE
- 10 PRODUCT SPECIFICATION
- 11 DEACTIVATION OF THE UNIT
- 12 SERVICE AND WARRANTY
- 13 Documents / Resources
MODELS

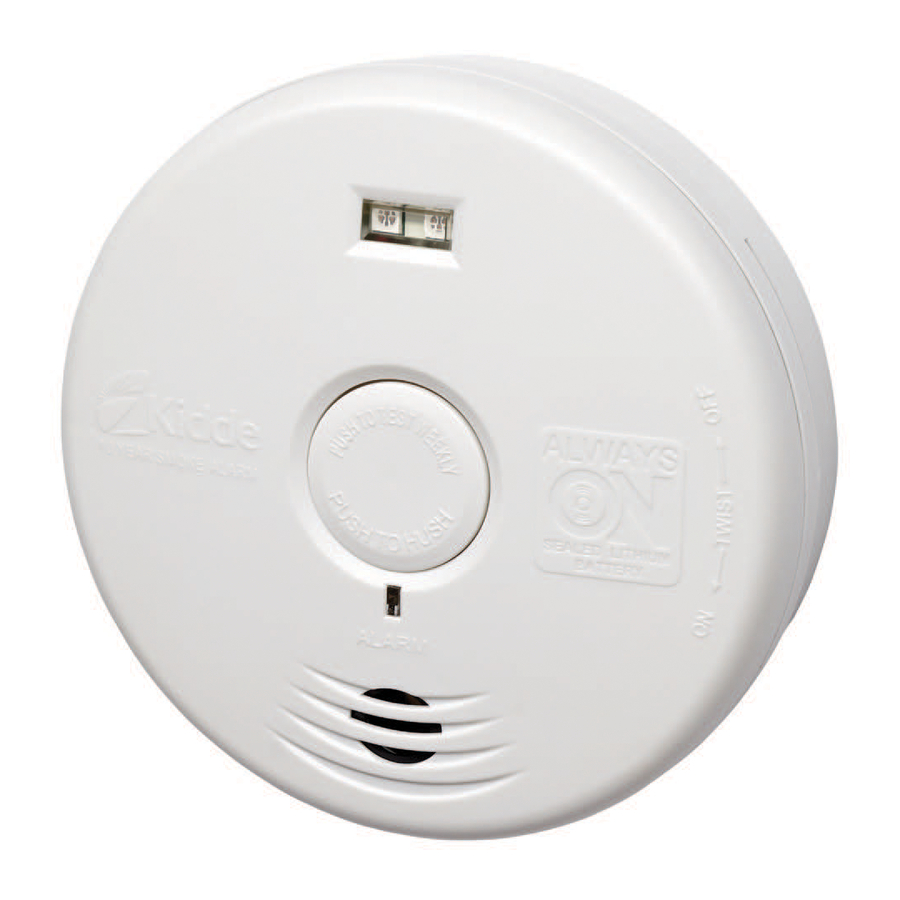
Hallways Unit with Escape Light

Voice Unit / Living Area Unit
PRODUCT BEST PRACTISE
At all times and before installing your smoke alarm you must;
- Have an escape plan with alternate exits
- Train your family in this escape plan and practise it regularly
- Ensure your family know what the alarm sounds like
If the alarm sounds check for fires first of all, and if one is discovered then;
- DO Alert small children
- DO Exit the home according to your escape plan
- DO Crawl if the smoke is dense, using a damp cloth to breathe through
- DO Call the fire brigade from a neighbour's home
- DO Ensure that everyone is awake, and assistance is given to those who require it
- DON'T stop to dress or retrieve valuables
- DON'T open doors that are warm, or through which smoke is seeping
NOTE – Situations where a smoke alarm might not be effective;
- Smoking in bed
- Leaving children unattended
- Cleaning with flammable liquids resulting in explosive vapour
IMPORTANT PRODUCT INFORMATION
- Before temporarily silencing the alarm with the Hush button, identify the source of the smoke.
- Smoke alarms need to be tested regularly
- Smoke alarms cannot provide an alarm if smoke cannot reach them
- Fires in chimneys, walls, roofs, different levels or behind closed doors might not be detected
- For the physically or mentally impaired, or very young, escape may be difficult and so alternative escape strategies should be adopted
- The smoke alarm may not wake heavy sleepers or those impaired by the use of drugs or alcohol. Inthis case an alarm should be fitted in each sleeping area
- Smoke alarms can save lives, but they are not an alterna0ve for an adequate insurance policy toprotect lives and property
![]()
Additional markings on back of unit.

Leading authorities recommend that both ionisation and photoelectric smoke alarms be installed to help insure maximum detection of the various types of fires that can occur within the home. Ionisation sensing alarms may detect invisible fire particles (associated with fast flaming fires) sooner than photoelectric alarms. Photoelectric sensing alarms may detect visible fire particles (associated with slow smoldering fires) sooner than ionisation alarms.
WHERE TO INSTALL THE UNIT
Locate one alarm on every floor level
Locate to monitor stairways – Escape Light alarm recommended (Model WFPL)
Locate in each sleeping location / bedroom – Voice alarm recommended (Model WFPV)
Locate in every room with electrical appliances
Hallways longer than 9m require a smoke alarm at each end – Escape Light alarm recommended
Rooms greater than 47m2 require additional alarms
NOTE – If your room is not well insulated, smoke may not reach the ceiling and wall-mounting should be adopted.
This apparatus is to be installed by a competent person.

WHERE NOT TO INSTALL THE UNIT
- Garages
- Areas of extreme temperature (below 0°C and above 40°C)
- Dusty or insect infested areas
- Do not install where the ventilation openings in the unit could be impeded by items such as newspapers, table-cloths, curtains, etc.
- Humid areas (greater than 93% RH)
- In front of fans, ducts or other high flow areas
- Within 1 metre of a fluorescent light
- Kitchens (or within 1 metre of the kitchen)
- Bathrooms (or within 1 metre of the bathroom)
- This alarm is intended for domestic use only – it is not tested for leisure boats, camper vans or caravans. It is not suitable for large passenger boats.
INSTALLATION OF YOUR PRODUCT
OPTION 1 - Easy mount to drywall only;

- Choose a mounting location (wall or ceiling) and drill a 5mm hole through drywall.
- Insert the provided screw through the mounting plate aligning the ribs on the screw with the slots on the mounting plate.
- Tighten the screw/mounting plate to wall or ceiling until it is snug against surface. DO NOT over-tighten.
OPTION 2 - Mounting onto other Surfaces

- Choose a location (wall or ceiling) and using the mounting plate provided as a template, mark three hole locations.
- Install the three provided screws through the mounting plate and tighten. DO NOT over-tighten screws (if mounting in plasterboard or similar surface, drill 5mm holes and use the plastic anchors provided). Anchors are not required for mounting on hard surfaces such as wood.
ACTIVATING THE UNIT
This alarm is automatically activated when it is attached to the moun ng plate for the first me. Once activated, the battery will power the alarm for its 10-year life under normal conditions.
Align the alarm with the mounting bracket and rotate clockwise approximately 45 degrees until the unit stops rotating and clicks into place. DO NOT over-tighten. If the unit needs to be re-aligned rotate the alarm anti-clockwise, remove and rotate to the desired alignment.
NOTE: This alarm will mount to the plate in 3 positions (every 120 degrees).
The alarm briefly chirps to indicate that power has been received. The unit will remain on until it is disabled by the user or at the end of the alarm's life. Do not over tighten the alarm as this can cause damage to the mounting bracket.
The alarm is now activated! Now test the alarm as described in this user guide.
Model WFPV will issue a voice prompt at activation asking the user to press the test button. Proceed to 'Operation and Testing' section.
OPERATING AND TESTING YOUR PRODUCT
| Sound Emitted | Voice Prompt (Model WFPV) | LED (all) & Escape Light (Model WFPL) | Note | |
| Normal Operation | None | None | Flashes once every 10 minutes | LED will flash every 60seconds for 10 minutes after power-up, then flashes every 10 minutes |
| Test | 3 long beeps repeated twice | "FIRE, FIRE!" | Flashes with alarm pattern (Model WFPL briefly illuminates amber safety light) | None |
| Alarm | 3 long beeps, repeating "FIRE, FIRE!" | 3 x flashes, synchronised with audible alarm (and illumination of amber safety light for model WFPL) | Identify source of smoke and evacuate if necessary | |
| Low Battery | Single chirp every 60 seconds | "Low Battery" | Flashes once every 30 seconds | Deactivate the alarm and replace within 7 days |
| Hush See NOTE 1 | "Hush Mode Activated" | Flashes every 10 seconds for 10 minutes | ||
| Hush Cancellation | "Hush Mode Cancelled" | Cancelled by pressing test button | ||
| Fault Mode | Single chirp every 30 seconds | Fault Code (2-12 flashes every 30 seconds) | ||
| End of Life See NOTE 2 | 2 chirps every 30 seconds | Flashes twice every 30 seconds |
Note 1 – Pressing the Test/Hush button will desensitize the alarm for 10 minutes to a known alarm condition such as burnt toast. During this period the LED flashes every 10 seconds.
Note 2 – Pushing the Test/Hush button at end of life silences End of Life chirps for 3 days. Can be used 10 times within 30 days. Allows the homeowner to purchase a replacement alarm.
MAINTENANCE
At least once a year remove the alarm and use a vacuum cleaner to suck out any dust. Wipe the outside of the alarm with a damp cloth. When you replace the alarm remember to test it.
- Never use detergent or other solvents to clean the alarm.
- Avoid spraying air freshener, hair spray, or other aerosols near the smoke alarm
- Do not paint the unit. Paint will seal the vents and interfere with the sensor's ability to detect smoke.
- NOTE: do not use naked flame sources, such as lighted candles, to test your apparatus.
- Storage and Transport Conditions: -20°C to +60°C, 5-95%RH (non-condensing).
PRODUCT SPECIFICATION
| Power | Sealed lithium battery |
| Sensors | Smoke - Optical |
| Operating Temperature Range | 0°C to 40°C |
| Humidity Operating Range | Up to 93%RH (non-condensing) |
| Storage and Transport Conditions | -20°C to +65°C, 5-95%RH (non-condensing) |
| Alarm Sound | 85dB @ 3m after 1 min., 82dB after 4 min. |
| Dimensions | Diameter 5.25"(133.3mm), Height 1.6"(40.3mm) |
| Weight | Weight: 0.173 kg |
NOTE: Constant exposures to extreme temperatures and humidities may affect battery life.
DEACTIVATION OF THE UNIT

- Deactivation of the alarm is permanent. Once the alarm has been deactivated, it cannot be reactivated!
- Once deactivated, the alarm will NO LONGER DETECT SMOKE.
- Once the alarm is deactivated the battery will be depleted and the alarm will no longer function.
- Once the alarm has been deactivated, it cannot be mounted onto the mounting plate or reactivated.

Failure to turn off alarm as instructed prior to disposal may create potential for lithium battery related fire or hazard.
TO DEACTIVATE THE ALARM:
Remove the alarm from the mounting plate by rotating it in the direction indicated by the arrows on the cover of the alarm.
On back side of alarm, locate the  area on product label.


Break through label with a screw driver.

Turn the screw to the "OFF" location.
This will deactivate the alarm, stop the low battery or end of life "chirp" and render the alarm safe for disposal by draining the battery.
SERVICE AND WARRANTY
If after reviewing this user guide you feel that your smoke alarm is defective in any way, do not tamper with it. Return for servicing to: Kidde Safety Europe LTD., Mathisen Way, Colnbrook SL3 0HB 0800-917-0722
QUESTIONS OR FOR MORE INFORMATION
Call our Consumer Hotline at 0800 917 0722 or contact us at our website at www.kiddesafetyeurope.co.uk
Kidde Safety Europe Limited,
Mathisen Way, Poyle Road, Colnbrook,
Berkshire SL3 0HB

Documents / Resources
References
Download manual
Here you can download full pdf version of manual, it may contain additional safety instructions, warranty information, FCC rules, etc.
Advertisement


Need help?
Do you have a question about the WFPL and is the answer not in the manual?
Questions and answers