EcoFlow Blade - Robotic Lawn Mower Manual
- Quick start manual (2 pages) ,
- Quick start manual (2 pages) ,
- User manual (51 pages)
Advertisement
- 1 Safety Warnings
- 2 Symbols and Decals
- 3 What's in the Box
- 4 Product Overview
- 5 Select Locations
- 6 Installation
- 7 Seeking a signal and fixing the antenna/charging station
- 8 Set up the working area
- 9 LED Indicators
- 10 Settings
- 11 Lawn Sweeper Kit
- 12 Maintenance
- 13 Specifications
- 14 FAQ
- 15 Documents / Resources
Safety Warnings
Before mowing
- Please read and follow the instructions and warnings carefully in the user manual before operating the mower.
- The operator is responsible for accidents or hazards occurring to other people on their property.
- Regularly inspect the area where the mower is used and remove all the obstacles.
- DO NOT use the mower if any part of it is damaged, worn or inoperable.
- DO NOT modify the mower by yourself, instead, contact after-sales service.
- Be careful of all the potential hazards that are hidden in the grass.
- Use the mower in daylight or good artificial light.
- DO NOT operate the mower in bad weather, such as rain, thunderstorms, or snow.
- Use a residual-current device (RCD) with a tripping current of maximum 30 mA when you connect the power supply to the power outlet.
- To achieve better mowing results and prolong its service life, please be sure to keep the mower clean and the blades in good condition. Inspection and maintenance should be carried out by an adult every week. Any damaged or worn parts should be replaced. DO NOT perform maintenance when wearing open sandals or barefoot. Always wear long trousers and work shoes when maintaining the mower.
- We recommend that you replace the blades every quarter depending on their condition. Replace all three blades and screws at the same time. Only use the right type of screws and original blades as approved by EcoFlow. When replacing the blade, make sure that the mower completely stopped and remove the battery temporarily. We recommend that you wear heavy work gloves in case of sharp blades.
 Never allow children, persons with reduced physical, sensory or mental capabilities or lack of experience and knowledge or people unfamiliar with these instructions to use the machine. Local regulations may restrict the age of the operator.
![]()
For the purposes of recharging the battery, only use the detachable supply unit KT180A3600500XX provided with this appliance.- For the European Union, only use with the KT180A3600500EU supply unit. For the United Kingdom, use the KT180A3600500BS supply unit. North America requires KT180A3600500US and Australia, the KT180A3600500AU supply unit.
When mowing
- DO NOT lift up the mower while it is in use.
- DO NOT allow children to get close to or play with the mower when it is in use.
- DO NOT touch the rotating blades! Do not put hands or feet under or near the rotating parts.
- If an accident or breakdown occurs when the mower is running, please press the STOP button immediately.
- During manual control, stay close to the mower and maintain balance at all times. Always wear long trousers and work shoes.
- Do not run while operating the mower or its peripherals.
- In the case of unusual vibrations, please turn off the mower, place it on level ground for about 30 seconds and then restart it. If the issue persists, please contact our authorized after-sales service.
- Please make sure that the mower has completely stopped and the battery has been removed before you clean, repair or inspect it.
- If the machine is not used for a long time, remove the battery. Store the machine indoors in a cool and dry place.
- When mowing in a public lawn, please put up a warning sign around the working area that says: Warning! Automatic mower! Keep away from the machine! Take care of your children!
- DO NOT use the product or its peripherals with defective guards/shields, or without safety devices, or if the cable is damaged or worn.
- If the cable of the power supply or the extension cable is damaged or entangled during use, disconnect the power supply from the power socket and untangle it. To avoid an accident, pull the body of the plug rather than the cord when separating the power supply from the power socket. Contact our after-sales service and have a professional technician repair or replace the cable if necessary.
- DO NOT modify or dismantle the battery by yourself. Please contact our after-sales service or a professional technician for help if necessary.
- The battery pack contains electrolytes. If the electrolytes come into contact with your skin, wash it off with soap and water immediately. Get medical help in case of eye contact and immediately flush the eyes with plenty of water for at least 15 minutes without rubbing.
Symbols and Decals
 |  Read instruction manual before operating the machine. |  | Keep a safe distance from the machine when operating. |
 | Do not ride on the machine. |  | Keep hands and feet away from the rotating blades. |
 | Remove the disabling device before working on or lifting the machine (The disabling device means battery pack) *Make sure the battery is removed before working on or lifting the machine. | ||
 | It is not permitted to dispose of this product as normal household waste. Ensure that the product is recycled in accordance with local legal requirements. | ||
 | This product conforms to the applicable EC Directives. |  | SMPS (Switch mode power supply unit) |
 | Class II appliance |  | Efficiency Level |
 | Class III appliance |  | Direct current |
 | SMPS incorporating a short-circuit-proof safety isolating transformer (inherently or noninherently) |  | Alternating current |
 | CLASS 1 LASER PRODUCT. Complies with 21 CFR 1040.10 and 1040.11 except for conformance with IEC60825-1 Ed.3., as described in Laser Notice No.56, dated May 8, 2019. | ||
What's in the Box
Please contact our customer service if any components are missing or defective.

Please do not remove stickers printed with "A1/B1/A2/B2". Save them for future use.
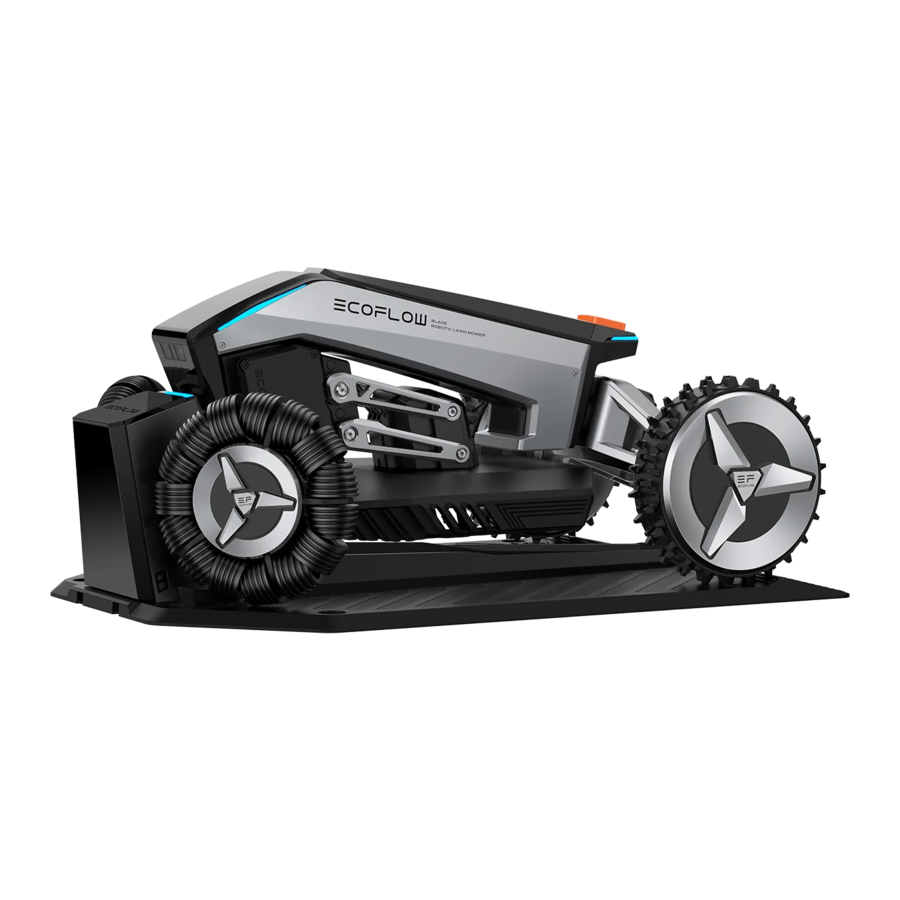
Product Overview
EcoFlow Blade

Front
- Headlight
- Front wheel (omni-wheel)
- Battery compartment cover
Rear
- Back wheel (drive wheel)
- Tail light
- Power button
- Start button
- Recharge button
- Stop button
- Lawn Sweeper Kit Port

Fig. 2 Underbody view of EcoFlow Blade
- Charging pads
- Blade (×3)
- M4 × 8 (×3)
- Blade disc
- Handle
- Blades and M4×8 are preinstalled onto the blade disc, the accessory kit is for a spare use.
- Ensure that the mower is completely turned off if you need to turn it over.
Charging Station & GNSS Antenna
GNSS antenna kit

- Fork
- Antenna tube 1
- Antenna tube 2
- Antenna
Charging station

- LED indicator
- Charging pad
- Holes for nails
- Extension cable connector
- Power cable connector
Select Locations
To improve performance, do not place your GNSS antenna or charging station in the pink areas shown below.

- Do not put the antenna or charging station between walls.


- Do not keep the antenna or charging station under trees.
![]()

- Keep the antenna/charging station at least 2 m (6.6 ft.) from nearby houses/walls.


- Keep the antenna/charging station away from water.


- Keep the charging station on flat ground or on a slope of less than 5°.


Installation
Install the GNSS antenna
There are a couple of ways to install the antenna, here are the two most common options for your reference.
Option 1
- Attach tube 1 to the fork and then attach tube 2 to tube 1.


- Slide the extension cable through the tubes.


Option 2
- Attach tube 1 to the fork and then slide the extension cable through tube 1.


- Attach tube 2 to tube 1, and then slide the extension cable through tube 2.


- Connect the antenna to the extension cable, and secure the connectors.


- Secure the antenna and tube 2.

![]()
Please carefully align the notch on the antenna with the groove of the extension cable.

- Secure the extension cable into the groove at the bottom of fork.

![]()
Do not insert the antenna kit into the ground yet before you find a proper satellite signal.

Install the charging station
- Connect the extension cable to the charging station.
![]()
Secure the cable connectors tightly to prevent the cable from loosening during use.


- Connect the power cable to the charging station.


- Connect the power cable to the power adapter.


- Plug in the power adapter.


Power adapter placement suggestions

- Away from rain or direct sunlight.
- In a well-ventilated place.
- At least 30 cm (1 ft) above the ground.
Seeking a signal and fixing the antenna/charging station
Download the EcoFlow App
Control, monitor, and customize your EcoFlow Blade from afar with the EcoFlow app. Download at: https://download.ecoflow.com/app
Privacy Policy
By using EcoFlow Products, Applications, and Services, you consent to the EcoFlow Term of Use and Privacy Policy, which you can access via the "About" section of the "User" page on the EcoFlow App or on the official EcoFlow website at https://www.ecoflow.com/policy/terms-of-use and https://www.ecoflow.com/policy/privacy-policy


Fig. 6 EcoFlow app
Seeking a signal
- Remove the sticker attached to the front of the mower.


- Push the mower onto the charging station, and the mower will turn on automatically.

- Log in to the app and make sure you have completed step 1 "Assemble Product".


- After step 1, select "Search device positioning satellite signal" and follow the instructions to "start searching signal".


Ensure that the signal strength is "strong", so that you'll get better performance later.
Antenna kit location
Once you have found a spot with a strong signal, you can fix the antenna kit in that spot.
- Take off the protective covers.
![]()

- Insert the antenna into the ground.


- Please be aware of sharp fork prongs to avoid an accident.
- Do not put anything on the antenna.
Charging station location
After you have fixed the position of the antenna, you can learn how to control the mower before finding a charging station location.
- Follow the instructions and select "start practicing".


- Turn the mower around by using the direction keys to complete the practice.
![]()

- Move the mower around by using the direction keys to find a spot with a strong signal for the charging station.
![]()

- Fix the charging station with nails.


- Secure the extension cable and power cable with pegs.


- We suggest that you secure the cables with pegs when you put the cables within the working area.
- When fixing the cables, please pull them straight and along the surface of the ground.
- Once you have fixed the antenna kit and the charging station, do not move their positions, otherwise, you will have to re-map the working area.
Set up the working area
Before setup
Clean your lawn
Remove all the obstacles inside the working area, including toys, wires, stones, etc. Make sure that kids and pets are not near the mower.

Power on/off
Scenario 1

- Normally, the mower will power on automatically when it's connected to the charging pads of the charging station. Once it's turned on, you'll hear the voice prompt "Power on, let's start a new journey".
Scenario 2
- When the mower is not on the charging station, you can turn it on by holding the power button for at least 3 seconds until the tail light pulses blue.


To turn off the mower, back up the mower from the charging station and then press and hold the power button for about 3 seconds until you hear the voice prompt "Power off. Look forward to working for you again".
Working area
- On the "Guide to EcoFlow Blade" page, select "Create mower work map".
![]()

- Follow the instructions and proceed to select "Start mapping".
![]()

- Select "Mapping working area".


- The mower activates and leaves the charging station automatically, manually control the mower to the proper position then choose "Start".


- Now map out the working area by using the direction keys.
![]()

- When the mower approaches the starting point, tap "finish" to end the process.


- Always keep the distance from the lawn edge about 15 cm (5.9 inches).
![]()

- While mapping out the working area, make sure that the turning angle is more than 90°.
![]()

- Make sure the slope of the lawn edge does not excceed 15°.


Restricted zones
- After setting up the working area, the app will guide you to the "Restricted zone" setting. Tap "Mapping restricted zone" to proceed.


- Map out the restricted zone by using the direction keys.
![]()

- We suggest that you move the mower near the area where you want to set up the "restricted zone", then tap the "start" button and tap "finish" button to end the process.
- Please keep the restricted zones inside the working area, otherwise, the app will remind you that your attempt to map out a restricted zone outside the working area failed.
Creating Paths
Make sure you have created more than two working areas (see steps in working area).
- Select "Mapping path" on the guide page.


- Draw a path between two or more working areas by using the direction keys.
![]()

LED Indicators
| Light | Color | Status | Meaning |
| Head light | Blue | Dark blue as the base color, bright blue flows from bottom to top | Power on |
| Dark blue as the base color, bright blue flows from top to bottom | Power off | ||
| Pulses for 1s and then fades away from back to front | Idle state | ||
| A small section of blue stays solid in the middle (stationary) A small section of blue stays solid in the front (moves forward) | Manual control | ||
| A small section of blue stays solid in the back (moves backward) | |||
| Blue | The left side of the light beads flow upward, the right side of the front light beads flow downward | OTA upgrade | |
| Solid | Works normally | ||
| Green | Presents a circular forward flow like a drop of water, then slowly displays halo light effect. The power progress bar, according to the current power value, shows the corresponding number of solid light beads. | Charging + state of charge | |
| Red | Pulses for 1s and then fades away from back to front | Low battery (≤20%) | |
| Light beads flow to the middle | Safety protection mode | ||
| Alternating red/ blue | Pulses and blinks blue & red alternately | The mower is locked | |
| No light on | Light off after charging for 30 seconds | Hibernates during charging | |
| Tail light | Blue | Pulsing slowly brightens | Power on |
| Pulsing becomes slower | Power off | ||
| Pulsing | RTK status 4 | ||
| Orange | Pulsing | RTK status 5 | |
| Blinking | RTK status 1 | ||
| Red | Pulsing | LoRa offline | |
| Charging station LED | Blue | Blinks for 4 times | The mower is on the charging station |
| Solid | The mower is not on the charging station | ||
| Green | Pulsing | The mower is charging | |
| Solid | The mower is fully charged | ||
| Red | Solid | Charging base station failure/ abnormal charging/ foreign objects detected on contacts |
RTK: real-time kinematic
LoRa: long-range radio
Settings
Start/Pause
After "Guide to EcoFlow Blade", you can choose "Start working".
- Tap "Start", and the mower will start mowing.
![]()

- Tap "Pause" to pause the mower, and then tap again to resume the work.
![]()

Recharge/Return to the charging station

Option 1
The mower will return to the charging station automatically when it is about to finish working.
Option 2
Tap "End" to make the mower return to the charging station for recharging.
Device sharing
If you need to share this mower with someone else, please follow the steps below:
- Tap the icon in the upper right.


- Select "Device sharing".


- If the mower is bonded with an account, then the new operators cannot connect to the mower unless the original account shares the device.
- There are several ways to share or unlink:
- Device sharing
- Unlink the mower (see the following section "Unlink")
- Press and hold "Start/Pause" and "Recharge" buttons simultaneously for about 20 seconds.
Unlink
- Tap the icon in the upper right and tap "Mower Settings".


- Tap "Account binding reset".


Mowing height
- Tap the icon in the lower right.


- Tap "Mower settings".


- Slide your finger to adjust the mowing height.


Firmware upgrade
Online upgrade
- Tap the icon in the upper right and then tap "Firmware".


- Tap "Upgrade Online" and wait for the process to complete.


Offline upgrade
- Tap "Offline Upgrade" and wait for the process to complete.


- Connect to the device's Wi-Fi, and the app will automatically send the firmware package to the device after connecting to a hotspot.


The EcoFlow app may get updated from time to time, please refer to the latest release.
Lawn Sweeper Kit
The mower can be used together with the Lawn Sweeper Kit to collect leaves and grass clippings. For more details, please refer to the Lawn Sweeper Kit manual or quick start guide.

Maintenance
Cleaning
- Ensure that the mower is powered off, and remove the battery before cleaning.
- Clean the mower with a clean, damp cloth or a soft brush. Do not use alcohol, chemicals, or other corrosive materials.
- Turn the mower upside down on a flat surface before cleaning all the foreign objects stuck to the bottom.
Please do not use high-pressure water to clean the mower in case of component damage
Transportation
Hold the handle when you need to lift or move the mower.

Residual risks
In order to reduce risks, wear gloves when replacing blades. Follow the instructions and warnings in this manual, but risks cannot be eliminated completely.
Blades
If the mower is used on a regular basis, we suggest that you change the blades and screws every 1 to 2 months to ensure a safer performance.
- Wear protective gloves when you inspect or replace the blades.
- Do not reuse the screws.
- Use the original spare blade and screws supplied by EcoFlow.

- Turn off the mower
- Turn the mower over and put it on a soft and flat surface.
- Loosen the three screws and then remove the blades.
- Replace with new blades and screws.
Battery
Remove
- Open the battery compartement cover and lift the antenna cover.

- Hold the button (as in fig. ) and then lift up the battery.


Install the battery
- Align the battery with the grooves in the mower.


- Push back the antenna cover.

- Install back the battery compartment cover by aligning it with grooves in the mower.

- Lightly push the battery compartment cover until you hear a "click".


Power
- You should disconnect the power supply: Before clearing a blockage; Before checking, cleaning, or working on the product; After striking a foreign object to inspect the product for damage.
- Regularly examine the cable, plug, enclosure, and other parts. If any damage or signs of aging are found, stop using the mower immediately.
- Connect the mower and/or its peripherals only to a supply circuit protected by a residual current device (RCD) with a tripping current of no greater than 30 mA.
- DO NOT operate a damaged power supply. If the supply cable is damaged, it must be replaced by the manufacturer, its service agent, or similarly qualified persons in order to avoid a hazard. If the extension cable is defective, please replace it with the 10-meter-long cable as approved by EcoFlow.
- DO NOT connect a damaged cable to the power supply or touch a damaged cable or extension cable before it is disconnected from the power socket. Damaged cable can lead to contact with live parts.
- DO NOT use the power supply with any other products or batteries, otherwise, there will be risks of personal injury, fire, or electrical shock. Product safety cannot be guaranteed with non-original batteries.
- DO NOT charge when the battery is leaking.
- Keep the extension cable away from moving hazardous parts to avoid damage to the cords which can lead to contact with live parts.
Storage
- Before storing the mower, please make sure that the mower is powered off and then fully charge it to avoid over-discharging.
- Store the mower out of reach of children and pets.
- Keep the mower away from heat sources, chemicals, or other hazardous materials.
- Keep the product in a cool and dry place.
Specifications
| Basic information | Name | EcoFlow Blade |
| Brand | EcoFlow | |
| Mower Dimensions | approx. 660 × 440 × 310 mm (26 × 17 × 12 in.) | |
| Charging Station Dimensions | approx. 715 × 501 × 205 mm (28 × 20 × 8 in.) | |
| Mower Weight | 16.2 kg (35.7 lbs) | |
| Mower + Package Weight | 27.5 kg (60.6 lbs) | |
| Materials | Plastic and aluminum alloy | |
| Mowing parameters | Working capacity | Max. 3,000㎡ (0.75 acre) |
| Typical mowing time per full charge | 240 minutes | |
| Mowing width | 26 cm (10 in.) | |
| Mowing height | 20-76 mm (0.8-3 in.) | |
| Charging time | approx. 130 minutes | |
| GNSS working mode | GPS, Beidou, Galileo, GLONASS | |
| Noise emissions | Gentle mode | Measured Sound Power Level LWA: 59 dB(A) |
| Sound Power Uncertainties KWA: 3 dB(A) | ||
| Sound pressure Level LpA: 51 dB(A) | ||
| Sound pressure Uncertainties KpA: 3 dB(A) | ||
| Quick mode | Measured Sound Power Level LWA: 65 dB(A) | |
| Sound Power Uncertainties KWA: 3 dB(A) | ||
| Sound pressure Level LpA: 57 dB(A) | ||
| Sound pressure Uncertainties KpA: 3 dB(A) | ||
| Working conditions | Working temperature | 0°C-45°C (32°F-113°F) |
| Discharging temperature | 0°C-60°C (32°F-140°F) | |
| Storage temperature | -20°C-60°C (-4°F-140°F) | |
| Charging temperature | 0°C-45°C (32°F-113°F) | |
| IP rating | IPX5 | |
| Max. incline | 50% (27°) | |
| Connectivity | Bluetooth frequency | 2,400-2,483.5 MHz |
| WiFi frequency | 2,400-2,483.5 MHz/5,725-5,850 MHz | |
| Cellular network | Europe LTE-FDD: B1/B3/B7/B8/B20/B28 North America WCDMA: B2/B4/B5 LTE-FDD: B2/B4/B5/B12/B13/B25/B26 | |
| Disc parameters | Rated speed | Gentle: 0.4 m/s Normal: 0.6 m/s Quick: 0.8 m/s |
| Maximum speed | 0.8 m/s | |
| Drive mode | Direct-drive hub motor | |
| Blade motor | Rated speed | 2,800 rpm |
| Maximum speed | 3,000 rpm | |
| Motor type | Brushless motor | |
| Battery | Battery type | Lithium-ion battery |
| Nominal capacity | 21.6V | |
| Nominal capacity | 298Wh | |
| Protection system | Over-heat, short-circuit, over-current, overvoltage, under-voltage | |
| Charging station | Input voltage | 36 V |
| Input current | 5 A | |
| Output voltage | Max. 25.2 V DC | |
| Output current | Max. 7A | |
| Other | Front wheel | 200 mm (7.9 in.) omnidirectional wheel |
| Rear wheel | Hub motor with rubber tyres | |
| Sensor | IM sensor, Lift sensor, rain sensor, wheel encoder, RGB-D camera | |
| Vertical obstacle crossing ability | 40 mm (1.6 in.) |
- The above data was measured in a laboratory and is for reference only.
- The noise emission declarations conform to EN 50636-2-107 and ANSI/OPEI 60335-2-107.
- The manufacturer reserves the right to make modifications without notice, please go to www.ecoflow.com for the latest specifications or related documents.
FAQ
- The robotic lawn mower cannot return to the charging station automatically. Why?
It may not return to the charging station in the following cases:- The satellite signal is weak due to walls, trees or other obstacles within the range of 2m (6.56ft) around the antenna. Solution: Move the antenna to an open area, and re-create the map.
- The path on which the robotic lawn mower returns to the charging station is blocked by obstacles. Solution: Remove the obstacles.
- The charging station or the antenna is moved after the map is created. Solution: Fix the charging station and the antenna, and then re-create the map.
- The front camera lens of the robotic lawn mower is broken or blocked by obstacles, and the robotic lawn mower cannot recognize the charging station as the result. Solution: Remove the obstacles/Contact the after-sales service for maintenance in case of broken camera lens.
- Where is the optimal position to install the GNSS antenna?
The GNSS antenna is used to receive satellite signals, so it is necessary to be installed in an open outdoor place, where there are no buildings or trees above the antenna, and the distance between the antenna and the surrounding obstacles is above 2 m (6.6 ft). Confirm that the satellite signal is good, and fix the antenna extension cable. - What is the largest communication range between the robotic lawn mower and the charging station?
The wireless communication range between the charging station and the robotic lawn mower is up to 300 m (984 ft) in an open and unobstructed environment. The actual operation range of the robotic lawn mower will be affected by the obstruction from surrounding buildings and the like. - Does the robotic lawn mower come with the positioning and anti-theft functions?
The robotic lawn mower has a built-in 4G module, which enables the GPS positioning function. If someone steals the robotic lawn mower and tries to use it in other places, you can acquire the real-time position information of the mower in the app and lock it remotely. - What should I do if the robotic lawn mower cannot be started?
The robotic lawn mower cannot be started in the following conditions:- The battery is dead. Solution: Charge the robotic lawn mower on the charging station until the battery is fully charged.
- The battery is over-discharged, that is, the battery level cannot be restored after charging, and the robotic lawn mower loses power quickly after leaving the charging station. Solution: Contact the after-sales service for solutions.
- The robotic lawn mower has the fault that it cannot be started after the battery is fully charged. Solution: Contact the after-sales service for solutions.
- The charging fails due to dirty charging pads. Solution: Clean the dirt with soft cloth. If it cannot be cleaned with the soft cloth, try to polish it with fine sandpaper.
- If the robotic lawn mower will not be used for a short time (within a week), should I disconnect the power supply or detach it from the charging station?
If the robotic lawn mower will not be used for a short time, you are recommended to shut down the robotic lawn mower after it is fully charged, and disconnect the power supply of the charging station. It is not necessary to disconnect the charging station and the robotic lawn mower. If the mower will be stored for a long time, you are recommended to charge it every six months.
- After the robotic lawn mower returns to the charging station due to low battery, what is the required battery level for it to continue the task?
When the remaining battery level of the robotic lawn mower is 20%, the robot will pause the mowing task and automatically return to the charging station. When the robotic lawn mower is charged to 90%, it will return to the point where it stopped mowing to continue the operation, with no need to set the task again. - How often should I charge the robotic lawn mower to prevent over-discharging the battery when it is stored for a long time?
When the mower is off, the power consumption of the Battery Management System (BMS) is about 20 uA (max), and that of the battery cell and the BMS is about 2% of the battery every month. Considering the activity of the chemical substances in the battery cell, you are recommended to charge the battery once every 6 months when the mower is stored for a long time. You are also recommended to fully charge the battery before the mower is stored. - What role does the e-SIM card built into the robotic lawn mower play?
The e-SIM card plays the following roles:- It supports firmware upgrade;
- When you report faults and contact the after-sales service, it can upload the logs and other data to the backstage for analyzing the fault causes;
- It is used for the anti-theft purpose. If the mower is lost, its GPS coordinates will be sent to the cloud through the 4G network once it is turned on. Then the user can search the robotic lawn mower and lock it remotely.
- It remotely controls the robotic lawn mower to start or stop, and acquires its status in real time.
- Can I replace the e-SIM card with another SIM card?
How do I renew my data traffic subscription? The e-SIM card built in the robotic lawn mower cannot be replaced. Free data traffic is provided for one year currently. The basic functions are still available after the data traffic expires, but the mobile phone cannot receive the real-time working status of the mower. You cannot check the pushed position information, or check the position of the mower if it is lost. When the data traffic expires, users can renew their subscriptions in the app. - Does the robotic lawn mower need to be connected to the internet during a mowing operation?
Connect the robotic lawn mower through Bluetooth. Remotely control the robotic lawn mower to create the map and start the mowing task. It does not need to stay online when mowing. If you want to acquire the real-time mowing status, it is necessary to connect the robotic lawn mower to the Internet. - How to create a working zone?
To create the map for the first time, you have to remotely control the robotic lawn mower to move around the boundary of the mowing zone to accurately record the boundary.
- When creating a map, is a Wi-Fi connection needed in the yard?
No. You can remotely control the robotic lawn mower to create a map with your mobile phone through Bluetooth. After the map is created, you can set scheduled tasks in the app to allow the robotic lawn mower to perform the daily mowing tasks. - Why does the robotic lawn mower mow the lawn unevenly sometimes?
- Please check the spare blades and the height of grass. If the spare blades are blunt, replace them with new ones. If the grass is too high, please cut the grass to expected height with a hand mower first.
- If the actual height of grass is significantly larger than the set cutting height, the robotic lawn mower needs multiple (>5) cycles to achieve the set mowing height.
- Should I sharpen the spare blade? How frequently?
The spare blades are replaceable, so the user does not need to sharpen them. You are recommended to replace the three spare blades every quarter. Take care to protect your hands when replacing them so as to avoid accidental injury.
- Why does the blade disc vibrate abnormally when mowing?
Check the blade disc and the spare blades. If a spare blade is damaged or falls off, please replace it or install a new one. If the blade disc is damaged, please contact the after-sales service department for maintenance. - What should I do when the wheel is stuck?
- Check whether the wheel is stuck in sand, gravel and other soft ground or deep trench. In such a case, you can set the soft foundation as a restricted zone in the app, or fill the trench for a flat ground;
- Check whether the tire is covered by a lot of soil, grass clippings etc;
- Check whether any foreign matter is stuck near the tire or the blade disc, and clean the tire and its accessories when necessary. If the wheel is damaged, please contact the aftersales service.
- Can the robotic lawn mower work in the rain, snow, hail or fog?
The robotic lawn mower can work in the rain, but mowing in the rain may harm the lawn. When mowing in the rain, the grass will attach to the equipment, and the robotic lawn mower is prone to skidding on the wet lawn. Avoid mowing the lawn in severe weather conditions, such as heavy rain, thunderstorm or heavy snow. - Can the robotic lawn mower work at night?
The robotic lawn mower can work normally at night. - Is there a lit display when the robotic lawn mower is working?
LED indicators are provided at the front and rear of the robotic lawn mower, and different colors will be displayed in different working conditions. The user can turn on or off the light at his/her own discretion. - Will any other expense be incurred during the use of the product?
For example, subscription fee, data traffic charge and the like. No other expenses will be incurred during the use of the product. We provide free data traffic for one year. You should renew the subscription in the app after it expires.
- How to check the serial number of the product?
There are 3 ways to check the serial number (SN):- Check the packing box. An SN label is attached on the side of the packing box.
- After removing the battery compartment cover, scan the QR code shown in the figure to check the SN.
- Open the app and go to Settings to check it.
- Are physical cables required in the mowing zone of the robotic lawn mower?
It is not necessary to bury any cables. A virtual boundary will be generated after a map is created through remote control of the robotic lawn mower. The robotic lawn mower will automatically plan the routes within the boundary for mowing. - What should I do if the charging pads of the charging station are blackened?
Charging may fail if the charging pads are blackened. Please polish the blackened area with dry sand paper. Also check whether the charging pads of the mower are blackened, and polish them if so. - How is the cutting height defined?
The cutting height refers to the height from the blade disc to the tire. The actual height of cut grass will be larger than the set value as the grass is soft. - How to distinguish the front and rear of a robotic lawn mower?
The side in contact with the charging pads of the charging station is the front, and the side with the rear wheel handle is the rear. - What does the work time delay mean? What's its role?
The rain-caused work delay refers to the function where the robotic lawn mower automatically returns to the charging station due to the rain. When it is detected that the rain has stopped, the mower will not resume the mowing task immediately, but begin the countdown as per the delay time set in advance, and start mowing after the countdown is over. This can protect the lawn by avoiding the mowing operation of robotic lawn mower when the lawn is damp. - How is the operating route of the robotic lawn mower planned?
When robotic lawn mower is used for the first time, remotely control it to set the virtual map boundary. After the map is created, the robot will perform mowing along the route planned by the algorithm, but not move randomly. - What should I do when the container is full?
When the container is full, the app will prompt that "Fallen leaves container is full. Please clean it soon". Please manually empty the leaves from the container, so that the mower can continue the cleaning task. - How many leaves can be collected in the container?
The maximum dimensions of the container are 404 × 390 × 265 mm (16 × 15.4 × 10.5 in.), and the volume is approximately 0.03 m³ (1.06 ft³). It can collect dry fallen leaves weighing approximately 1 kg (2.2 lbs). The specific collecting capacity depends on the species of fallen leaves and the collection environment.

Documents / Resources
References
![download.ecoflow.com]() https://download.ecoflow.com/app
https://download.ecoflow.com/app![www.ecoflow.com]() EcoFlow - POWER A NEW WORLD | EcoFlow US
EcoFlow - POWER A NEW WORLD | EcoFlow US![www.apple.com]() App Store - Apple
App Store - Apple![play.google.com]() Google Play
Google Play
Download manual
Here you can download full pdf version of manual, it may contain additional safety instructions, warranty information, FCC rules, etc.
Advertisement


Need help?
Do you have a question about the Blade and is the answer not in the manual?
Questions and answers