Beyerdynamic A1 - Headphone Amplifier Manual
- Operating instructions manual (12 pages) ,
- Operating instructions manual (24 pages)
Advertisement
Introduction
This unit has been made from high grade materials and assembled under stringent quality and performance conditions to provide you with an excellent product. Please take some time to read carefully through this manual before using the product, even if you have experience with similar devices.
Supplied accessories
- Please check if the delivery of the A 1 is complete. If any parts are missing, please contact your dealer directly, where you purchased this product. The packaging should include the following components:
- A 1 headphone amplifier
- Power cable
- Manual
- beyerdynamic warrranty card
Why use a headphone?
There are many good reasons for using a headphone:
- With headphones music is perceived more intensely than when using loudspeakers, because the transducer areworn directly at the ears.
- With headphones you can achieve an excellent music reproduction at a lesser price. For an appropriate loudspeakersystem you would pay much more. Regarding resolution and dynamics, high-quality headphones are comparable to excellent loudspeakers, as these have to put more air into oscillation to achieve the same volume. The thin and lightweight diaphragm of a headphone, however, starts to oscillate very quickly.
- With a headphone you can listen to music undisturbed, even in noisy surroundings or late at night without disturbing the neighbourhood.
Why use a headphone amplifier?
- Integrated headphone amplifiers are often simple and inefficient operational amplifiers. Due to a high internalnoise and an insufficient performance of the original dynamics these circuits make music sound quite bland and dreary.
- There are high-impedance headphones which need more voltage and low-impedance models which need more power to provide excellent results. In comparison to integrated amplifiers, an external headphone amplifier such as the A 1 features more dynamics and increases the sound quality of standard headphones considerably.
- A headphone amplifier provides a higher volume and more powerful bass response, even with less output power. When using a headphone and headphone amplifier, make sure that the desired volume can be achieved without any distortions.
Features
- The A 1 is a high-quality headphone amplifier which has been developed and manufactured in Germany for headphones with a nominal impedance between 30 and 600 ohms.
- The special circuit design provides an impressing natural sound reproduction with an excellent resolution and spatiality.
- The powerful mains adapter avoids dynamic distortions.
- Although we have developed the A 1 for use with our Premium Line headphones, you can use also headphonesof other manufacturers.
- The A 1 is ideal for very different impedances, because the high output impedance at the headphone socket ensures that the range of the volume potentiometer remains ideal even for low-impedance transducers.
- Intelligent circuit design with microcontroller capable of 96 kHz
- Volume control with high-quality ALPS potentiometer
- Large dimensioned toroidal core transformator for high fidelity of impulse and dynamics
- Two stereo inputs for alternative sound sources
- Blue LEDs to indicate the active signal input, multicolour power LED
- Gold plated audio sockets for perfect signal transmission
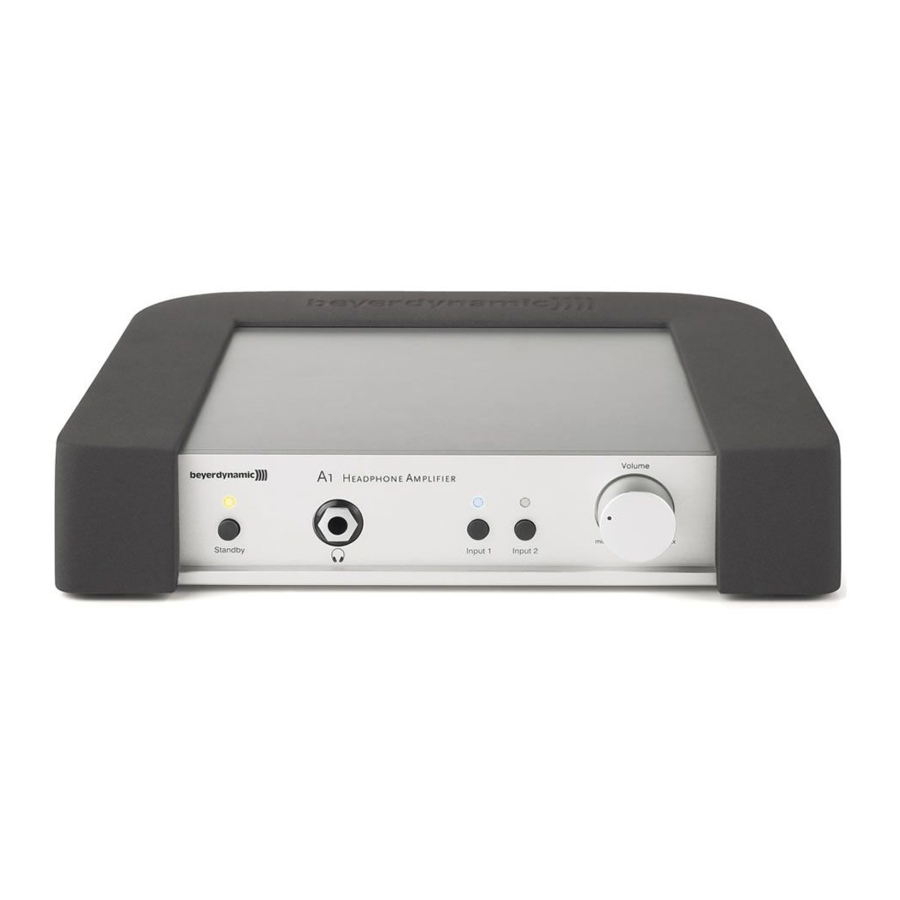
Controls and indicators
Front view

- Dual-colour LED to indicate the operating state of the A 1.
Red: Stand-by, i.e. the amplifier is not active as there is no signal at the headphone socket.
The amplifier, however, is connected to the mains supply.
Green: The A 1 is ready for operation, the amplification is active. When a signal is fed into the selected input, it is routed to the headphone socket according to volume control.
Red flashing: A technical defect of the A 1 has occurred. Please contact your beyerdynamic dealer for repair. - Button to activate / deactivate the amplification function of the A 1.
![]()
The button does not disconnect the device from the mains supply when turning off.
Unplug the device if you want to disconnect it from the mains supply. Before using the device make sure that the mains plug is in perfect condition. If you do not use the device for a longer period of time, please unplug the mains plug. - Headphone socket, 1/4" (6.35 mm) stereo jack, to connect standard headphones.
- LED to indicate the active signal input, Input 1 or. Input 2. The blue LED will illuminate if a signal is present.
- Button to select the sound source of the A 1. Input 1 is automatically looped through to the output socket on the rear; Input 2 can be activated, if another sound source is connected to the A 1. Refer also to chapter "Application example".
- Volume control to set the volume.
![]()
We would like to point out that listening at high volumes over a long period of time may damage your hearing irreversibly. Therefore, reduce the volume before putting into operation and when changing the audio source, as the connected devices or reproduced audio data can have very different output levels.
Make sure that the set volume is not too high. Rule of thumb: The higher the volume, the shorter the time of listening. According to employer's regulations for safety and health the noise exposure e.g. when working should not exceed 85 dB (low volume). This is an allowed time of listening of 8 hours at maximum. If the volume is increased by 3 dB, the allowed time of listening is halved, i.e. with 88 dB the time of listening is 4 hours, with 91 dB 2 hours and so on.

Rear view

- Input 1, stereo RCA sockets for sound sources with a high level. Connect your audio source here (CD player, DVD player etc.)
- Input 2, stereo RCA sockets for sound sources with a high level. Connect your second audio source here, if present.
- Output, stereo RCA sockets, looped-through input signal from input 1.
At this output you can pick up the audio signal from input 1 and route it to your stereo amplifier, active loudspeakers or other devices with a standand input for high levels. - Fuse holder.
The A 1 provides a microfuse as protection against wrong voltage. If it is necessary to change the fuse, only use the same type (350 mA T). Only this ensures an optimum protection of the circuitry. - Mains connection for 110 - 120 V AC.
Application example
A 1 with CD player and DVD player

- Connect a CD player to the input 2
![]() of the A 1 and a DVD player to the input 1
of the A 1 and a DVD player to the input 1![]() to which you would like to listen to alternatively with your hi-fi system (e.g. home cinema).
to which you would like to listen to alternatively with your hi-fi system (e.g. home cinema). - To listen to the sound via headphones you can use the buttons
![]() to select the sound source (input 1 = CD player or input 2 = DVD player). This means the A 1 provides either the audio signal of the CD player or DVD player.
to select the sound source (input 1 = CD player or input 2 = DVD player). This means the A 1 provides either the audio signal of the CD player or DVD player. - The signal of the DVD player is also permanently present at the output socket
![]() . This means you can listen to the looped through audio signal via your hi-fi system, even when the A 1 is turned off.
. This means you can listen to the looped through audio signal via your hi-fi system, even when the A 1 is turned off. - An intelligent, microprocessor-controlled relay allows noiseless switching between the two different sound sourcesand avoids unpleasant noise when turning the A 1 on or off.
 to which you would like to listen to alternatively with your hi-fi system (e.g. home cinema).
Trouble shooting
| Problem | Possible cause | Solution |
| The amplifier does not work. The Power LED does not illuminate although the A 1 is connected to the mains. | The internal fuse is probably blown. | Unplug the power cable of the A 1, before changing the fuse. The fuse holder  is directly next to the mains connection. Pull the small cover and replace the fuse (5 x 20) by the same type 110 - 120 V, 0.315 A, slow. is directly next to the mains connection. Pull the small cover and replace the fuse (5 x 20) by the same type 110 - 120 V, 0.315 A, slow. |
| Although the headphone is properly connected there is no sound. The Power LED illuminates green. | Different source selected, volume turned to minimum or defective cable. | Check the selected audio source and the cabling on the rear of the A 1. Make sure that the volume is not turned too high, as sudden high volumes may occur which can damage your hearing. |
Technical specifications
| Input impedance | 50 kΩ |
| Maximum amplification | 18 dB |
| Frequency response | 1 Hz - 100 kHz (-1 dB) |
| T.H.D. | 0.001% at 170 mW / 250 Ω |
| Channel separation | > 89 dB |
| Output power | 100 mW / 600 Ω 170 mW / 250 Ω 150 mW / 30 Ω |
| Unweighted signal-to-noise ratio | > 100 dB |
| Output impedances | Line Out (depending on the connected device), 100 Ω headphone output |
| Power consumption | < 15 W via internal, controlled power pack |
| Audio connections | Headphone socket, 1 Line output, 2 Audio inputs (gold-plated RCA sockets) |
| Mains power input | 110 - 120 V AC, 50/60 Hz |
| Dimensions | 250 x 225 x 50 mm |
| Weight | approx. 2.3 kg |
Important safety information
- Read the Operating Instructions.
- Keep these Operating Instructions safe.
- Comply with the Operating and Safety instructions listed.
- Heed all warnings.
- Install the A 1 as described in these operating instructions.
- To avoid damage to your hearing always reduce the volume before putting the A 1 into operation and whenchanging the audio source, as the connected devices or reproduced audio data can have very different output levels.
- The A 1 is not designed for outside use. To reduce the risk of fire or electric shock, do not expose the A 1 to rain or moisture. For this reason do not install it in the immediate vicinity of swimming pools, showers, damp basement rooms or other areas with unusually high atmospheric humidity.
- Never place objects containing liquid (e.g. vases or drinking glasses) on the A 1. Liquids in the A 1 could cause ashort circuit.
- Only clean the A 1 with a dry cloth.
- Never install and operate the A 1 close to radiators, lighting equipment or other heat generating equipment.
- Never place naked flames near the A 1.
- Protect the power cord from being walked on or pinched particularly at plugs, convenience receptacles, and thepoint where they exit from the apparatus.
- Lay all connection cables so that they do not present a trip hazard.
- Unplug the A 1during lightning storms or when unused for long periods of time.
- Check whether the connection figures comply with the existing mains supply. Serious damage could occur due toconnecting the A 1 to the wrong power supply. An incorrect mains voltage could damage the A 1 or cause an electric shock.
- If the A 1 causes a blown fuse or a short circuit, disconnect it from the mains and have it checked and repaired.
- Do not open the equipment without authorisation. You could receive an electric shock. Leave all service work toauthorised expert personnel.
- Do not hold the mains cable with wet hands. There must be no water or dust on the contact pins. In both casesyou could receive an electric shock.
- The mains cable must be firmly connected. If it is loose there is a fire hazard.
- Always pull out the mains cable from the mains and/or from the equipment by the plug, never by the cable. Thecable could be damaged and cause an electric shock or fire.
- The A 1 must not be operated when the mains cable is damaged.
- Do not insert objects into openings. You could damage the device and/or injure yourself.
- Refer all servicing to qualified service personnel. Servicing is required when the A 1 has been damaged in any way, such as power-supply cord or plug is damaged, liquid has been spilled or objects have fallen into the A 1, the A 1 has been exposed to rain or moisture, does not operate normally, or has been dropped.
beyerdynamic GmbH & Co. KG
Theresienstr. 8 | 74072 Heilbronn – Germany Tel. +49 (0) 7131 / 617 - 0 | Fax +49 (0) 7131 / 617 - 224 info@beyerdynamic.de | www.beyerdynamic.de
beyerdynamic Inc. USA
56 Central Ave. | Farmingdale, NY 11735
Tel. +1 (6 31) 2 93 - 32 00 | Fax +1 (6 31) 2 93 - 32 88 salesUSA@beyerdynamic.com | www.beyerdynamic.com
For further distributors worldwide, please go to www.beyerdynamic.com

Documents / Resources
References
Download manual
Here you can download full pdf version of manual, it may contain additional safety instructions, warranty information, FCC rules, etc.
Advertisement


Need help?
Do you have a question about the A1 and is the answer not in the manual?
Questions and answers