Advertisement
Advertisement
Table of Contents

Related Manuals for Craftsman 315.21449


Summary of Contents for Craftsman 315.21449
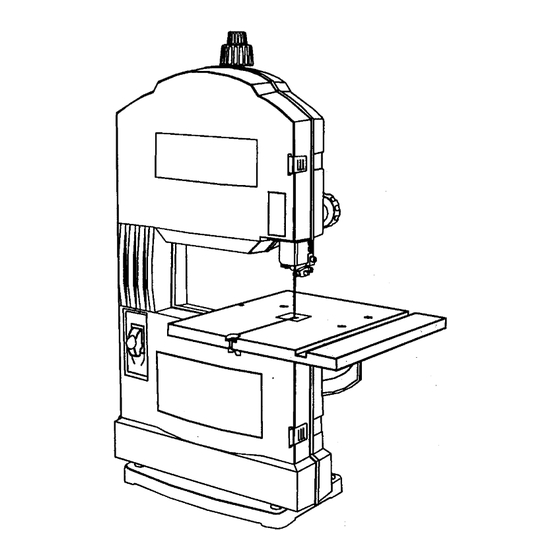
- Page 1 Owner's Manual II:RRFTSMRNI 9 in. single speed BAND SAW Model No. 315.214490 Save this manual for future reference. CAUTION: Read follow all Safety Rules and Operating Instructions before first use of this product. Sears, Roebuck and Co., Hoffrnan Estates, IL 60179 USA...
-
Page 2: Full One Year Warranty
, FULL ONE YEAR WARRANTY ON CRAFTSMAN BAND SAW If this I'RII FTSMAN" Band Saw fails due to a defect in material or workmanship within one year from the date of purchase, Sears will repair it, free of charge. Contact a Sears Service Center for repair. - Page 3 READ INSTRUCTIONS KNOW YOUR POWER TOOL. Read the owner's manual carefully. Learn the saw's applications and limitations as well as the specific potential hazards related to this tool. • GUARD AGAINST ELECTRICAL...
-
Page 4: Operation
• ALWAYS SUPPORT LARGE WORK PIECES while cutting. To minimize risk of blade pinching and kickback, always support large workpieces. Saw may slip, walk or slide while cutting large or heavy boards. Always use a clean cloth-... -
Page 5: Rules For Safe Operation
Sears store. WARNING: When servicing, use only identical Craftsman replacement parts. Use of any other parts may create a hazard or cause product damage. NEVER USE IN AN EXPLOSIVE ATMO- SPHERE. -
Page 6: Extension Cords
ELECTRICAL CONNECTION Your Sears Craftsman Band Saw is powered by a precision built electric motor. It should be connected to a power supply that is 120 volts, 60 Hz, AC only (normal household current). Do not operate this tool on direct current (DC). - Page 7 As it applies to the workpiece, that area which will be, or has been, cut by the blade. Thedistance that the tip of the saw b ada tooth s bent (or sat) outward from the face of the blade.
- Page 8 • Carefully remove all parts from the carton and place the saw on a level work surface. Separate and check against the list of loose parts. Check all loose parts from the box with the list below. For your convienence when identifying parts, items A-I below have been drawn actual size.
- Page 9 A WARNING / ADVERTENCIA Blade Blade Thickness TPI 59 1/4in. .018in, .012in. 59 114in. .012in. 591/4 in. 59 1/4 in. ,014in. Application Forfinescrollcuts inthinwoodmathdals and plastics Upto 1/2" thick. ForextrafaststralgMcutting, Bestfor cutting thickwoods, Forsb'algMandcurved Heavydutycuts in all wood 3/4" to 3 1/2"...
- Page 10 &WARNING • For your safety, read owner's manual before making adjustment_ • Failure to remove switch key and unplug your saw could result In acaldental starting causing possible sedous personal Injury. • Para su eagurldad, lea el manual del usuado antes de hacar aJustos.
-
Page 11: Knowyourband Saw
BAND SAW TABLE Your band saw has an 11-I12 in. square, aluminum saw table with a rack and pinion tilt control for maxi- mum accuracy. It has a red snap in throat plate, and a miter slot for use with an optional miter gage. - Page 12 MOUNTING WORKBENCH See Figure 9. If the band saw is to be used in a permanent applica- tion, we recommend that you secure it in a permanent location such as a workbench. When mounting the saw to a workbench, holes should be ddlled through the supporting surface of the workbench using the dimensions illustrated in figure 9.
- Page 13 BAND TO WORKBENCH See Figure 10. If the band saw is to be used in a portable application, we recommend that you fasten it permanently to a mounting board that can easily be clamped to a workbench or other supporting surface. The mounting board should be of sufficient size to avoid tipping of saw while in use.
- Page 14 • Slide the new blade into the slot of the table with the teeth of the blade toward the front of the saw and facing down toward the table. Note: The blade may need to be tumed inside out if the teeth are pointing in the wrong direction.
-
Page 15: Adjusting Blade Tension
Insert the 1/8 in. hex key into the tracking adjust- ment screw located on the back of the saw behind the upper wheel. If the blade moved toward the front of the saw " turn the adjustment screw in (to the right or TO DECREASE... - Page 16 - From the back of the saw, push the lock lever counterclockwise or to the left 1/4 turn to unlock the blade guide assembly. See Figure 11, page •...
- Page 17 Tighten the screw securely. Repeat this procedure for the lower blade guide support. Note: The lower blade guide support screw is the top screw located on the right of the saw frame under the table. See Figure 21. _,i_ WARNING: Never operate saw without blade guard secured !n place.
-
Page 18: Basic Operation
=relieving" blade pressure. • Avoid injury from unexpected saw move- ment: • Put the saw on a firm level surface with plenty of room for handling and properly supporting the workpiece. Make sure table is level and saw does not rock. •... - Page 19 • Turn the upper wheel by hand while backing up the workpiece. Before removing loose pieces from the table, turn saw off and walt for all moving parts to stop. Before leaving the saw: Wait for all moving parts to stop.
-
Page 20: Maintenance
WARNING: When servicing, use only identical Craftsman r(_placement parts. Use of any other part may create a hazard or cause product damage. GENERAL MAINTENANCE Avoid using solvents when cleaning plastic parts. Most plastics are susceptible to damage from various types of commercial solvents and may be damaged by their use. - Page 21 WARNING: To prevent accidental starting that could cause possible serious personal injury, turn off the saw, remove the switch key, and unplug the saw before working on the band saw. Due to wear or breakage, the drive belt may need to be replaced.
- Page 22 ,_1= WARNING: For your own safety, turn switch Off, remove switch key and unplug the saw from power supply before adjusting or aligning your band saw. PROBLEM Motor will not run. Blade does not run in the approxi- mate center of the upper wheel.
- Page 24 CRAFTSMAN The model number will be found on a plate attached to the frame. Always mention the model number in all correspondence regarding your BAND SAW or when ordering repair parts. FIGURE BAND - MODEL NO. 315.214490...
- Page 25 CRAFTSMAN The model number will be found on a plate attached to the frame. Always mention the model number in all correspondence regarding your BAND SAW or when ordering repair parts, BACK PAGE PARTS LIST FOR FIGURE A Part Number...
- Page 26 CRAFTSMAN BAND SAW - MODEL NO. 315.214490 The model number will be found on a plate attached to the frame. Always mention the model number in all correspondence regarding your BAND SAW or when ordering repair parts. SEE NOTE"A"PAGE27 FIGURE...
- Page 27 CRAFTSMAN numberin all correspondenceregarding your BAND SAW or when orderingrepairparts. The model numberwill be found on a plate attachedto the frame. Always mentionthe model PARTS LIST FOR FIGURE B Part Number 977084-001 977083-001 977056-001 STD551208 977082-001 977056-001 STD51008 STD52008 STD835020...
- Page 29 ii!iiiiiiiiiiiiiii : :-r-_. : : : : : : : • : : : : : • " ._oe_ _" _ u)_ x _ u_ • _ _- • C_ _ CO _ "-- X: _- x _D :_ tO ,_-- LO 0 ,.Z ,_ _ _ 88OoOoOOOOOOo oo ooooooo2ooooo "...
- Page 31 • _oo_ iii iiiiiii iii *°,. • ,,...**..ii i i i i ! i i i i i i i i i i i i i • • "0 '_ .m '_ _ _,._ _ - ._ _ •...
- Page 32 Forthe repairor replacementpartsyouneed delivered directlyto yourhome Call7 am - 7 pm, 7 daysa week 1-800-366-PART (1-800-366-7278) Forrepairservice Call24 hoursa day,7 daysa week 1-800-4-REPAIR (1-800-473-7247) For the location of a SearsPartsandRepairCenterin yourarea Call 24 hours a day,7 daysa week 1-800-488-1222 The modelnumberof thistool will be foundon a serial plate attachedto the motorhousing.When requestingserviceor orderingparts, always providethe followinginformation: •...
Need help?
Do you have a question about the 315.21449 and is the answer not in the manual?
Questions and answers