Table of Contents
Advertisement
Quick Links
Instruction
Perdelle-Neo
1.
IMPORTANT ................................................................................................................................................................2
2.
POSSIBLE ASSEMBLY ..............................................................................................................................................2
3.
PACKAGING - WEIGHT - DIMENSION............................................................................................................4
4.
NAME OF THE PARTS .............................................................................................................................................5
5.
CLASSIC ASSEMBLY ..................................................................................................................................................7
6.
THROUGH-HOLE MOUNTING ........................................................................................................................14
7.
ADJUSTMENT............................................................................................................................................................15
8.
OPERATION...............................................................................................................................................................15
9.
CLEANING ..................................................................................................................................................................15
Instruction Version A Perdelle-Néo
/
1
15
Advertisement
Table of Contents

Related Manuals for Perdelle Neo

Summary of Contents for Perdelle Neo
-
Page 1: Table Of Contents
Instruction Perdelle-Neo IMPORTANT ................................2 POSSIBLE ASSEMBLY ..............................2 PACKAGING - WEIGHT - DIMENSION......................4 NAME OF THE PARTS .............................5 CLASSIC ASSEMBLY ..............................7 THROUGH-HOLE MOUNTING ........................14 ADJUSTMENT................................15 OPERATION................................15 CLEANING ..................................15 Instruction Version A Perdelle-Néo... -
Page 2: Important
IMPORTANT 1. READ THE ENTIRE MANUAL BEFORE INSTALLATION 2. The user is responsible if Perdelle-Néo is not used for its intended purpose. 3. Do not modify the device. 4. The element on which the clamp is fixed must be stable and solid. - Page 3 Picture C Picture D for exemple wallmount Picture E Picture F Instruction Version A Perdelle-Néo...
-
Page 4: Packaging - Weight - Dimension
- 1 flange - 4 pulleys - 4 butterfly screws - 2 rings - 2 handles - 2 plugs - 1 cap - 2 screws M4 x 4 - 1 screw M6 x 10 - 2 washers Instruction Version A Perdelle-Néo... -
Page 5: Name Of The Parts
4. NAME OF THE PARTS clamp flange washer drum plug screw M4x4 butterfly screw ring screw M6x10 pulley pair of armbands elastic band handle Perdelle Néo Instruction Version A Perdelle-Néo... - Page 6 Upper jaw Upper shoe Lower shoe Lower jaw Piston Clamp pin Clamp bar Fall prevention Instruction Version A Perdelle-Néo...
-
Page 7: Classic Assembly
A, B or C. Once the two jaws are in contact, make between 1.5 and 2 turns of tightening. Caution: Do not use an extension cord. The area where the clamp is attached must be stable and solid. Instruction Version A Perdelle-Néo... - Page 8 7 Slide the flange about 20 cm from 8 Put the cap on the bar of the the drum and slightly tighten its clamp. screw. Instruction Version A Perdelle-Néo...
- Page 9 12 ... slide the bow into the bottom of the drum hole. Be careful, the bow can 11 Pass the bow through the flange rotate because it is not yet blocked by and then through the ring and... the handle. Instruction Version A Perdelle-Néo...
- Page 10 16 Slide the two rings until they touch the flange and tighten the screws to 0.5 N.m. /CAUTION Check to make sure that the bows have been pushed to the bottom of the holes of the drum. Instruction Version A Perdelle-Néo...
- Page 11 19 Slide the 4 pulleys approximately 20 Insert the two plugs into the ends of the as shown in the figure and tighten bows. the thumb screws slightly. Do not use a tool to tighten the thumb screws. will adjustmentbelow. Instruction Version A Perdelle-Néo...
- Page 12 23 Pull on the elastic to bring the 24 Pass in front of the drum, on bottom of the brace to about 50 cm the operator's side, then go up from the work surface. behind. Instruction Version A Perdelle-Néo...
- Page 13 ..turns and insert its end in the groove provided for this purpose. The rest of the rubber band can hang down. 27 Repeat the process for the second elastic. Perdelle-Néo is ready to be adjusted. Instruction Version A Perdelle-Néo...
-
Page 14: Through-Hole Mounting
Pass the clamp through the hole. Lower jaw 30 Reassemble the lower jaw and 31 Continue the assembly as indicated tighten it between 1.5 and 2 turns, above in "Classic assembly". then clip on the drop prevention device. Instruction Version A Perdelle-Néo... -
Page 15: Adjustment
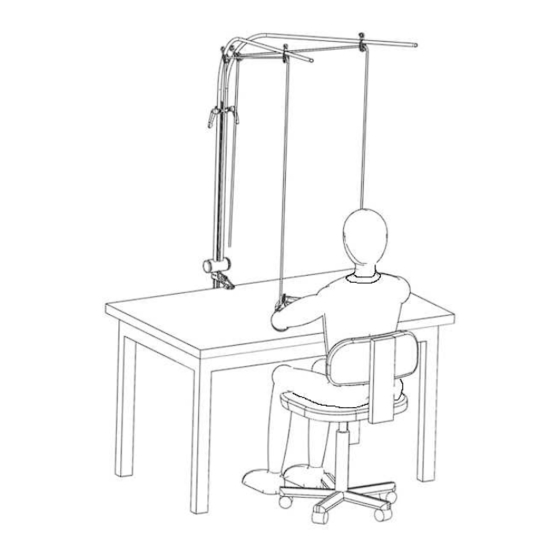
Perdelle-Néo is ready to be used. OPERATION The user will quickly get used to the comfort offered by Perdelle-Néo. Within a few hours, the user will find the best adjustment that suits him/her. The brace can be placed at about 10 cm from the wrist to start with. Depending on the comfort of each person and the operations to be performed, the position of the armbands can vary.
Need help?
Do you have a question about the Neo and is the answer not in the manual?
Questions and answers