Table of Contents
Advertisement
Quick Links
Advertisement
Table of Contents

Related Manuals for ato form Liftolet

Summary of Contents for ato form Liftolet
- Page 1 User manual Toilet seat lift Liftolet Liftolet small Bath & WC edition 36/23...
-
Page 3: Foreword
We would like to thank you for your trust extended to us and for purchasing our product. The toilet seat lift Liftolet distinguishes itself by its quality, security, easy operation and modern design. For optimal use of this aid, we ask you and possible other users to carefully read this operating manual. -
Page 4: Table Of Contents
Table of contents Table of contents Topic Page Foreword ……………………………………… Table of contents ……………………………… Safety instructions …………………………… Warranty and product liability …………… CE sign and position ………………………… Indications and prophylaxis ………………… Purpose of use ………………………………… Product overview …………………………… Basic model ……………………………… Accessories / options ……………………... -
Page 5: Safety Instructions
Safety instructions Safety instructions The toilet seat lift Liftolet is CE-marked experience and knowledge of operators, and fulfils the requirements of the lastest which they gained from (for example) directives. It was developed in line with most training courses. recent findings. Production is subject to an In the event of specific or difficult on-going quality control. - Page 6 • The Liftolet may only be used by persons drawn up for your safety and as a guideline of a suitable stature and physical aptitude.
- Page 7 • Clean the toilet seat lift Liftolet in whom you purchased the device. accordance with the instructions given in • The Liftolet is connected via a power plug the chapter „cleaning”. to a standard household wall socket. The • Please ensure before use the product...
-
Page 8: Warranty And Product Liability
The warranty can only be sustained if the documentation before agreeing to the ATO FORM product is in use in the same warranty claim and to decide upon whether country where it was purchased and if the to replace or repair the defective product. -
Page 9: Ce Sign And Position
CE-sign and position CE sign and Position The CE-label, which in- cludes the article number, serial number and man- ufacturer information is located on the back of the right column. Page 9/32 (36/23) -
Page 10: Indications And Prophylaxis
Furthermore, the medical specialist has de- user is gently and steplessly brought by termined the aid to be suitable according to the Liftolet, at the touch of a button, to the measurements, weight and willingness of the sitting or standing position. -
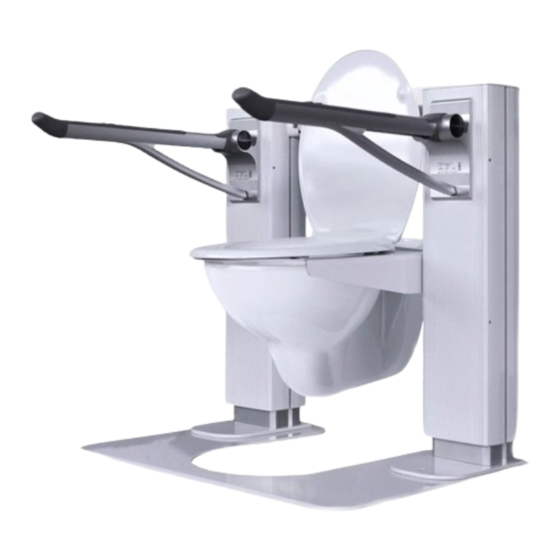
Page 11: Product Overview
Product overview Product overview 8.1 Basic model 1. Lifting columns 2. Mounting flange 3. Base plate (option) 4. Carrier plate for the WC seat 5. WC-seat with lid 6. Cable channel 7. Upward folding support handles 8. Push button Image model with Pressalit support handles. -
Page 12: Accessories / Options
Product overview 8.2 Accessories / options 1. Base plate For a complete overview of our extensive range of accessories for the Liftolet see item 2. Upward folding support handles 11.2 Types and accessories on page 20. Pressalit (please refer to the product ®... -
Page 13: Initial Operation
Initial operation Initial operation The reseller is to unpack the unit, ensure basic functions of the equipment. This is the that the components and accessories listed only way to prevent the user from dangerous in the scope of delivery are all present and situations. -
Page 14: Assembly And Adjustment
Space requirement: ing. • If the Liftolet is used by a wheel chair user, then the entry side is according to the space available. Preparing for self-assembly: • Unpack the product and remove the pack- ing materials. - Page 15 • Fasten the 3 screws on either side again onto the WC. once the carrier plate rests on the WC. • It is recommended to raise the Liftolet once before marking the bore holes onto Attention: the floor to ensure the Liftolet does not...
- Page 16 Assembly and adjustment Initial Operation “Position Lost” during operation: On first use of the system and in case of error • If the system is overloaded or there is a it is necessary to restart the system by follow- height difference between the actuators of ing the steps given below.
- Page 17 Functionality: Intimate care: Push buttons are embedded in all offered The Liftolet is optionally available with support arms for raising and lowering the WC an opening at the front of the seat, which seat lift together with the support arms.
- Page 18 Assembly and adjustment For battery operated model (rechargeable battery) to charge the battery: The battery needs to be charged at least 24 hour before first use of the WC seat lift in order to ensure proper function and to prolong the lifetime of the batteries. The battery charger is designed for operation on 230 V alternating current.
-
Page 19: Accessories / Options
Assembly and adjustment 10.2 Accessories / options Mounting with use of base plate • If the Liftolet cannot be mounted to the ground due to the reasons mentioned on point 10.1 then the base plate offered as an accessory should be used. To prevent... -
Page 20: Types Of Models And Accessories
Toilet paper holder for support arms Pressalit ® The most up-to-date overview of our extensive range of accessories for Liftolet and their description as well as much more useful information can be found on our homepage www.ato- form.com. For special problems, or if it seems the accessories you require are not demonst- rated nor described, please contact us. - Page 21 Page 21/32 (36/23)
-
Page 22: Technical Details
Technical details 12 Technical details Liftolet Standard Small Indicative user height up to 190.0 Overall depth (base plate) 62.0 Product height 79.0 to 119.0 78.0 to 118.0 Overall width 80.5 66.5 Seat width 44.5 Seat depth 47.0 Seat height (default settings)* 44.0... - Page 23 Technical details Page 23/32 (36/23)
- Page 24 Technical details Construction Operating conditions All outside parts are made out of high quality Temperature: +5 °C to +40 °C corrosion-resistant materials: stainless steel, Relative humidity: 20% to 90% – aluminium anodized and plastics. noncondensing The surface of the equipment parts which Air pressure: 800 to 1060 hPA by normal use come in contact with the skin,...
-
Page 25: Cleaning And Disinfection
Cleaning and disinfection 13 Cleaning and disinfection Disinfection: In order to ensure lasting trouble-free operation of the Liftolet in almost all For disinfecting, use household disinfectants operating conditions influenced by the and consider the following indications: existing conditions on site, please note the... -
Page 26: Maintenance And Overhaul
Please contact your specialist dealer to carry wear out corrective maintenance works for your • No signs of wear of damage of the safety Liftolet. components The device should be checked by the manufacturer at the latest after 3 years. - Page 27 Maintenance and overhaul Date Service performed Name Sign Page 27/32 (36/23)
-
Page 28: Operating Life And Re-Use
Operating life and Re-use 15 Operating life and Re-use The Liftolet is made from high quality ma- The product Liftolet was designed so it could terials and is subject to a continuous quality be reused after the application of various control in our house. -
Page 29: Faults, Repairs, Spare Parts
Faults, Repairs, Spare parts 16 Faults, repairs, spare parts If your toilet seat lift Liftolet cannot be Only original accessories and original spare operated? parts may be used. Non-compliance with these instructions and repairs carried out Please ensure….. or modifications made to the Liftolet or its •... -
Page 30: Storage
17 Storage Keep this operating manual in a safe place, The current version of these inst- where you or care and maintenance staff ructions for use can be found on have access to it. our homepage in the download area. You can find more information about the product on our home- page at www.ato-form.com or... - Page 31 Disposal of battery operated devices The battery pack must not be disposed of together with normal household waste at the end of its service life. Please observe the legal re- quirements in your area. Your municipal government and locally based waste disposal companies will be happy to provide you with information in this regard.
- Page 32 Hoists ■ Customized solutions ■ Thank you for your interest in our products. For questions please contact ATO FORM GmbH or your specialist dealer. Your ATO FORM Team ATO FORM GmbH Zur Lauterhecke 34, 63877 Sailauf, Germany Tel. +49 6093 944-0, Fax +49 6093 944-444 E-Mail: info@ato-form.com...
Need help?
Do you have a question about the Liftolet and is the answer not in the manual?
Questions and answers