Advertisement
Quick Links
Advertisement

Related Manuals for Westinghouse RT304


Summary of Contents for Westinghouse RT304
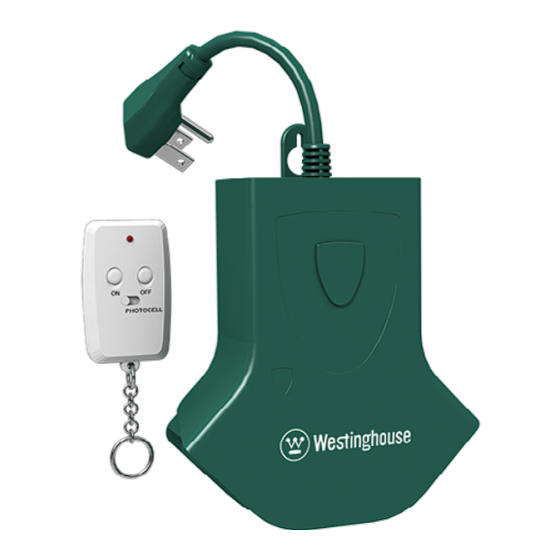
- Page 1 3 OUTLET WIRELESS REMOTE 3 PRISE TELECOMMANDE SANS FIL MODEL / MODÈLE #RT304...
- Page 2 INSTALLATION & PAIRING Our Westinghouse remote control units include a unique pairing feature that allows you to control multiple receivers (indoor or outdoor) from the same transmitter. Nos télécommandes Westinghouse comprennent une fonction unique de pairage qui vous permet de contrôler de multiples récepteurs...
- Page 3 / INSTALLATION & PAIRAGE Press and hold the power button on the receiver for 5 seconds. The LED indicator will begin to flash slowly indicating pairing mode has been activated. Appuyez sur le bouton de mise en marche du récepteur et gardez-le enfoncé...
- Page 4 Press the ‘ON’ button followed by the ‘OFF’ button on your transmitter to complete the pairing process. Appuyez sur le bouton de mise en marche (« ON »), puis sur le bouton d’arrêt (« OFF ») de votre transmetteur pour terminer le pairage.
- Page 5 TO REMOVE ALL PAIRED TR POUR ENLEVER TOUS LES Press and hold the power button for 5 seconds. The LED indicator located on the power button will begin to flash slowly. Appuyez sur le bouton de mise en marche et gardez-le enfoncé...
- Page 6 RANSMITTERS FROM YOUR REC TRANSMETTEURS COUPLÉS À V While the indicator is flashing, press and hold the power button for an additional 5 seconds. The LED indicator will now begin to flash rapidly. Pendant que l’indicateur clignote, appuyez sur le bouton de mise en marche et gardez-le enfoncé...
- Page 7 CEIVER / VOTRE RÉCEPTEUR POWER While the indicator is flashing rapidly, press the power button once to confirm the reset. Pendant que l’indicateur clignote rapidement, appuyez sur le bouton de mise en marche une autre fois pour confirmer la réinitialisation. POWER...
- Page 8 NSTALLATION Select a location to install the receiver base. Mount the receiver at least 6˝ above the ground using the built-in keyhole mount. The outlets must be pointed downwards to prevent exposure to rain. All outdoor devices should be plugged into a GFCI electrical outlet to prevent electrical shock.
- Page 9 OVERRIDE: You can override any program operating by pressing the button on the front panel of the receiver base. Do not hold the button down for manual override as this will cause the unit to enter Pairing Mode. If you press the OFF button, the unit will revert back to the last programmed setting.
- Page 10 CELLULE PHOTOÉLECTRIQUE MODE: Assurez-vous que le commutateur de mode sur l’émetteur est dans la position de la PHOTOCELL. Appuyez sur le bouton ON pour allumer le récepteur. Tous les appareils connectés s’allument instantanément et automatiquement hors tension à l’aube. ANNULATION: Vous pouvez annuler une opération du programme en appuyant sur le bouton sur le panneau avant de la base du récepteur.
-
Page 11: Specifications
SPECIFICATIONS 3 Grounded Outlets and Plug Rated: 125VAC/60Hz/15A/1875W Resistive 8A/1000W Tungsten 1/2 HP Motor Load CARACTÉRISTIQUES 3 Prises and fils avec mise à la terre Calibré à: 125VAC/60Hz/15A/1875W Résistive 8A/1000W Tungstène 1/2 HP Charge du Moteur Customer Service Service à la Clientèle 1-855-350-6868 10AM - 6PM, EST Monday to Friday... - Page 12 WARNING: CHANGES OR MODIFICATIONS TO THIS UNIT NOT EXPRESSLY APPROVED BY THE PARTY RESPONSIBLE FOR COMPLIANCE COULD VOID THE USER AUTHORITY TO OPERATE THE EQUIPMENT. THIS DEVICE COMPLIES WITH PART 15 OF THE FCC RULES. OPERATION IS SUBJECT TO THE FOLLOWING TWO CONDITIONS: (1) THIS DEVICE MAY NOT CAUSE HARMFUL INTERFERENCE, AND (2) THIS DEVICE MUST ACCEPT ANY INTERFERENCE RECEIVED, INCLUDING INTERFERENCE THAT MAY CAUSE UNDESIRED...
- Page 13 • REMOVE BATTERIES IF PRODUCT IS NOT TO BE USED FOR A LONG TIME. • DO NOT DISPOSE OF BATTERIES IN FIRE. BATTERIES MAY EXPLODE OR LEAK. AS WITH ALL SMALL ITEMS, THESE BATTERIES SHOULD BE KEPT AWAY FROM CHILDREN. IF SWALLOWED, SEEK MEDICAL ATTENTION IMMEDIATELY.
- Page 14 ATTENTION: NE PAS ÉPISSER, RÉPARER, OU MODIFIER. DÉBRANCHER SI NON UTILISÉ. BIEN INSÉRER LA FICHE. NE PAS EMPLOYER UN APPAREIL ENDOMMAGÉ. VÉRIFIER-LE PÉRIODIQUEMENT. UTILISER SELON LES INDICATIONS ÉLECTRIQUES MARQUÉES SUR L’APPAREIL. NE PAS BRANCHER PLUS DE 1000 WATTS DANS CET APPAREIL. SI LE NOMBRE DE WATTS N’EST PAS INDIQUÉ...
- Page 15 WESTINGHOUSE are trademarks of Westinghouse Electric Corporation. Used under license by The NCC. All rights reserved. et WESTINGHOUSE sont des marques de Westinghouse Electric Corporation. Utilisée sous licence a The NCC. Tous droits réservés. Manufactured and distributed by / Manufacturé...
Need help?
Do you have a question about the RT304 and is the answer not in the manual?
Questions and answers
My receiver turns on, flashes as it should to pair the remote, but remote doesn't pair and I cannot manually adjust the receiver to any option except on and off? Is my receiver broken?