Table of Contents
Advertisement
Quick Links
Advertisement
Table of Contents

Related Manuals for Stereo Optical Optec PLUS

Summary of Contents for Stereo Optical Optec PLUS
- Page 1 User Manual...
-
Page 3: Table Of Contents
USER MANUAL > CONTENTS CONTENTS I. INTRODUCTION 1. To install the Bluetooth dongle 2. Installing the software II. TO START A PROTOCOL III. TO INSERT AN ANCILLARY LENS IV. TESTS 1. To start a test 2. Read the answers a. Relaxation accommodation test b. - Page 4 USER MANUAL > CONTENTS c. To set-up the screen d. To manage the licenses e. To select the voice synthesis VI. STARTING WITH A PATIENT 1. Import existing patient 2. Creating a new profile a. Identity of the Patient b. Correction worn and the patient's work environment 3.
-
Page 5: Introduction
I. INTRODUCTION... - Page 6 USER MANUAL > INTRODUCTION Optec Plus > V4 - 04.17...
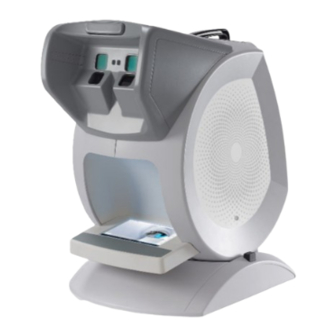
- Page 7 USER MANUAL > INTRODUCTION This device C86 (Optec Plus) makes it possible to carry out an easy, fast and precise vision screening through: its easy to use interface, its height adjustment system for customised use, its integrated protocols which allow targeted screening.
-
Page 8: To Install The Bluetooth Dongle
A USB stick is provided with the device. It contains the software. You must install it on your computer before being able to use it or start tests. Insert the Bluetooth key into one of your computer’s USB ports. > A new folder is displayed in the file explorer list. Open the file and double-click on the software. Optec Plus > V4 - 04.17... - Page 9 USER MANUAL > INTRODUCTION > The installation window opens. Follow the installation instructions. > The software has been installed on your computer. Optec Plus > V4 - 04.17...
- Page 10 USER MANUAL > INTRODUCTION Optec Plus > V4 - 04.17...
-
Page 11: To Start A Protocol
II. TO START A PROTOCOL... - Page 12 USER MANUAL > TO START A PROTOCOL Optec Plus > V4 - 04.17...
- Page 13 Select a protocol by clicking on (manual protocol). > The first protocol test starts. Night vision (mesopic) activation Peripheral glare allowing the glare sensitivity to be set Display of acuities on black or white background Optec Plus > V4 - 04.17...
- Page 14 The test in progress and the tests that have already been carried out are indicated by a tick " ." Click on: to scroll through the tests. You can also scroll through the tests on the side menu by selecting the test of your choice. Answers Input the results from the part. Optec Plus > V4 - 04.17...
- Page 15 If you need to complete a test or to carry out a new one, you can press on: if not click on The results report for completed tests opens (unit protocols and/or tests as well as information about the patient). You can export (XML file), send (PDF) or print these results. Optec Plus > V4 - 04.17...
- Page 16 USER MANUAL > TO START A PROTOCOL Optec Plus > V4 - 04.17...
-
Page 17: To Insert An Ancillary Lens
III. TO INSERT AN ANCILLARY LENS... - Page 18 USER MANUAL > TO INSERT AN ANCILLARY LENS Optec Plus > V4 - 04.17...
- Page 19 A incorrectly inserted ancillary lens remains stuck. Do not exert excessive pressure on the ancillary lens so as not to damage it. Do not forget to remove the ancillary lens after use. Forgetting to remove it could distort the other test results. Optec Plus > V4 - 04.17...
- Page 20 USER MANUAL > TO INSERT AN ANCILLARY LENS Optec Plus > V4 - 04.17...
-
Page 21: Tests
IV. TESTS... - Page 22 USER MANUAL > TESTS Optec Plus > V4 - 04.17...
-
Page 23: To Start A Test
1. To start a test You can choose to complete tests outside the suggested protocols. To do this: Press: > The list of the tests appears: Select a test by pressing on > Test settings window opens. Optec Plus > V4 - 04.17... - Page 24 Stereoscopic acuity test: Depth perception. (random display of dots) > The test starts. The test overview is displayed only once all the settings have been selected. Answers Input the results obtained in the part Optec Plus > V4 - 04.17...
-
Page 25: Read The Answers
Stereoscopic acuity test: Depth perception Stereoscopic acuity test: Road signs (p.38) (p.38) Peripheral field test Test of the horizontal and vertical peripheral field (p.39) Recovery from glare test (p.39) Ultra central field test (optional) (p.41) Optec Plus > V4 - 04.17... -
Page 26: Relaxation Accommodation Test
> Then insert the ancillary lens in the upper part of the device and ask: “With this, what is the smallest line which you can read? Is this more blurred than before?” The range of acuities selected by default runs from 4 to 12/10: Optec Plus > V4 - 04.17... - Page 27 Press a second time on: to display the line of optotypes corresponding to the acuity of your choice. Choose the line to be displayed via the screen below: Make hesitant people make a guess. Optec Plus > V4 - 04.17...
-
Page 28: Hotv Acuity Test
Answer The test is successful if the patient reads the letters correctly. Press for a random display of the optotypes. Press: to display the group of characters of your choice via the screen below: Optec Plus > V4 - 04.17... -
Page 29: Landolt Acuity Test
“In each frame, there are three split rings and a full ring. Can you tell me which one is the full ring?“ People who are not used to reading the letters (or figures) will have less difficulty with the Landolt rings or “broken rings” as they are well lateralized. Optec Plus > V4 - 04.17... -
Page 30: E" Snellen Acuity Test
People who are not used to reading letters (or figures) will have less difficulty with the letters E as long as they are lateralized well. Use the “Tumbling E” test rather than the “Snellen E” test. Encourage hesitant people to take a guess. If in doubt, ask them to point in the direction of the lines. Optec Plus > V4 - 04.17... -
Page 31: Tumbling E Acuity Test
Press for a random display of the optotypes. Press: to display the line of optotypes corresponding to the acuity of your choice: Press: to modify the direction of the branches of the “E” Optec Plus > V4 - 04.17... -
Page 32: Astigmatism Test
If the patient sees three series of circles instead of two, ask him to look away from the device and start the test again. Very often, the subject will see no more than two of them. > Input in notes: “Difficulty of fusion on the Red/Green test”. Optec Plus > V4 - 04.17... -
Page 33: Color Vision Test: Ishihara
“For each line, from left to right, which colors can you see?” Answer The patient passes the test if all the lines are read correctly. Answers Indicate the colors seen in the section. Press for a random display of the optotypes. Optec Plus > V4 - 04.17... -
Page 34: Color Vision Test: Tumbling E
“Can you read the line at the bottom?” Each block represents a different acuity: 4.6 and 8 /10. Each line has a different shade of gray: 60%,40% and 20%. The darkest line is at 60% and the clearest at 20%. Optec Plus > V4 - 04.17... -
Page 35: Fusion Test
It is necessary to allow some time for the circle to stabilize itself. In 85% of the cases, the circle will not be stabilized exactly in the middle of the rectangle. Note where the circle is stabilized. Optec Plus > V4 - 04.17... -
Page 36: Phoria Test: Notes Of Music (Side)
Each note of music number represents half of a diopter of the power prisms: 1 to 3 indicating a left hyperphoria 5 to 8 indicating a right hyperphoria The test can be carried out only in binocular vision. Optec Plus > V4 - 04.17... -
Page 37: Stereoscopic Acuity Test: Depth Perception
, all the correct answers are displayed , none of the answers are displayed By clicking on the button on the right of visual, you indicate that the patient does not see the point in relief but that it moves. Optec Plus > V4 - 04.17... -
Page 38: Stereoscopic Acuity Test: Road Signs
Where can you see them?” Check that the patient keeps their eyes fixed on the black dot. Choose the lights tthat will flicker in a random way by mixing both eyes. Optec Plus > V4 - 04.17... -
Page 39: Test Of The Horizontal And Vertical Peripheral Field (Optional)
, the lit LED is seen by the patient. It is displayed in green on the screen. , the lit LED is not seen by the patient. It is displayed in red on the screen. Optec Plus > V4 - 04.17... - Page 40 Let the subject know that a bright light will dazzle him for a few seconds. Click on the answer box to start the glare test. The calculation starts. Once the glare test is finished, the following screen is displayed: Optec Plus > V4 - 04.17...
-
Page 41: Ultra Central Field Test (Optional)
Look at the displayed point. While keeping your eyes fixed on this point, you see lights blinking in the periphery of your vision. Where can you see them?” Check that the patient keeps their eyes fixed on the black dot. Choose the lights that should be blinking by using the diagram displayed on your screen. Optec Plus > V4 - 04.17... - Page 42 , the lit LED is seen by the patient. It is displayed in green on the screen. , the lit LED is not seen by the patient. It is displayed in red on the screen. Optec Plus > V4 - 04.17...
-
Page 43: Settings
V. SETTINGS... - Page 44 USER MANUAL > SETTINGS Optec Plus > V4 - 04.17...
- Page 45 USER MANUAL > SETTINGS Settings menu allows you to: to set up the monitoring software (tablet or PC) (p.46) (p.62) to set up the device (viewer) Driving software setting Device setting PC synchronisation software setting Optec Plus > V4 - 04.17...
-
Page 46: To Set Up The Monitoring Software (Tablet Or Pc)
(p.51) to create data exchange folders (p.56) to manage software updates (p.56) to set up the tests (p.59) (p.60) to set information of the medical centre to remove data (p.61) Optec Plus > V4 - 04.17... -
Page 47: To Choose A Language
You can change the software language. Select Language Settings language Click on to open the menu Check the box to select the language of your choice. > The language of the interface changes immediately. Optec Plus > V4 - 04.17... -
Page 48: To Manage The User Accounts
Manage user account Select > A window opens: The default password is: 0000. Click Optec Plus > V4 - 04.17... - Page 49 Rights Administrator Doctor Operator Setting up data transfers Manage licences Management of profiles and passwords Delete data Protocol management operator doctor Creation of profiles To run the protocols and tests To view the reports Optec Plus > V4 - 04.17...
- Page 50 Click on on the right of > The following window is displayed: Click on located on the right of Password in the User password part. Enter your new password. Click on to save the changes. Optec Plus > V4 - 04.17...
-
Page 51: Creating Or Modifying A Protocol
A window is displayed. Enter the name of your protocol and choose if it will be automatic or manual and static or random. You can constantly modify or remove your protocols by clicking on Optec Plus > V4 - 04.17... - Page 52 Drag and drop the tests (and/or vocal setpoints) to be integrated into the entitled right part My protocol Carefully select the test by pressing The vocal setpoints are to be chosen among the list proposed by the software (if the function available). Optec Plus > V4 - 04.17...
- Page 53 80cm (31 inch), the mid-distance vision 67cm (26 inch), the near vision. Eye selection Check the box to select the left eye, the right eye or both. Optec Plus > V4 - 04.17...
- Page 54 Selection of reversed acuity Click on the button to display acuities: black on white background or white on black background (Only available if the option is activated). Click > Your choices are displayed on the screen. Optec Plus > V4 - 04.17...
- Page 55 Black on white background acuity White on black background acuity Click on Save protocol to save the protocol. You can reorganise the order of your tests or vocal setpoints by dragging and dropping them while pressing Optec Plus > V4 - 04.17...
-
Page 56: To Create Data Exchange Folders
If you do not tick the box, the new exported file will write over the previous one. e. To manage software updates Viewer You can install the updates your remote control (tablet or PC). Click on Check for updates Optec Plus > V4 - 04.17... - Page 57 To start the update click on Start the update > A window is displayed: Click > A window is displayed: The update can take a few minutes. The following screen appears on the viewer: Optec Plus > V4 - 04.17...
- Page 58 PC remote control To install PC remote control updates, you must first uninstall the old versions. You will then be able to install the new version by following the steps of the Software Installer (p.8) section. Optec Plus > V4 - 04.17...
-
Page 59: Setting Up The Tests
Un-check the box : the optotypes will be displayed from the smallest (on top) to the largest (on bottom) Click on the features you wish to activate: the icon appears close to the activated features. Optec Plus > V4 - 04.17... -
Page 60: To Set Up The Medical Centre Information
This part contains information on the center where the tests are carried out. This information appears in particular on result reports, once printed. Click on Practice / Office Information State the information you want to display by clicking on Click on to save. Optec Plus > V4 - 04.17... -
Page 61: To Delete Data
Click on Delete patient database to delete all the people. This choice is irreversible. It allows you nevertheless to make the application more reactive. > A window is displayed: Click to confirm your choice. Optec Plus > V4 - 04.17... -
Page 62: To Set Up The Device (Viewer)
Select one of the following actions: (p.63) to connect the monitoring software to the device to choose a language (p.64) (p.65) to set-up the screen to manage the licenses (p.66) to select the voice synthesis (p.67) Optec Plus > V4 - 04.17... -
Page 63: To Connect The Monitoring Software To The Device
The following message appears: This remote control is not connected. Please establish the connection. Please first check that the “without remote control” mode on the viewer has not been activated. Click on > Settings window opens. Click on Search viewers (devices). Optec Plus > V4 - 04.17... -
Page 64: To Choose The Language
The device (viewer) and the remote control (tablet or PC) are connected. b. To choose the language You can change the language of the device. Click on Select Language Check the box to select the language of your choice. Optec Plus > V4 - 04.17... -
Page 65: To Set-Up The Screen
To set-up the screen Settings menu allows you to manage the screen brightness of the device. Set brightness Click on Select the logo and slide it from left to right to increase or decrease the brightness. Optec Plus > V4 - 04.17... -
Page 66: To Manage The Licenses
This file will be sent to you and it will be necessary to save it on the computer desktop. Optec Plus > V4 - 04.17... -
Page 67: To Select The Voice Synthesis
Click on Select voice Use the drop-down menus to choose the language and the profile of the voice synthesis. Optec Plus > V4 - 04.17... - Page 68 USER MANUAL > SETTINGS Optec Plus > V4 - 04.17...
-
Page 69: Starting With A Patient
VI. STARTING WITH A PATIENT... - Page 70 USER MANUAL > STARTING WITH A PATIENT Optec Plus > V4 - 04.17...
-
Page 71: Import Existing Patient
Information about the patient is displayed on the screen. To set up the exchange directory with the connected medical software refer to section Settings > Setting up the (p.56) software > Definition of the data exchange files Optec Plus > V4 - 04.17... -
Page 72: Creating A New Profile
It is necessary to complete the user profiles beforehand in Settings > Managing user accounts menu > Press on to save information about the identity of the patient. At any time you can edit the information relating to the subject by clicking on Optec Plus > V4 - 04.17... -
Page 73: Correction Worn And The Patient's Work Environment
Conditions related to the workstation Tick the relevant boxes to the working conditions of the patient: work distances, visual angles. Near vision Acquisition of information at reading distance. Mid-distance vision (screen) Mid-distance vision Far vision High angle Optec Plus > V4 - 04.17... -
Page 74: To Create An Anonymous Patient
> Correction worn and the patient’s work environment (p.73) Skip this step You can choose not to enter any information about the Patient. Then, select to directly access the tests and protocols. Optec Plus > V4 - 04.17... - Page 75 USER MANUAL > STARTING WITH A PATIENT > You are redirected towards the main menu. Optec Plus > V4 - 04.17...
- Page 76 USER MANUAL > STARTING WITH A PATIENT Optec Plus > V4 - 04.17...
-
Page 77: Main Menu
VII. MAIN MENU... - Page 78 USER MANUAL > MAIN MENU Optec Plus > V4 - 04.17...
- Page 79 The main menu allows you to: start a protocol: (p.11) directly start a test: (p.23) access information about (p.73) patient: Press: to visualise the summary of the tests done on the patient and finish the session. Optec Plus > V4 - 04.17...
- Page 80 USER MANUAL > MAIN MENU Optec Plus > V4 - 04.17...
-
Page 81: List Of Errors
LIST OF ERRORS... - Page 82 The name of the XML file must be higher than 0. The coding control does not match the apk. An error occurred during the reading of the XML file. A tag must be missing. Check your viewer - connection impossible Optec Plus > V4 - 04.17...
-
Page 83: Technical Data
TECHNICAL DATA... -
Page 84: The Device
Do not place anything on the device. Avoid exposing the equipment to vibration or impact. Optec Plus > V4 - 04.17... -
Page 85: General Information
GENERAL INFORMATION... -
Page 86: Symbols
NB: read and understand the accompanying documents (user manual, etc.) This side up Fragile Keep dry Do not put in a pile Limited temperature for transportation and storage Limited humidity for transportation and storage Limited pressure for transportation and storage Optec Plus > V4 - 04.17... -
Page 87: Modifications
No known contraindication linked to using the machine. At the end of the product use, please press on the power switch. Do not carry out any maintenance whilst the machine is being used by a patient or in use. Optec Plus > V4 - 04.17... - Page 88 Radiated RF disturbance 3 V/m distance in metres (m). 3 V/m IEC 61000-4-3 from 80 MHz to 2.7 GHz Field strengths from fixed RF transmitters, as determined by an electromagnetic site Optec Plus > V4 - 04.17...
- Page 89 NOTE 1: At 80 MHz and at 800 MHz, the highest separation distance applies. NOTE 2: These directives may not apply in all situations. Electromagnetic propagation is affected by absorption and reflections of structures, objects and people. Optec Plus > V4 - 04.17...
- Page 90 USER MANUAL > GENERAL INFORMATION Optec Plus > V4 - 04.17...
-
Page 91: Glossary
GLOSSARY... - Page 92 The principle of correction is to introduce in front of the short-sighted eye a lens of negative strength which makes the image move back and repositions it on the retina. Optec Plus > V4 - 04.17...
- Page 93 USER MANUAL > GLOSSARY Optec Plus > V4 - 04.17...
- Page 94 Stereo Optical Company, Inc. 86 0 0 W C atalpa Ave . , Suite 7 03 , Chicago, IL 606 5 6 - USA EC representative: Essilor International Compagnie Générale d'Optique S.A. Head Office: 147 rue de Paris - 94220 Charenton-le-Pont France 772 049 618 RCS Créteil - www.essilor.com...
Need help?
Do you have a question about the Optec PLUS and is the answer not in the manual?
Questions and answers