Table of Contents
Advertisement
Quick Links
Advertisement
Table of Contents

Related Manuals for Stereo Optical OPTEC PLUS


Summary of Contents for Stereo Optical OPTEC PLUS
- Page 1 uickstart guide...
- Page 2 Copyright 2017 StereoOptical...
-
Page 3: Table Of Contents
The quick start guide provides an overview of the machine C86 (Optec Plus) it contains: ● basic information on the device, ● its main features, ● its maintenance. However, the quick start guide is not intended to provide exhaustive information. It does not cover the details of the functionalities of the device. -
Page 4: Packaging And Accessories
escription 1. p ackaging and accessories Quickstart guide Headset* Protective cover Accessories box Ancillary lenses* (VI 31” VI26” +1.75 + 2.25) Left protective foam Device Packaging Screen cleaning cloth Power supply cable Device power supply USB key Bluetooth key Right protective foam (*) Options included or at extra cost. -
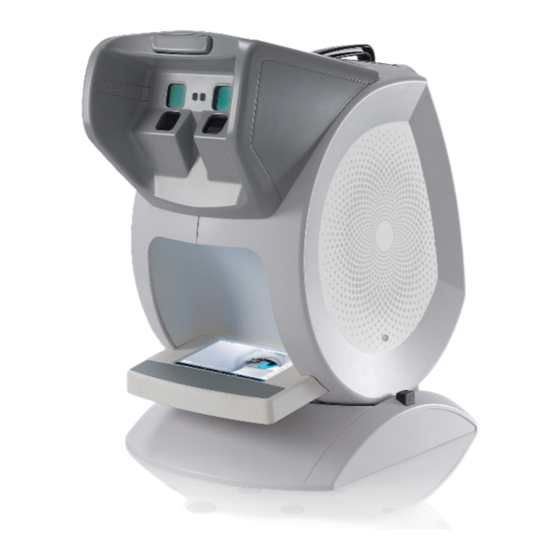
Page 5: Overview
escription 2. o verview a. Front view Fixed face rest* Eyepieces for far vision Eyepieces for near vision External screen Handle Opening for ancillary lenses Connector for peripheral devices Height adjustment button b. Back view Flap (access to the inside of the device) ON/OFF button 24V power socket... -
Page 6: Unpack The Device
irst steps 1. u npack the device Take out the boxes on top and put them on the table. Take the device out of its protective foam by holding it by the handle and remove the protective plastic covering it. Never hold the device by the external screen, to prevent it from damage. -
Page 7: Turn On And Off The Device
irst steps Remove the protective cover and put it away for later use. Remove the charger (cable and power supply), plug it into the power socket then into the main power supply. Before plugging in the device, ensure that your power supply voltage complies with the external power indicated. -
Page 8: Install Pc Interface Software
irst steps 4. i nstall interface software The bluetooth key must be installed beforehand (cf preceding chapter). Insert the stick containing the software into one of the USB ports on your computer. › A new folder will appear in the browser list. Open the folder. -
Page 9: Connect The Device And The Remote Control
irst steps 5. c onnect the device and the remote control Before you can start your first tests, it is necessary to connect the remote control and the device. Turning on the device and its screen. Turn on the remote control. ›... -
Page 10: Change The Language
irst steps Select the peripheral you require by pressing › The device and remote control are synchronizing. Press to go back to the main screen. 6. c hange the language You can change the language of remote control and the viewer. Press in menu bar. -
Page 11: Use The "Remoteless" Mode
irst steps 7. u “ ” se the remoteless mode If you do not have the remote control, this mode allows you to control the device. Press on the top right of the viewer. › The following message appears: “Do you want to start in the mode without remote control?”... -
Page 12: Manage The Device Options
irst steps 9. m anage the device options in the viewer Settings/Configuration menu. Press › The Settings Licences and Package screen appears: The packages and licenses may change over time. They also differ between the versions. Press › The license key window appears: Press the field, then enter the number using the keyboard. -
Page 13: General Guidelines
ecommendations 1. g eneral guidelines ● Place the device and remote control in a room where the temperature is neither too high (<40°C) nor too low (>10°C). ● Protect the device from vibrations and impact. ● Keep the device and the remote control/tablet away from chemicals and gas. Never try to dismantle the device or remote control. -
Page 14: Connectors And Charging
ecommendations 3. c onnectors and charging ● Ensure that the equipment is connected to the main supply and to a power socket which comply with local regulations. ● main power supply with a Your device must be plugged into a ma ground connection. -
Page 15: Adjust The Height Of The Device
ecommendations b. Adjust the height of the device Use the handle to hold the device. Press on height adjustment button and keep pressed down. Incline the device until the required height has been reached. Let go of the button and wait for a click sound. Let go of the handle. -
Page 16: Main F Eatures
eatures You can access the remote control menus via the menu bar. Following is a brief description of the main features that are available to you. For more information on one or more of these features, please refer to the menu on remote control. -
Page 17: Cleaning The Device
& aintenance servicing 1. c leaning the device To avoid any incidents, unplug the device before cleaning. Clean the interior and exterior screen and the remote control with a soft dry cloth. The screens must never come into contact with liquid (e.g. water, alcohol, window cleaner). To clean the interior screen: Unplug the device. -
Page 18: Cleaning The Ancillary Lenses
& aintenance servicing 2. c leaning the ancillary lenses Clean the ancillary lens with a dry soft cloth. ● Badly cleaned ancillary lenses can distort the test results. ● Clean the intermediate vision ancillary lenses without putting too much pressure on them. You are likely to damage the lens surface, which may also distort the test results. -
Page 19: T Echnical D Ata
echnical This device is a class I medical device without measurement function. 1. t he device ● Dimensions : 483 x 283 x 456 (mm) or 19.0 x 11.2 x 18.0 (in) ● Weight: 6.700 Kg or 15 lb ● Power supply: AC Input : 100-240 VAC, 1.9A max, 47-63 Hz DC Input : 24.0 V, 2.70A... -
Page 20: G Eneral Information
eneral information 1. Symbols ymbols on the device ymbols on the device D.C. current NB: read and understand accompanying documents (user manual, etc.). Polarity This side up Disposal of this electrical and electronic equipment Careful, read assimilate Fragil accompanying documents (user manual, etc…). - Page 21 5. Copyright Copyright © 2018 Stereo Optical - Translation of the original handbook All rights reserved. All reproduction of the content of this document, whether in part or as a whole, for the purpose of its publication or dissemination by any means and in any format whatsoever, even free of charge, is strictly prohibited...
- Page 22 Your device must be carefully maintained, in accordance with the instructions detailed in this document. Your system is an electrical device which complies with the relevant safety standards. In the event of malfunction, the repair operations must be performed by qualified personnel approved by Stereo Optical. Otherwise, the user’s safety would be at risk.
- Page 24 8600 W. Catalpa Avenue, Suite 703. Chicago, IL 60656 Phone: 733.867.0380 Toll-Free (US): 800.344.9500 email: sales@stereooptical.com www.stereooptical.com © Stereo Optical Co., Inc. 03/2018. All rights reserved. Unless indicated otherwise, all trademarks are the property of Stereo Optical Co., Inc. in the United States and other countries.
Need help?
Do you have a question about the OPTEC PLUS and is the answer not in the manual?
Questions and answers