Table of Contents
Advertisement
Quick Links
Advertisement
Table of Contents

Related Manuals for NEC LT10


Summary of Contents for NEC LT10
- Page 1 Portable Projector LT10 User’s Manual...
- Page 2 FCC Notice This equipment has been tested and found to comply with the limits for a Class B digital device, pursuant to Part 15 of FCC Rules. These limits are designed to provide reasonable protection against harmful interference in a residential installation. Trademarks Trademarks are the rights of their respective owners.
-
Page 3: Table Of Contents
nglish Table of Contents Table of Contents ..................1 Important Information ................2 Precautions ......................2 Introduction ....................4 Introduction ......................4 What's in the Box? ....................5 Product Overview ....................6 Main Unit ........................6 Control Panel ........................ 7 Terminal Panel ...................... -
Page 4: Important Information
nglish Important Information Precautions Follow all warnings, precautions and maintenance as recom- mended in this user’s guide to maximize the life of your unit. Warning- Do not look into the projector’s lens when the lamp is on. The bright light may hurt your eyes. Warning- To reduce the risk of fire or electric shock, do not expose this product to rain or moisture. - Page 5 nglish Important Information Turn off the product before cleaning. Use a soft cloth moistened with mild detergent to clean the display housing. Disconnect the power plug from AC outlet if the product is not being used for a long period of time. Don’t: Block the slots and openings on the unit provided for ventilation.
-
Page 6: Introduction
nglish Introduction Introduction This product is an XGA single chip 0.7” DLP projector. Outstanding features include: True XGA, 1024 x 768 addressable pixels 2.1 lbs (0.95 kgs) compact design Single chip DLP technology NTSC/NTSC4.43/PAL/PAL-M/PAL-N/SECAM and HDTV compatible Full function remote control User friendly multilingual on-screen-menu (OSM) Advanced electronic keystone correction and high quality full screen image re-scaling... -
Page 7: What's In The Box
nglish Introduction What's in the Box? This projector comes with all the items shown below. Check to make sure your unit is complete. Contact your dealer immedi- ately if anything is missing. Projector with lens cap Power Cord VGA Cable S-Video Cable Composite Video Cable User’s Guide... -
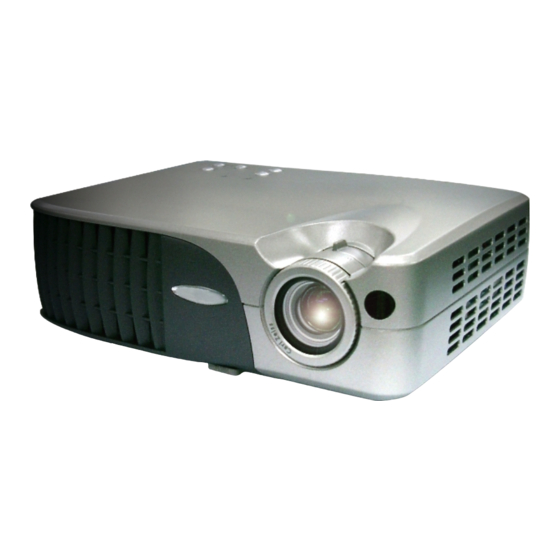
Page 8: Product Overview
nglish Introduction Product Overview Main Unit Focus Ring Zoom Ring Adjustable Tilt Foot Button Zoom Lens Remote Control Receiver Terminal Panel AC Inlet Control Panel... -
Page 9: Control Panel
nglish Introduction Control Panel Power Indicator Status Indicator On/Standby Source Directional Select and Enter Keys Keystone Correction Menu (On/Off) Terminal Panel AC Inlet PC Analog Signal/HDTV/Component Video Connector Composite Video Input Connector S-Video Input Connector Remote Control Receiver Kensington Lock Port... -
Page 10: Remote Control
nglish Introduction Remote Control Transmit Indicator Light Power Source Keystone Correction Zoom In/Zoom Out Four Directional Select Keys Menu Picture-In-Picture Hide 10. Freeze 11. Auto Adjust &... -
Page 11: Installation
nglish Installation Connecting the Projector S-Video Output Video Output 1. Power Cord 2. VGA Cable 3. S-Video Cable 4. Composite Video Cable To ensure the projector works well with your computer, please set the display mode of your graphics card is less than or equal to 1024 X 768 resolution. -
Page 12: Powering On/Off The Projector
nglish Installation Powering On/Off the Projector Powering On the Projector 1. Remove the lens cap. 2. Ensure that the power cord and signal cable are securely connected. 3. Turn on the lamp by pressing “On/Standby” button on the control panel. The startup screen will display for 20 seconds and the Power indicator will flash green. -
Page 13: Powering Off The Projector
nglish Installation Powering Off the Projector 1. Press the “Power” button to turn off the projector lamp. 2. After pressing the “Power” button, you will see a message “Power off the lamp?” on the on-screen display. Press the “Power” button again to confirm. Otherwise the message will disappear after 5 seconds. -
Page 14: Adjusting The Projected Image
nglish Installation Adjusting the Projected Image Adjusting the Projector Height The projector is equipped with an adjustable tilt foot foot for adjusting the projector height. To raise the projector: 1. Press the adjustable tilt foot button 2. Raise the projector to the desired display angle , then release the button to lock the adjustable tilt foot into position. -
Page 15: Adjusting The Projector Zoom / Focus
nglish Installation Adjusting the Projector Zoom / Focus You may adjust zoom ring to zoom in or out. To focus the image, rotate the focus ring until the image is clear. The projector will focus at distances from 3.94 to 32.81 feet (1.20 to 10.0 meters). Focus Ring Zoom Ring Adjusting Projection Image Size... -
Page 16: User Controls
nglish User Controls Control Panel & Remote Control There are two ways for you to control the functions: Remote Control and Control Panel. Control Panel Remote Control Using the Control Panel On/Standby Refer to the “Powering On/Off the Projector” section on pages 10-11. - Page 17 nglish User Controls Using the Remote Control Power Refer to the “Powering On/Off the Projector” section on pages 10-11. Source Press “Source” to choose RGB, Component-p, Component-i, S-Video, Composite Video and HDTV sources. AUTO ADJ. (Auto Adjust) When “AUTO ADJ.” is pressed, the projector will automatically synchronize with source signal.
-
Page 18: On Screen Menus
nglish User Controls On Screen Menus The Projector has multilingual On Screen menus that are multilingual allowing you to make image adjustments and change a variety of settings. The projector will automatically detect the source. How to operate To open the OSM menu, press “Menu” on the Remote Control or Control Panel. -
Page 19: Language
nglish User Controls Computer / Video Mode Language Language You can display the multilingual OSM menu . Use the key to select your prefered language. Press “Menu” to finalize the selection. -
Page 20: All Images
nglish User Controls Computer / Video Mode All Images Brightness Adjusting the brightness of the image. Press the to darken image. Press the to lighten the image. Contrast The contrast controls the degree of difference between the lightest and darkest parts of the picture. Adjusting the contrast changes the amount of black and white in the image. - Page 21 nglish User Controls Computer / Video Mode All Images Aspect Ratio Selects the desired aspect ratio. Reset This Menu Choose “Yes” to return the display parameters on this menu to their factory default settings.
-
Page 22: Computer Image
nglish User Controls Computer Mode Computer Image Auto Adjust The projector automatically adjusts clock, phase, horizontal and vertical. With most signal sources, Auto Adjust provides the best results. Clock “Clock”changes the display data frequency to match the frequency of your computer’s graphic card. If you experience a vertical flickering bar, use this function to make an adjustment. -
Page 23: Video Image
nglish User Controls Video Mode Video Image Color Adjusts a video image from black and white to fully saturated color. Press the to decrease the amount of color in the image. Press the to increase the amount of color in the image. Sharpness Adjusts the sharpness of the image. -
Page 24: Setup
nglish User Controls Computer / Video Mode Setup Menu Location Choose the Menu location on the display screen. Orientation Front-Desktop The factory default setting. Rear-Desktop When you select this function, the projector reverses the image so you can project behind a translucent screen. Front-Ceiling When you select this function, the projector turns the image upside down for ceiling-mounted projection. - Page 25 nglish User Controls Computer / Video Mode Setup Factory Default Choose “Yes” to return the display parameters (except for Lamp Hours) on all menus to their factory default settings.
-
Page 26: Pip
nglish User Controls Computer Mode Picture-In-Picture Choose “On” to turn the PIP screen on. PIP Location Choose the PIP screen position on the display screen. PIP Switch Source Choose the input source of the projector on the PIP screen. Reset This Menu The OSM does not Choose “Yes”... -
Page 27: Appendices
nglish Appendices Troubleshooting If you experience trouble with the projector, refer to the following information. If the problem persists, please contact your local reseller or service center. Problem: No image appears on screen. Ensure all the cables and power connections are correctly and securely connected as described in the “Installation”... - Page 28 nglish Appendices 4. Follow above steps 1-2. Click on the “Advanced Properties” button. 5. Select the “Change” button under the “Monitor” tab . 6. Click on “Show all devices”. Then select “Standard monitor types” under the “Manufactures” box ; choose the resolution mode you need under the “Models”...
- Page 29 nglish Appendices Problem: Image is out of focus Adjusts the Focus Ring on the projector lens. Refer to page 13. Make sure the projection screen is between the required distance 3.94 to 32.81 feet (1.20 to 10.00 meters) from the projector. Problem: The image is outstretched when displaying 16:9 DVD.
-
Page 30: Changing The Lamp
nglish Appendices Changing the lamp The projector will detect the lamp life itself. It will show you a warning message “The Lamp has been in use for over 2000 hours. You should purchase a spare bulb.” When you see this message, please change the lamp as soon as possible. -
Page 31: Specifications
nglish Appendices Specifications Light Valve - Single Chip DLP Technology by Texas Instruments Lamp - 120W User Replaceable P-VIP Lamp Number of Pixels - 1024 pixels(H) X 768 lines(V) Displayable Color - 16.7M colors Projection Lens - F/2.8~3.1 f=25.8~30.0mm with 1.16x Manual zoom lens Projection Screen Size (Diag.) - 27.6 to 267.2 inches (0.70 to 6.79 meters) Diagonal... -
Page 32: Compatibility Modes
nglish Appendices Compatibility Modes (ANALOG) Mode Resolution V.Frequency H.Frequency (Hz) (kHz) " " Remark : “ ” compression computer image. -
Page 33: Travelcare Guide
6) Problems or damage caused by expendable supplies or devices connected to the product other than those designated by NEC. TravelCare - a service for international travelers 7) Problems caused by natural consumption, wear or deterioration This product is eligible for "TravelCare", NEC's unique international war-... - Page 34 +886 2 8500 1420 Email Address: nickliao@nec.com.tw WEB Address: http://www.nec.com.tw (Regions Covered) Taiwan NEC Solutions Asia Pacific Pte. Ltd Address: 401 Commonwealth Drive, #07-02, Haw Par Technocentre, Singapore 149598 Telephone: +65 6 273 8333 Fax Line: +65 6 274 2226 Email Address: tehgh@rsc.ap.nec.com.sg...
- Page 35 P-1/ Date: TO: NEC or NEC’s Authorized Service Station: (Company & Name with signature) Dear Sir (s), I would like to apply your TravelCare Service Program based on attached registration and qualification sheet and agree with your following conditions, and also the Service fee will be charged to my credit card account, if I don’t return the Loan units within the specified period.
- Page 36 3) Any fault in the attachments or associated products or components (whether or not supplied by NEC or its agents which do not form part of the Product covered by this warranty); 4) Any act of God, fire, flood, war, act of violence or any similar occur- rence;...
Need help?
Do you have a question about the LT10 and is the answer not in the manual?
Questions and answers