Advertisement
Quick Links
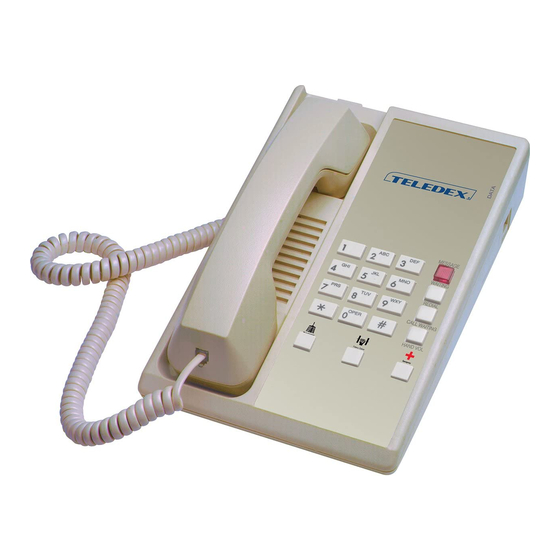
CONNECTING THE DIAMOND TELEPHONE
Included with the Diamond telephone are (one each):
• Base unit
• Coiled handset cord
• Handset
• Clear plastic overlay
Contact your supplier or Teledex for information on ordering
custom designed and printed faceplates to enhance the look of your
Teledex telephone.
1) Located on the left side of the telephone is a modular jack
TO HANDSET.
labeled
Insert one end of the coiled handset cord
into this jack. It is inserted properly when you hear a click.
2) Insert the other end of the coiled handset cord into the handset.
3) Turn the telephone so the back panel is facing you. Insert either
end of the line cord into the jack on the back of the telephone
TO TEL.
labeled
4) Insert the other end of the line cord into a telephone wall jack.
5) Once your telephone is connected, place the paper faceplate over
the keys. The plastic overlay slips into place by hooking the tabs
on the overlay into the recessed slots located on both sides. The
overlay is easiest to insert when the left or right side tabs are
inserted first, and the middle part of the overlay is slightly bowed
to allow for insertion of the other tabs.
RECEIVING A CALL
Lift the handset to answer incoming call. To end the call, hang up by
replacing the handset.
PLACING A CALL
Lift the handset. Listen for dial tone, dial the desired number, or
press an autodial key to automatically dial a number. To end the call,
hang up by replacing the handset.
MESSAGE WAITING LIGHT
The raised red lens is a message waiting light. Many telephone systems
turn on the red message waiting light to alert the user that there is a
message waiting. Additionally, the message waiting light will act as a
visual ring indicator, flashing when the telephone is ringing.
USING THE DATA PORT
The data port is a modular jack, located on the right side of the
DATA
telephone, labeled
. You can connect a fax machine, computer
modem, answering machine and other similar devices to the telephone
line through this port. To use the data port, insert the line cord from
the device you wish to connect into the jack labeled
ADJUSTING THE RING VOLUME
The telephone has two ring volume settings. To change the ring vol-
ume, locate the adjustment control on the back of the telephone
RINGER LOW/HI.
labeled
Slide the switch to the desired volume.
The ring volume can be changed at any time.
AUTO DIAL / ONE TOUCH FEATURE KEYS
Depending on your model, the telephone has up to ten (10) programmable
auto dial keys. These keys can be programmed to automatically dial
telephone numbers, or to activate telephone system features, when
connected to a compatible PBX.
STORING AUTO DIAL INFORMATION
The telephone must be connected to a working telephone line.
1) Lift the handset.
STORE
2) Press the
key and release it (see diagram for key location).
3) Enter the telephone number (including PAUSE as required - see
diagram.) The dialing sequence can be up to 15 digits long.
4) Press the auto dial key where the number is to be stored.
5) Replace the handset.
DIAMOND+3A/5A/10A
GUESTROOM TELEPHONE
USERS GUIDE
• User guide
• Line cord
DATA.
HANDSET VOLUME KEY
HANDSET VOLUME
The
key increases the handset volume to aid
in hard to hear environments. At the start of each call, the handset
volume is at a normal level. Pressing the
increases the handset volume. Pressing the key again increases the
handset volume additionally. Pressing the key a third time returns the
handset volume to the normal level.
REDIAL
To redial the last telephone number dialed, lift the handset, listen for
REDIAL
dial tone, and press the
number dialed.
NOTE: Some PBX's require a pause after the first digit to access an outside
line. The redial function will automatically incorporate a pause if the dialed
number is 7 digits or more. The inserted pause will be of the same duration
as set in the pause timing (see below.)
CALL WAITING
CALL WAITING
The
key is a programmable auto dial key. Upon
shipment from the factory, the
with a 600 ms hookflash.
NOTE: Some PBX systems may require 'flash plus digits' to be dialed to access
call waiting. Contact your system administrator for details.
FLASH KEY
FLASH
The
key, when programmed behind an auto dial key, provides
a timed line interrupt typically used for accessing PBX/CO features
such as transfer and conference. The timing of the hookflash is
programmable, with the factory default timing set to 600 milliseconds.
Some PBXs may require you to change the hookflash timing from
the default 600ms.
TO CHANGE HOOKFLASH TIMING:
1) Lift the handset.
STORE
2) Press the
key (see diagram.)
FLASH
3) Press the
programming key (see diagram.)
4) Select 1 - 9 on the dial pad. The number selected will be the
new Flash timing in hundreds of milliseconds; ie: "3" = 300 ms.
STORE
5) Press the
key.
PAUSE KEY
PAUSE
The
key can be used to provide a timed pause between dialed
digits within an auto dial key. The timing of the pause is programmable,
with the factory default set to zero (0) seconds. To change pause timing:
1) Lift the handset.
STORE
2) Press the
key (see diagram.)
PAUSE
3) Press the
key (see diagram.)
4) Select 1 - 9 on the dial pad. The number selected will be the
new Pause timing in seconds; ie: "3" = seconds.
STORE
5) Press the
key.
WALL MOUNTING
The telephone can be wall mounted. It is easiest to do the conversion
when the handset and line cords are not connected.
1) Located on the front of the telephone, above the speaker grill, is
the wall/desk mount clip. Remove this clip by pushing upward.
2) Rotate clip one half turn (180 degrees) so the side with the pro-
truding edge is towards the top. This edge will hold the handset.
3) Slide the clip downward into the slot until it snaps into place.
4) Turn the telephone over onto a non-abrasive surface so the back
side is up, facing you.
5) Locate the mounting bracket, and firmly push back and pull up
to remove.
NOTE: There are four (4) retaining tabs.
6) Rotate the mounting bracket one half turn (180 degrees) so that
the mounting eyelet is facing in the same direction as the mounting
eyelet located on the bottom surface of the telephone.
HANDSET VOLUME
key. The telephone will dial the last
CALL WAITING
key is programmed
key
Advertisement

Related Manuals for Teledex Diamond Plus 10


Summary of Contents for Teledex Diamond Plus 10
-
Page 1: Users Guide
• Coiled handset cord • Handset • Clear plastic overlay Contact your supplier or Teledex for information on ordering custom designed and printed faceplates to enhance the look of your Teledex telephone. 1) Located on the left side of the telephone is a modular jack TO HANDSET. -
Page 2: Ring Volume
This device has been granted a registration number by the Federal Communications Commission, under Part 68 rules and regulations for direct connection to the telephone lines. In order to comply with these FCC rules, the following instructions must be carefully read and applicable portions fol-...