Table of Contents
Advertisement
Quick Links
Advertisement
Table of Contents

Related Manuals for Avidsen HomeCam Battery


Summary of Contents for Avidsen HomeCam Battery
- Page 1 HomeCam Battery WIFI IP CAMERA Ref.127070 www.avidsen.com...
-
Page 2: Table Of Contents
2 - MAINTENANCE AND CLEANING 1.2 - Recording with an SD card 3 - RECYCLING 2 - BENEFIT AND USE OF PARTS IN THE AVIDSEN HOME APP 5.1 - Creating a family B - PRODUCT 3 - USING THE PRODUCT WITH GOOGLE... - Page 3 E - FAQ F - TECHNICAL AND LEGAL INFORMATION 1 - TECHNICAL CHARACTERISTICS 2 - WARRANTY 3 - HELP AND ADVICE 4 - DECLARATION OF CONFORMITY...
-
Page 4: A - Safety Instructions
A - SAFETY INSTRUCTIONS 1 - OPERATING PRECAUTIONS 3 - RECYCLING • The cameras must not be installed where the Disposing of used batteries in household lens filter may be vulnerable to scratching and waste is strictly forbidden. Batteries/ dirt. accumulators containing harmful... -
Page 5: B - Product Description
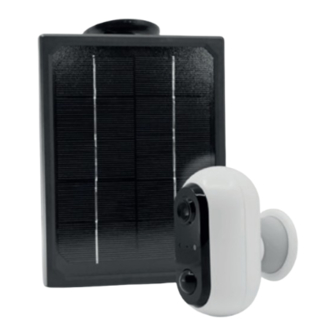
B - PRODUCT DESCRIPTION 1 - KIT CONTENTS Camera Solar panel Protective silicone skin Solar panel bracket Camera base Wall plugs for attaching the solar panel Wall plugs for mounting the camera base Screws for attaching the solar panel Screws for attaching the camera base MicroUSB cable Batteries... -
Page 6: Camera
B - PRODUCT DESCRIPTION 2 - CAMERA Lens On/off button: press and hold to turn the camera on or off (avoids having to remove batteries in the Infrared light for night vision (around the lens) event of occasional use) Brightness sensor MicroSD slot (not included) Microphone MicroUSB socket to charge batteries or plug in... -
Page 7: C - Installation
C - INSTALLATION 1 - OPERATION 3 - INSTALLING THE CAMERA This camera will allow you to monitor your home Open the camera by flipping the latch at the top and will alert you directly on your smartphone if and insert the batteries supplied, ensuring that you motion is detected. -
Page 8: Installing The Mobile App And Creating An Account
CREATING AN ACCOUNT Once the camera is connected, follow the instructions below to pair it. Download the Avidsen Home app from the Play Store or App store. Procedure by email Launch the app and log in if you already have an account. -
Page 9: Connecting The Camera
C - INSTALLATION In both cases, choose your country and then, after To complete your registration, set a password entering your email address or phone number, between 6 and 20 characters long with letters and select Obtenir le code de vérification (Get numbers only, then press Terminé... - Page 10 C - INSTALLATION Select the product that you wish to pair and select Select your 2.4 GHz WiFi network (note: your the HomeCam camera. smartphone must be connected to the WiFi network to which the camera will be connected), enter your network password and press CONFIRMER (CONFIRM) Check that the camera indicator light is flashing...
- Page 11 If this fails, check that the lens is clean and clear (protective film removed) and then repeat the step. Your Avidsen HomeCam Battery has been successfully paired. You can set a name by tapping the pencil and pressing TERMINE (FINISH).
-
Page 12: Other Method
C - INSTALLATION Your camera is now operational and will appear in Now press étape suivante (next step). your app. The camera indicator light will then be solid blue. 5.2 Other method. If you are unable to install your camera with the QR code or the password and SSID of your box are more than 20 characters long, follow the procedure indicated below:... -
Page 13: Resetting The Camera
C - INSTALLATION Wait for it to connect: 6 - RESETTING THE CAMERA The following instructions may help you if you have any problems during the pairing procedure: To reset the camera, press the RESET button for 15 seconds. The camera will play a melody to confirm that the operation was successful. - Page 14 C - INSTALLATION The camera also needs to be deleted from the mobile app. To do this, tap the pencil at the top right of your screen. Once in the détails de l’appareil (device details), scroll down to the bottom of the interface and select enlevez l’appareil (remove device).
-
Page 15: D - Using The Product
D - USING THE PRODUCT 1 - SETTINGS FOR RECORDINGS The Avidsen HomeCam Battery is designed to make recordings that can be viewed from the Avidsen Home app. 1.1 RECORDING WITHOUT AN SD CARD You will then be able to select the recording mode: Event recording: triggers recording once motion or sound is detected. -
Page 16: Benefit And Use Of Parts In The Avidsen Home App
“Terminé (Finished)” at the top right. AVIDSEN HOME APPLICATION The family name (“house” in this example) will then With the Avidsen Home application, you can appear on the home screen with your devices. manage different kinds of smart devices (bulb,... -
Page 17: Using The Product With Google Home
WITH GOOGLE ASSISTANT and you can use voice control with it. 3.2 IF YOU HAVE AN ANDROID SMARTPHONE Your devices need to be paired in the Avidsen Home WITHOUT GOOGLE ASSISTANT OR AN app to be controlled with Google Assistant. They IPHONE must be connected on the same WiFi network. -
Page 18: Alexa
- In the Amazon Alexa app, press the menu at the top left and select Skills et Jeux (Skills and Games) - Search for Avidsen Home in the list of skills or use Recherche (Search) at the top right. - Select the Avidsen Home Skill and activate... -
Page 19: Scenario And Automation
Amazon Alexa, please contact Amazon support. 5 - SCENARIO AND AUTOMATION Each device in the Avidsen Home range can be triggered and interact with other products. This way, you can create life scenarios, grouping different actions or sequences into one, or automatically trigger a device according to the status of another. -
Page 20: Programming The "I'm Going" Scenario
After following the previous steps, click on “Appareil” (“Device”) to access the list of possible actions for each device that you wish to trigger with your scenario. In this example, Avidsen HomePlug is selected. The actions for the camera and the plug will then appear in the scenario list. -
Page 21: Creating An Automation
5.2 - CREATING AN AUTOMATION Go back The automation system in the Avidsen Home app Save automation allows you to group devices and actions which will Change the name as you wish be triggered automatically by the action of another device or a condition (temperature, time, etc.) . - Page 22 D - USING THE PRODUCT • Quand toutes les conditions sont réunies Set a temperature weather condition* (When all the conditions are met) corresponds Set a humidity weather condition* to an “ET” (“AND”) function: Set a weather condition* - If Temperature = x ET (AND) time = y ET (AND) device = n then…...
-
Page 23: Programming The "Living Room Lighting" Automation
D - USING THE PRODUCT 5.2.1 PROGRAMMING THE “LIVING ROOM Allows you to use a previously defined LIGHTING” AUTOMATION Scenario (set of actions). Allows you to use a previously defined The automatic action in this example will allow the automation user to turn on the bulb at night as soon as motion (an automatic action) is detected by the camera and the lamp is already... - Page 24 D - USING THE PRODUCT • FOR THE CAMERA • FOR THE BULB Under these conditions, the actions will start if motion is detected in the camera's visual field ET (AND) if the bulb is off:...
- Page 25 D - USING THE PRODUCT Now, set the actions that will be carried out: Then add a “retard” (“delay”) that will trigger the next action after the desired time period: To turn on the bulb: Then add the last action, turn off the lamp in this example:...
- Page 26 D - USING THE PRODUCT The automation is now complete. You can save it at the top right: After these steps, you will have 3 actions: turn on the bulb, wait one minute and turn off the bulb: Finally, you can choose an automation validity period, in this case at night: If you wish to access the details or delete it, click on the “...”...
- Page 27 Android Android device to get a recent update. Unable to install the Avidsen GooglePlay checks Home app that you have all the essential on my Android device items for the proper operation Try the installation on a different of the app.
- Page 28 Push alert settings or Android application settings Please restart Avidsen Home. Make sure that no other Avidsen Home is not allowed to management or power saving run in the background, or has application automatically been completely closed...
- Page 29 • The warranty does not cover damage caused by negligence, knocks or accidents. The parts of this product must not be opened or repaired by any persons not employed by Avidsen. The warranty will be void if the device is tampered with.
- Page 30 Alexandre Chaverot, CEO 0 892 701 369 0,35 € / min Monday to Friday, 9pm to 12pm, and 2pm to 6pm. Avidsen undertakes to keep a stock of spare parts for this product throughout the contractual warranty period. Need some help? Avidssy will answer your questions at www.avidsen.com...
- Page 32 Avidsen 19 avenue Marcel Dassault - ZAC des Deux Lions 37200 Tours - France...
Need help?
Do you have a question about the HomeCam Battery and is the answer not in the manual?
Questions and answers