Table of Contents
Advertisement
Quick Links
Edge Computer EC900 Series
User Manual
(Applicable for Debian10,IEOS V2.0.0 and above)
Version2.0, October 2023
www.inhandnetworks.com
The software described in this manual is provided according to the license
agreement and can only be used according to the terms of the agreement.
Copyright Notice
© 2023 InHand Networks.All rights reserved.
Trademarks
The InHand logo is a registered trademark of InHand Networks.
All other trademarks or registered trademarks in this manual belong to
their respective manufacturers.
Advertisement
Table of Contents

Related Manuals for InHand EC900 Series


Summary of Contents for InHand EC900 Series
- Page 1 Copyright Notice © 2023 InHand Networks.All rights reserved. Trademarks The InHand logo is a registered trademark of InHand Networks. All other trademarks or registered trademarks in this manual belong to their respective manufacturers.
- Page 2 Disclaimer InHand Networks reserves the right to change this manual, and the product is subject to subsequent changes without prior notice. We will not be responsible for any direct, indirect, intentional, or unintentional damages and hidden dangers caused by improper installation and use.
-
Page 3: Table Of Contents
Contents 1 Introduction ................................5 2 Hardware installation instructions ........................5 2.1 Introduction ..............................5 2.2 EC942 panel ..............................5 2.3 EC942 external connector........................... 6 2.3.1 Ethernet ..............................6 2.3.2 Serial port ..............................7 2.3.3 CAN ................................8 2.3.4 Switching Input interface (Digital Input) ..................8 2.3.5 Switching Output interface (Digital Output) ................. - Page 4 3.3 Network administration and system administration ................23 3.3.1 web Management based on IEOS ....................23 3.3.2 Linux-based command-line management .................39 4 Advanced configuration of peripheral interfaces ..................45 4.1 Serial Port ...............................45 4.1.1 Change the serial port Settings ......................46 4.1.2 View serial port information: ......................48 4.1.3 Set the baud rate of COM1 serial port: ..................48 4.1.4 Set the baud rate of COM2 serial port ..................49 4.2 the USB interface ............................49...
-
Page 5: Introduction
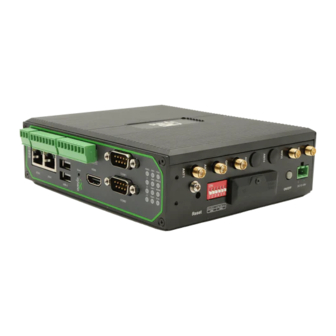
1 Introduction This user's manual is for the EC900 series of edge computers based on the Arm architecture and covers a complete set of instructions for all supported models. Before referring to these sections, verify that the hardware specifications of your computer model support the features/Settings covered. -
Page 6: Ec942 External Connector
Front panel 2.3 EC942 external connector 2.3.1 Ethernet This is a dual RJ45 connector for Ethernet connection The EC942 has 2 RJ45 Ethernet ports and supports 10M/100M/1000M adaptive rates. Green light: LINK indicator, 1000M interface is on for the end device, and 10/100M interface is off for the end device. -
Page 7: Serial Port
Yellow light: ACT light, flashing when there is data 2.3.2 Serial port EC942 supports two-channel serial port, support RS-232 or RS-485 or RS-422 communication, software can be configured. DB9 pin Pin name Pin Definition number RS-232 RxD/RS-422 TxD+ RS-232 receive /RS-422 send positive RS-232 TxD/RS-485 B/RS-422 RS-232 send /RS-485 signal B/RS-422 RxD-... -
Page 8: Can
2.3.3 CAN EC942 has 1-way CAN bus interface and supports CAN 2.0A/B standard. It is compatible with CAN FD and can achieve a maximum rate of 5Mbps. Signage Features CAN_H CAN high level data line CAN_L CAN low level data line 2.3.4 Switching Input interface (Digital Input) Interface identification Features... -
Page 9: Usb
Digital output port 0 DGND Ground end Digital output port number 1 DGND Ground end 4 digital output DO, Isolated 3000VDC Digital output port 2 DGND Ground end Digital output port No. 3 DGND Ground end 2.3.6 USB The EC942 provides two USB 2.0 Host ports. -
Page 10: Led
2.3.7 LED EC942 has 12 LED lights to indicate the power supply and system operation status respectively. Signage Name Definition Power indicator Power on and always on When the system starts normally, the STATUS blinks. If the system fails to start due to an System operating status STATUS exception in the system startup... - Page 11 upgrade or factory restoration has not been completed. When a serious system Error occurs and the system upgrade or Error Error indicator light factory restoration has not been completed, the Error light blinks. Select SIM card 1 for dialing, SIM1 SIM1 card indicator, select SIM card 2 for dialing or turn off dialing, long off.
- Page 12 Cellular signal strength indicator Weak signal (RSSI < Moderate signal (-90 Strong signal No signal -90) <= RSSI < -70) (RSSI >= -70) destroy bright bright bright destroy destroy bright bright destroy destroy destroy bright In addition to the combination of L1, L2, L3 signal lights to indicate cellular signal strength, there is also a set of LED combinations to mark the process of restoring the factory.
-
Page 13: User Programmable Keys
2.3.8 User programmable keys EC942 provides API interface, the user can call the API interface to detect the state of the programmable key, and then implement their own key logic. 2.3.9 DC input The EC942 supports 12 to 48V DC input 2.3.10 SIM card slot The EC942 supports 2 SIM card slots, the SIM card needs to be installed with power off, the SIM card is pressed into the slot. -
Page 14: Microsd Card Slot
2.3.11 MicroSD card slot The EC942 has a slot for the MircoSD card, SD does not support hotplug and needs to be plugged in and out with power off. After inserting the SD card and powering up the device, the system will automatically mount all partitions. 2.3.12 Restore factory keys There is a reset button for the system to restore the factory. -
Page 15: Switch The Machine Button
2.3.13 Switch the machine button EC942 is equipped with an on-off the machine on and off. button for switching 2.3.14 Antenna interface There are 5 antenna interfaces in EC942, and the number of antennas standard with different models is different. The antenna is screwed into the corresponding antenna interface to complete the antenna installation. - Page 16 logo Name ANT1 4G LTE main antenna /5G antenna 4G LTE diversity receive antenna /5G ANT2 antenna GNSS GNSS antenna ANT3 5G antenna ANT4 5G antenna WiFi1 WiFi antenna WiFi2 WiFi antenna...
-
Page 17: Dial Switch
2.3.15 Dial switch The dial switch controls the pull up and pull down resistance of the 485 bus. The pull up and down resistance can be selected to increase the number of 485 bus loaded devices. Identification Functional Notes ON - enable pull-up resistor; OFF - disables the pullup resistor ON - enables pull-down resistor;... -
Page 18: Getting Started
3 Getting Started In this chapter, we will cover the basic configuration of EC900, an edge computer based on Arm architecture. 3.1 Connect to the EC900 You will need a computer that you can use to connect to the EC900 and log in to the command-line interface. -
Page 19: Connecting Via The Ssh Console
EC900 devices are factory created root by default, but login is disabled. If you need to use the root user, change the system configuration manually and type sudo -s to switch to the root user. The user edge is in the sudo group, so you can use sudo under the edge user to execute system-level commands. - Page 20 Use the ssh command to access the ETH1 port of the EC900 on a Linux PC. Type yes to continue to complete the connection. When the terminal prompt edge@edge-computer:~$appears and shell commands can be entered, the connection is successful. 3.1.1.2 Windows users Tips These steps apply if you are connecting the EC900 on a Windows PC.
-
Page 21: User Account Management
Click the link http://www.chiark.greenend.org.uk/~sgtatham/putty/download.html, download PuTTY (free) software, SSH command in Windows environment to establish a connection to the edge computer EC900. The following is an example of using SSH to connect: 3.2 User Account management 3.2.1 Switch to the root user You can use the sudo -s command to switch to the root user. -
Page 22: Creating And Deleting User Accounts
You may get a "permission denied" message when using some pipe or redirect behavior without root permissions. In this case, you must use 'sudo su -c' instead of '>','<','>>','<<','etc', etc. You need to include the full command in single quotes. 3.2.2 Creating and deleting user accounts You can create and delete a user's account using the useradd and userdel commands. -
Page 23: Network Administration And System Administration
The EC942 is based on debian 10, so native Linux commands can be used for network management and system administration; In order to facilitate user configuration, InHand has developed a set of IEOS system programs, providing a web interface, users can easily through the web network management and system management, but it should be noted that when the IEOS function is enabled, IEOS will take over the network management and system management. - Page 24 Important note: When using IEOS program to manage network configuration and system configuration, if you use Linux native commands at the same time, the two may affect each other, resulting in abnormal running state. It is recommended that the configuration supported by IEOS be managed through IEOS web, and the configuration not supported by IEOS, such as VPN, can be combined with native Linux commands to achieve the configuration goal.
- Page 25 3.3.1.2 Network management 3.3.1.2.1 Configuring the Ethernet interface Configure the eth1 interface with a static IP address Configure the eth1 interface with a DHCP Client...
- Page 26 Start the dhcp server function on the eth1 interface and assign an address to the eth1 unhooked device DHCP Server configuration parameters description: Enable DHCP Server: The switch of DHCP Server function Starting Address: Starting base address of DHCP Server address pool, network segment + starting address = starting ip address of address pool.
- Page 27 3.3.1.2.2 Configure cellular dialing Cellular network parameters Description: Enabled: The switch of cellular function; Enabled by default. 10. Profiles: A set of dial parameters used to configure APN, username, password, and authentication methods when dialing a dedicated network card. If you are not a dedicated network card, you usually do not need to change the configuration here.
- Page 28 Dual SIM Enabled: Dual Sim enabled. In order to improve the reliability of the network, EC942 supports dual SIM and single dial. Two sim cards need to be inserted into the device. If the sim1 card fails to dial because of unpaid charges, it will automatically switch to the sim2 card for dialing.
- Page 29 recommended that customers with cellular connections enable ICMP probing so that false connections can be quickly recovered. ICMP probe parameters: ICMP Detection Server Probes: ICMP probe address; 2 probe addresses can be configured, as long as 1 address is successfully probed, it means that there is no fake connection in the cell. When neither address is configured, ICMP probing is turned off.
- Page 30 the system will restart, in this case, you can open unlimited redialing; In this way, no matter how many times the dialing fails, the system will not restart. Dial Interval; But if a dial fails, the amount of time to wait before making another dial. Signal Query Interval: Signal query interval.
- Page 31 3.3.1.2.4 Configuring static routes This is a static routing for Ethernet. When the default routing for Ethernet, cellular, and wifi is configured, the default route with the lowest metric value will take effect. You need to make sure that the Metric value of the default route is different. Static route configuration parameters: Interface: The outgoing interface of the static route Target: The target network...
- Page 32 3.3.1.2.6 Configuring DNS DNS Servers: DNS Server address, up to 4 can be configured Domain name hijacking: Domain name hijacking function, can realize the binding between IP address and domain name. 3.3.1.2.7 Network diagnostics Network diagnostics support ping, traceroute and nslookup functions.
- Page 33 Cloud management Enabled: the enable switch that connects to the DeviceLive platform; DeviceLive is the remote monitoring and management platform of InHand equipment; Cloud Server: DeviceLive platform has 2 addresses; One is the address of the domestic platform, the other is the address of the overseas platform; Here you choose which platform to connect to.
- Page 34 Up to 10 NTP Server addresses can be configured, and the program periodically sends synchronization requests to each server address in turn. After the synchronization is successful, the system time is written to the RTC and no longer continues to send synchronization requests to the later NTP servers. In addition to using NTP to synchronize the time, there is a synchronization button in the Device Info status page to synchronize the time manually, but only when the device time and the local time (the time of accessing the computer used...
- Page 35 3.3.1.3.2 Firmware upgrade The automatic restart option is turned off by default. After upgrading the firmware, you need to manually restart the system to take effect; When the automatic restart option is enabled, the system will be restarted automatically after the firmware upgrade is successful. 3.3.1.3.3 Others This page has 2 functions: restart the system and reset the system.
- Page 36 3.3.1.4 Status 3.3.1.4.1 Equipment information The device information status page shows the hostname, device model, serial number, firmware version, kernel version, file system version and an overview of CPU, memory and disk space usage. 3.3.1.4.2 Cellular dialing status information The cellular dialing status page shows the sim card, IMEI, IMSI, ICCID, signal strength used by the current dialing, as well as the IP address, DNS and other information obtained by the dialing.
- Page 37 3.3.1.4.4 DHCP Server status information The DHCP Server status page shows the assigned IP address of the device as a DHCP Server, the client hostname, the client host mac, and the expiration time. 3.3.1.4.5 Route state information The route status page displays IPv4 direct route, static route and route neighbor information.
- Page 38 3.3.1.4.6 Firewall status information Firewall status information shows filtering rules, IP address mapping rules and other information. 3.3.1.4.7 Log information The log page can view the system log, user log and set the log level, including Error, Info, Debug and other levels. Logs can also be downloaded locally.
-
Page 39: Linux-Based Command-Line Management
3.3.2 Linux-based command-line management When using the Linux command line for network and system configuration, the first thing you need to do is close the IEOS program. IEOS is managed through systemctl, Shutting down IEOS is done as follows: systemctl stop ieos_daemon This shutdown only applies to this startup, and IEOS programs will still start after the system is rebooted. - Page 40 After changing the interface IP configuration, run /etc/init.d/networking restart to restart the network service for the configuration to take effect. 3.3.2.1.2 Set up a dynamic IP address If you want to for EC942 dynamic IP address, through the command vim/etc/network/interfaces. D/eth1 or vim/etc/network/interfaces. D/for eth2 modify the corresponding network configuration file, Setting it to DHCP after inet will automatically get the IP address.
- Page 41 After changing the interface IP configuration, run /etc/init.d/networking restart to restart the network service for the configuration to take effect. 3.3.2.3 System administration 3.3.2.3.1 Querying the firmware version To check the computer firmware version for EC942, type: Add the -a option to see the full version information: 3.3.2.3.2 Viewing available disk space To determine the amount of available drive space, use the df command with the -h option.
- Page 42 system. For EC942 products, the disk partition available to the user is /dev/mmcblk0p8. Here's an example: 3.3.2.3.3 Querying product model information The devinfo tool can view the product model information 3.3.2.3.4 Adjust the time EC942 has two time Settings. One is system time and the other is RTC (Real Time Clock) time, which is maintained by the hardware of the EC942.
- Page 43 YYYY: Year RTC time can be set to system time using the following command Click on the link below for more details about the date and time: https://www.debian.org/doc/manuals/system-administrator/ch-sysadmin-time.html https://wiki.debian.org/DateTime 3.3.2.3.5 set time zone There are two ways to configure the time zone for EC942. One is to use the command tzselect.
- Page 44 Follow the steps above to get the China time zone keyword Asia/Shanghai and execute the following command to set the time zone 3.3.2.3.7 Using localtime files The localtime zone is stored in /etc/localtime and is used by the GNU library for C (glibc) if no value is set for the TZ environment variable.
-
Page 45: Advanced Configuration Of Peripheral Interfaces
Note After successfully downloading the required time zone information file, unzip it, and then compile and generate the corresponding binary file using zic command. The generated time zone file is "/usr/share/zoneinfo/custom time zone filename". 4 Advanced configuration of peripheral interfaces In this chapter, we will introduce the advanced configuration of peripheral interfaces for EC900, an edge computer based on Arm architecture. -
Page 46: Change The Serial Port Settings
4.1.1 Change the serial port Settings View and set the serial port with the stty command To see the details, type sudo stty --help:... -
Page 48: View Serial Port Information
4.1.2 View serial port information: 4.1.3 Set the baud rate of COM1 serial port:... -
Page 49: Set The Baud Rate Of Com2 Serial Port
4.1.4 Set the baud rate of COM2 serial port Note Details about the stty command are available at the following link http://www.gnu.org/software/coreutils/manual/coreutils.html 4.2 the USB interface EC942 provides two USB 2.0 Host interfaces, which are mainly used to expand storage devices and connect to mice and keyboards 4.2.1 USB auto-mount EC942 supports USB storage device hotplugging. -
Page 50: Micro Sd Card Mounts Automatically
4.2.2 micro SD card mounts automatically EC942 supports micro SD memory card but does not support hotplugging. It will mount all partitions automatically. EC942 will mount all micro SD memory card partitions to the /mnt/ path with the mount folder named sd_<node>_<num>. Where <node>... - Page 51 Format the partition to the desired filesystem, such as ext4...
-
Page 52: Can Bus Interface
Create a mount point such as /mnt/sda1 (4) Edit vi /etc/fstab file, Add /dev/sda1/mn/sda1 ext4 defaults,nofail,x-systemd.device-timeout=1s 0 0 to the end line, as shown below: /dev/sda1: device partition, which needs to be configured by the user according to the actual situation /mnt/sda1: mount point, which needs to be configured according to the actual situation etx4 hard disk partition file system format, users need to configure according to... -
Page 53: Configure The Connection Can Interface
4.3.1 Configure the connection CAN interface By default, the CAN port will be initialized. If you need any other configuration, check the CAN device using the ip link command. To check the status of the CAN device, use the ip link command: To configure the CAN device, use ip link set can0 down to turn the device off first Then configure the bit rate (here's a 50k bit rate example) :... -
Page 54: Gps
dio_mgmt set D<I/O><number><HIGH/LOW> When you need to set a bit of IO port to high or low, type dio_mgmt set d <I/O><number>< high/low > Print the corresponding IO level information by typing dio_mgmt show D<I/O><number>. 4.5 GPS Some models of EC900 are integrated with GPS module, and the data serial port node is /dev/ttyS9. -
Page 55: Toggle The Machine Button
4.6 Toggle the machine button 4.6.1 Turn off the device 1. Turn off the device by long pressing the on/off button for 8 seconds 2. You can use Linux commands to shut down all software running on the device and stop the system. -
Page 56: Firewalls
• Some system-level commands are not available directly to the user, as shown in the following example output: 5.2 Firewalls Netfileter/iptables is an excellent and free firewall tool based on packet filtering which comes with nuix/linux system. It is very powerful and flexible, and can control the data packets flowing in, out and through the server in fine detail. -
Page 57: The System Restores Factory Settings And Updates
6 The system restores factory Settings and updates In this chapter, we will describe how EC900, an edge computer based on Arm architecture, restores factory Settings and updates. 6.1 Restore factory Settings There are two ways to restore factory Settings: 1. -
Page 58: System Upgrades
EC942-V2.0.0.img as an example to explain. • Create an empty ec900_img directory in the root directory of the U disk (SD card), and put the EC942-V2.0.0.img file and md5.txt file published by inhand into the ec900_img directory. • Make sure that the MD5.txt file only has the md5 hash value of EC942- V2.0.0.img line. - Page 59 Device description file path: /tmp/ieos/etc/system_info.json, the content is as follows: "device_info":{ "model_info":{ "model":"EC942 ", "pn":"LQA8-W-G", "sn":"CL9422343000019", "oem":"inhand", "features":"; std; cell-LQA8; wlan; io; tmp2;" "software_info":{ "boot_loader":"1.0.1", "kernel ":"4.19.232", "version":"V2.0.1-test.2", "OS":"Debian GNU/Linux 10 (buster)" "hardware_info":{ "arch":"arm64", "soc":"rk3568", "interface":{ "eth":[ "iface_name":"eth2", "iface_mac":"2E:62:32:7B:B5:28" "iface_name":"eth1", "iface_mac":"2A:62:32:7B:B5:28"...
- Page 60 "iface_name":"wlan1", "iface_mac":"8A:12:AC:FA:AD:53" "gpio":[ "gpio_name":"cellular_power", "dev_node":"/sys/class/gpio/gpio0" "gpio_name":"sim_switch", "dev_node":"/sys/class/gpio/gpio19" "gpio_name":"msata_power", "dev_node":"/sys/class/gpio/gpio20" "gpio_name":"gnss_power", "dev_node":"/sys/class/gpio/gpio110" "gpio_name":"ble_power", "dev_node":"/sys/class/gpio/gpio220" "user_key":[ "user_key_name":"USER", "dev_node":"/sys/class/gpio/gpio95" "uart":[ "uart_name":"COM1",...
- Page 61 "dev_node":"/dev/ttyS3" "uart_name":"COM2", "dev_node":"/dev/ttyS4" "io":{ "di":[ "di me":"DI1", "dev_node":"/sys/class/gpio/gpio487" "di_name":" DI2", "dev_node":"/sys/class/gpio/gpio488" "di_name":"DI3", "dev_node":"/sys/class/gpio/gpio489" "di_name":"DI4", "dev_node":"/sys/class/gpio/gpio490" "do":[ "di_n ame":"DO1", "dev_node":"/sys/class/gpio/gpio491"...
- Page 62 "di_name":"DO2 ", "dev_node":"/sys/class/gpio/gpio492" "di _name":"DO3", "dev_node":"/sys/class/gpio/gpio493" "di_name":"DO4", "dev_node":"/sys/class/gpio/gpio494" "led":[ "led_name" :"USER1", "dev_node":"/sys/class/leds/user1" "led_name" :"USER2", "dev_node":"/sys/class/leds/user2" " ed_name":"4G/5G", "dev_node":"/sys/class/leds/cell" "l ed_name":"SIM1", "dev_node":"/sys/class/leds/sim1" "le d_name":"SIM2", "dev_node":"/sys/class/leds/sim2" "...
-
Page 63: A Guide To Io Programming
led_name":"WARN", "dev_node":"/sys/class/leds/warn" "l ed_name":" ERROR", "dev_node":"/sys/class/leds/error" "led_nam e":"STATUS", "dev_node":"/sys/class/leds/status" "led_ e":"L1", "dev_node":"/sys/class/leds/level1" "led_na me":"L2",dev_node":"/sys/class/leds/level2" "led_name":"L3", "dev_node":"/sys/class/leds/level3" A guide to IO Programming Currently, there are a total of 8 IO interfaces on the device: for example, there are 4 input pins from DI0 to DI3 on the device panel; Do0-do3 are 4 output pins. The IO device nodes can be obtained from the device description file /tmp/ieos/etc/system_info.json as follows:... -
Page 64: Led Programming Guide
DI0~DI3-----sys/class/gpio/gpio487~sys/class/gpio/gpio490 DO0~DO3------sys/class/gpio/gpio491~sys/class/gpio/gpio494 When you need to programming IO interface, direct manipulation background device nodes below the value value (sys/class/gpio/gpioxxx/value) Case study: When DO0 need to output high electricity at ordinary times, can be directly to sys/class/write 1 gpio/gpio491 / value echo 1 >... - Page 65 / sys/class/leds/user1 / brightness: this file is used to control the user1 lights on or off. Write 1 to always on, write 0 to always off. / sys/class/leds/user1 / trigger: leds trigger, can write the timer timer trigger, write none said cancel the trigger. / sys/class/leds/user1 / delay_on: it is time to file said led lights, is an unit with ms.
-
Page 66: Cross-Compilation
7.3 Cross-compilation A user's own c/ C ++ program can be cross-compiled by using the cross-compilation toolchain on the development machine, and then the object file is uploaded to the EC942 device for execution. Cross-compiler package: gcc-linaro-6.3.1-2017.05-x86_64_aarch64-linux-gnu.tar.gz Here's how to configure the environment variables for the cross-compilation toolchain: 1. - Page 67 return 0; The contents of the ~/example/Makefile are as follows: # Define TARGET and source filenames target := hellworld DIRS := $(shell find.-maxdepth 3-type d) SRCS := $(foreach dir,$(DIRS),$(wildcard $(dir)/*.c)) OBJS := $(SRCS:.c=.o) CC=aarch64-linux-gnu-gcc # Define compiler and compile options CFLAGS := -Wall-Wextra -g-wno-unused-parameters # define default TARGET all: $(TARGET)
Need help?
Do you have a question about the EC900 Series and is the answer not in the manual?
Questions and answers