Advertisement
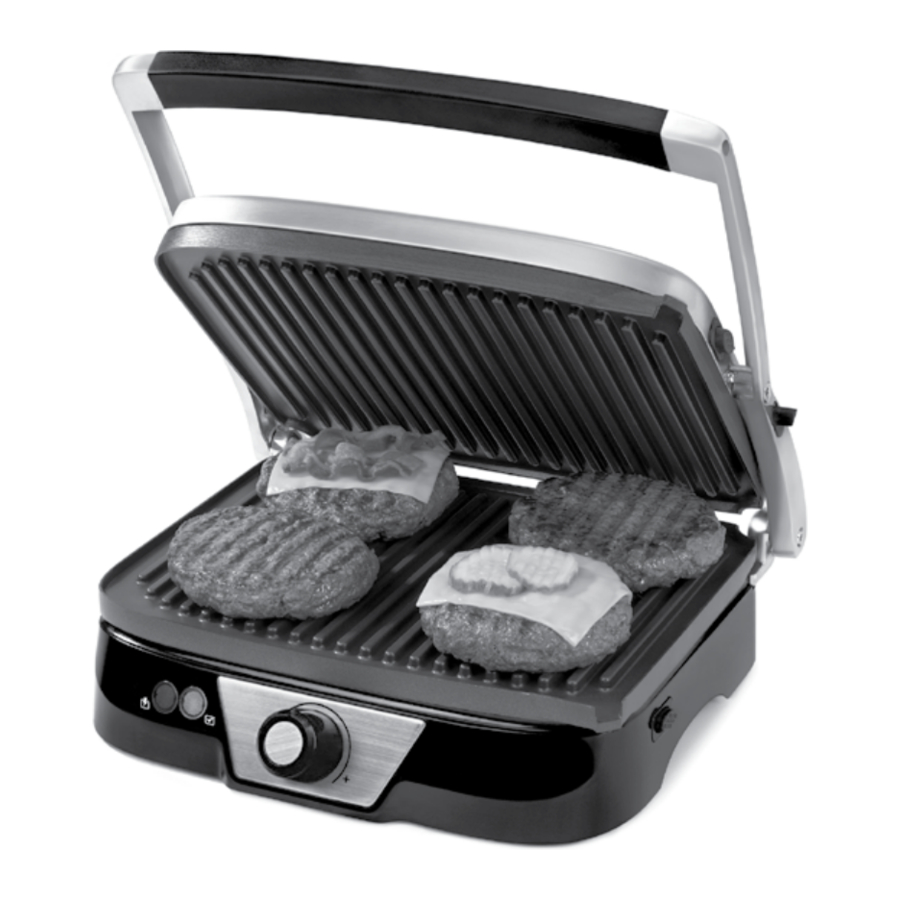
LEARNING ABOUT YOUR PANINI MAKER/GRILL

- Handle
- Stainless Steel Upper Housing
- Grill/Griddle Release Switch
- Upper Removable Grill Plate
- Lower Removable Grill Plate
- Removable Plate Release Button
- Bottom Housing
- Thermostat Knob
- Green Pilot Light
- Red Power Light
- Drip Cups and Cleaning Tool
HOW TO
Before First Use
Before using the appliance for the first time, remove and peel off any promotional materials and packaging materials, and check that the cooking plates and accessories are clean and free of dust. Read entire instruction manual for a full understanding of your new appliance.
- Clean the grill, plates and the accessories (see "Cleaning and Care"). It is recommended to heat up the grill for about 10 minutes without any food in order to eliminate any grease that may have adhered during the manufacturing process.
- Ventilate the room during this period. When your Panini Maker/Grill is heated for the first time, it may emit slight smoke or odor. This is normal with many heating appliances. This does not affect the safety of your appliance.
Operation
 Note: Ensure that the cord is kept well away from the cooking surfaces at all times while in use or when the unit is hot.
- With unit UNPLUGGED insert plates into unit (insert plates while the unit is in the 180°/flat position).
![warning]() Note: Each plate is labeled "Upper" or "Lower" on bottom of grill plates. Insert accordingly.
Note: Each plate is labeled "Upper" or "Lower" on bottom of grill plates. Insert accordingly. - With the thermostat set to "Min", plug the appliance in. The red light will light up.
- Apply a little oil on the cooking plate. Turn the knob to desired temperature level. Preheat the grill to reach the ideal cooking temperature. When the appliance reaches the desired temperature, the green pilot light will light up.
Note: Green pilot light may turn on and off during cooking. This indicates that the thermostat is maintaining the proper cooking temperature to grill to perfection.
- Position the fat collecting tray near the spout on the right side of the appliance.

THE METAL TOP COVER GETS VERY HOT. KEEP HANDS AND OTHER OBJECTS AWAY FROM IT. ALLOW THE UNIT TO COOL OFF COMPLETELY FOLLOWING OPERATION (USUALLY APPROXIMATELY 40 MINUTES) BEFORE TOUCHING THE PLATES OR HOUSING.
Inserting/Removing Grill Plates
- Unit should be in the 180 degree/Flat position. To do this hold the handle with you left hand, press the Grill/Griddle Release Button up with your thumb and slowly move the handle back towards the counter. Ensure the appliance is off, unplugged and cool.
- Inset one plate at a time. Plates are labeled "Upper" and "Lower" and are designed to fit into those places. Insert accordingly.
- To insert the lower plate stand directly in front of the unit – the grease drip spout should be at the bottom right hand corner of the base of the unit.
- There are metal brackets at the center of the unit. Line up the cutouts located at the back of the grill plate with the metal brackets at the center of the unit. Slide the plate underneath the metal brackets and push down gently on the front of the plate (you will hear it snap into place).
- To insert the "Upper" Plate turn the grill around and repeat the steps to add your 2nd plate. With the unit turned around the grease drip spout should be at the bottom left hand corner of the top of the unit.
- To remove the plates after the unit is off, unplugged and has completely cooled – Press firmly on the "Removable Plate Release Button" located on the bottom housing and top housing of the unit (remove one plate at a time). Firmly press one button at a time and the plate will release from the base. Hold the plate with two hands and slide it out from under the metal brackets at the center of the unit. Repeat for 2nd set of plates.
To Use as a Contact Grill:
The Contact Grill can be used to cook items such as burgers (including but not limited to hamburgers, veggie burgers, turkey burgers, etc), boneless pieces of meat and thin cuts of meats and vegetables.
- With the unit UNPLUGGED, open the unit to the 180 degree/flat position. Insert Grill plates. Be sure to locate the labeled "Upper" and "Lower" markings on the bottom of the plates to make sure you place the plate on the correct surface. Then return the unit to the closed position.
- Plug in the unit.
- Select your desired temperature on the TEMPERATURE CONTROL KNOB. Once desired temperature is reached indicator light will illuminate.
- Place drip cup accessories at the corner of the plate in order to catch the grease.
- Insert your desired food onto the bottom cooking plate. Ideally make sure your foods are approximately the same height, as the lid will need to press on the top of the food in order to cook it evenly.
- Close the top cooking plate which has a floating hinge that is designed to evenly press down on the food. The top plate must be fully lowered to achieve Grill marks on the selected foods.
- When the food is cooked use the handle to open the lid. Remove the food with the help of a plastic or wooden spatula. DO NOT use metal utensils for any reason as these will scratch the non-stick coating on the plates.
Note: The ribs on the grill plates, combined with the grease spout at the corner of the plate, allow the grease to drip from the food and drain off the plates.
To Use as a Panini Grill/Press:
The Panini Grill can be used to cook items such as grilled sandwiches, breads and quesadillas.
- With the unit UNPLUGGED, open the unit to the 180 degree/flat position. Insert Grill plates. Be sure to locate the labeled "Upper" and "Lower" markings on the bottom of the plates to make sure you place the plate on the correct surface. Then return the unit to the closed position.
- Plug in the unit.
- Select your desired temperature on the TEMPERATURE CONTROL KNOB. Once desired temperature is reached indicator light will illuminate.
- Place drip cup accessories at the corner of the plate in order to catch any grease that might drip.
- Insert your desired food onto the bottom cooking plate. Make sure your foods are approximately the same height as the lid will need to press on the top of the food in order to cook it evenly.
- Close the top cooking plate which has a floating hinge that is designed to evenly press down on the food. The top plate must be fully lowered to achieve grill marks on the selected foods.
- When the food is cooked use the handle to open the lid. Remove the food with the help of a plastic or wooden spatula. DO NOT use metal utensils for any reason as these will scratch the non-stick coating on the plates.
Note: The ribs on the grill plates combined with the grease spout at the corner of the plate allow the grease to drip from the food and drain off the plates.
To Use as an Open Grill:
The Open Grill can be used to cook items such as burgers, steak, poultry (it is not recommended to cook chicken parts with bones, as they might not cook evenly), hot dogs, fish and vegetables.
- With the unit UNPLUGGED, open the unit to the 180 degree/flat position using the Grill Release Switch. Insert Grill plates. Be sure to locate the labeled "Upper" and "Lower" markings on the plates to make sure you place the plate on the correct surface (reference Inserting/Removing Grill Plates).
- It is important to make sure that the upper and lower plates are both in the level position before plugging in and turning on the unit. If the upper plate does not sit completely flat, carefully hold the bottom plate with one hand and push down on the outer portion of the upper plate until the upper and lower plates line up to create one large cooking surface.
- Plug in the unit.
- Select your desired temperature on the TEMPERATURE CONTROL KNOB. Once desired temperature is reached indicator light will illuminate.
- Place drip cup accessories at the corner of the plates in order to catch any grease that might drip. In the Open Grill option you will use two drips cups (one at each plate) if you are cooking on both plates.
- Place your desired foods on to the top and bottom cooking plates. Your grilling surface has doubled when you use the Open Grill position. Feel free to cook up different foods at the same time and don't worry about mixing flavors since they are on separate plates!
- When the food is cooked remove the food with the help of a plastic or wooden spatula. DO NOT use metal utensils for any reason as these will scratch the non-stick coating on the plates.
Note: The ribs on the grill plates combined with the grease spout at the corner of the plate allows the grease to drip from the food and drain off the plates.
Helpful Hints
- Frozen food should always be thawed before it is grilled.
- If you grill vegetables, fish or lean meat, spray the grilling surface with a cooking spray. If you are grilling meat with any amount of fat, or if the food has been marinated, there is no need to treat the grill prior to cooking.
- Never use metal utensils – they will scratch the non-stick plates.
- Do not leave plastic utensils in constant contact with the hot grill plates. They could melt.
- Do not touch unit for at least 45 minutes after use to ensure the unit has cooled down.
When in doubt always use an oven mitt.
CARE & CLEANING
Taking Care of Your Panini Maker/Grill
- After use be sure the Function Control knob is in the off position. Turn Grill and Griddle Temperature control knobs to the lowest settings.
- Unplug the unit from the power and let the appliance cool down for 45 minutes minimum before cleaning. If you are unsure if the unit is hot be sure to use an oven mitt.
- Both the grill and griddle plates are dishwasher safe. You may also hand wash them if you desire.
- Wipe the outside of the unit with a damp cloth, sponge or paper towel.
- Do not use anything abrasive that can scratch or damage the non-stick coating.
- Do not use hard, sharp utensils. Plastic utensils are the best if you find you need to scrape leftover food from the unit.
- Make sure no water or other liquid penetrates into the appliance.
- Do NOT place unit in the dishwasher. Only the plates and included accessories are dishwasher safe.
- NEVER clean or rinse the appliance under running water.
- Do NOT immerse electrical parts and base appliance in liquids.
Storage
- Always unplug the unit before storage.
- Always make sure the unit is cool, clean and dry before storing.
For product questions contact:
Sunbeam Consumer Service
USA: 1.800.334.0759
Canada: 1.800.667.8623
www.oster.com
©2011 Sunbeam Products, Inc. doing business as Jarden Consumer Solutions. All rights reserved.
Distributed by Sunbeam Products, Inc. doing business as Jarden Consumer Solutions, Boca Raton, Florida 33431.
Sunbeam Products, Inc. is a subsidiary of Jarden Corporation (NYSE: JAH).

Documents / ResourcesDownload manual
Here you can download full pdf version of manual, it may contain additional safety instructions, warranty information, FCC rules, etc.
Advertisement


Need help?
Do you have a question about the CKSTPM5450 and is the answer not in the manual?
Questions and answers