Fitbit Flyer - Wireless Headphones Manual
- User manual (29 pages) ,
- Manual (11 pages) ,
- Service manual (4 pages)
Advertisement
Getting started
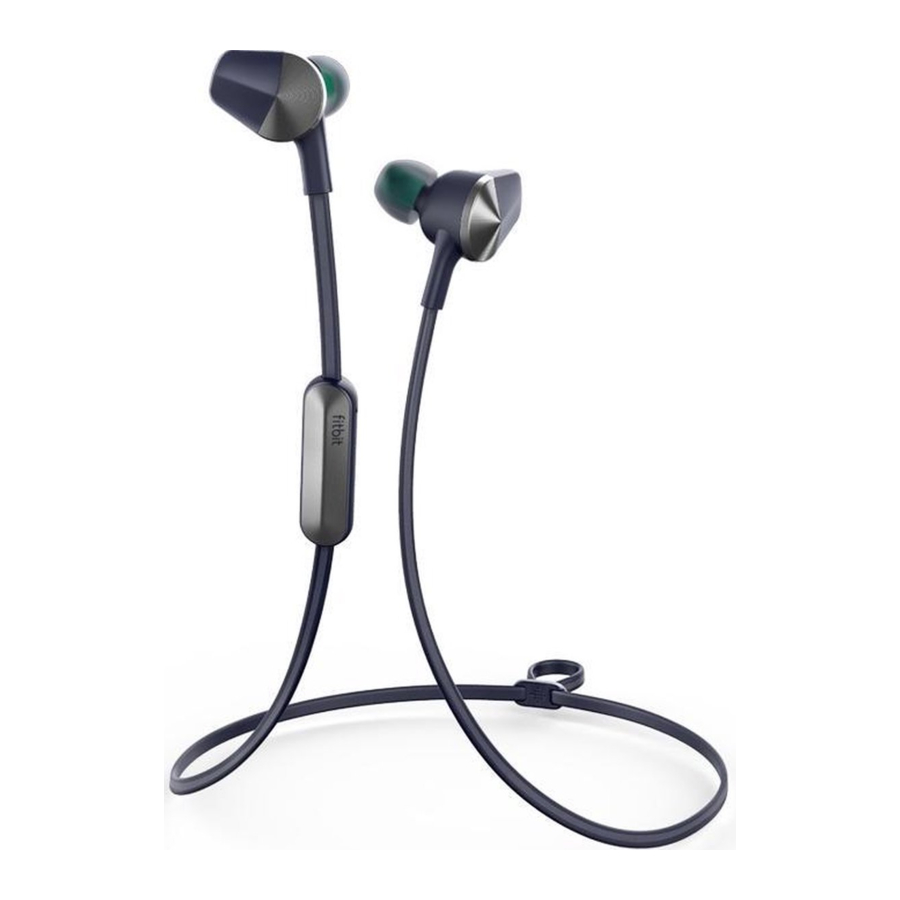
Welcome to Fitbit Flyer, the wireless headphones designed for workouts which pack crisp sound and powerful bass into a comfortable, sweat-proof, and secure design. Take a moment to review our safety information at http://www.fitbit.com/safety.
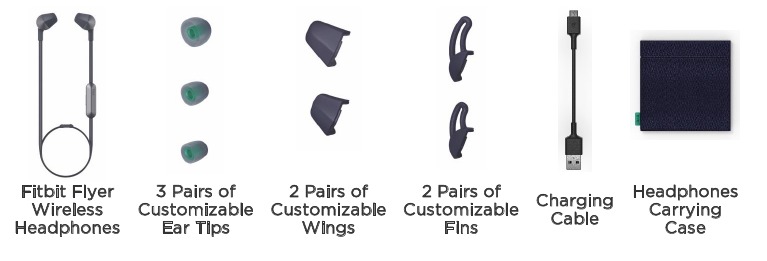
What's included
Your Flyer box includes:
What's in this document
We get you started by connecting Flyer with an audio device. After customizing the headphones to find the best fit, you'll be ready to listen to audio and receive phone calls.
Next, we explain how to adjust your settings, connect an additional device, and get the most out of Flyer. To find more information, tips, and troubleshooting, please browse our comprehensive articles at help.fitbit.com.
Setting up Fitbit Flyer
You must connect Flyer to a Bluetooth®-enabled device. After connecting Flyer, you'll be able to play audio and receive phone calls through your headphones.
Powering on
To power on Flyer, press and hold the Power button until the LED lights up. If Flyer does not turn on, it may need to be charged first. For instructions, see Charging Flyer.

Connecting to devices
To pair Flyer to a device, you must put the headphones in pairing mode, indicated by a pulsing blue light.
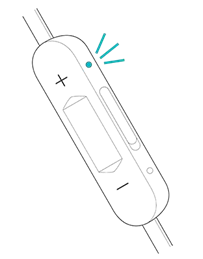
The first time you turn on Flyer, it will automatically be in pairing mode, and you can skip to step 2.
To pair Flyer to a new device:
- Press and hold the Power button for 4 seconds when turning on Flyer, and wait until the LED pulses blue. If you release the Power button before Flyer is in pairing mode, Flyer turns on, but won't pair to your device. If Flyer doesn't enter pairing mode, turn it off by holding the power button for 1 second, and try this step again.
- Open the Bluetooth menu on your device and select Flyer. You'll hear an audio notification through the headphones letting you know Flyer and your device are paired.
When you pair Flyer to a new device, it is stored in Flyer's memory. Flyer automatically attempts to connect to this device if it's nearby the headphones when you turn them on. Flyer can store up to 8 Bluetooth-enabled devices, such as phones, tablets, and smartwatches. If Flyer already has 8 devices in its memory and you pair a new device, it forgets the first device you paired.
Of these devices in Flyer's memory, it can connect to 2 of them at the same time. This means you can listen to audio or receive phone calls from either connected device. When you turn on Flyer, the audio notification tells you how many devices are currently connected. The device and Flyer must be nearby each other to connect. Note that you can only listen to audio from 1 device at a time. To switch between 2 connected devices, pause the audio on your first device, and then play the audio on your second device. For more information about connecting Flyer to your devices, as well as troubleshooting tips, see help.fitbit.com.
NOTE: If Flyer is connected to 2 devices, you can manually switch between them by opening the Bluetooth menu on the device you want to use and selecting Flyer from the list of connected devices.
Connecting to Fitbit Ionic
If you own a Fitbit Ionic watch, pair Flyer to listen to audio such as music, audiobooks, and podcasts. To pair Flyer, press and hold the Power button for 4 seconds when turning on the headphones, and wait until the LED pulses blue, which indicates Flyer is in pairing mode.

To pair Flyer to Ionic:
- On Ionic, open the Settings app.
- Tap Bluetooth.
- Tap + New Device.
- When Ionic finds Flyer, tap Flyer on the screen to pair the headphones to Ionic. When pairing is complete, a green checkmark appears on Ionic's screen and an audio notification plays through Flyer.
In the future, Flyer automatically attempts to connect to Ionic if it's nearby the headphones when you turn them on. To allow the two devices to connect, turn on Ionic's screen to wake it up. For more information about connecting Flyer to Ionic, including troubleshooting tips, see help.fitbit.com.
Changing the language
Flyer provides voice prompts for various notifications such as powering on and off, the current battery level, and how many devices the headphones are currently connected to. Flyer defaults to English; to change the language of these prompts, press the Power button and the Select button at the same time. Press the same 2 buttons again to switch to the next language.

Language selection is only available while your audio is paused and you are not on a phone call. The supported languages, in order, are:
- English
- French
- Italian
- German
- Spanish
- Chinese
- Korean
- Japanese
- No language (tones only)
Customizing your fit
Flyer comes with ear tips, wings, and fins. Attach the ear tips and either wings or fins before inserting the headphones into your ears to ensure a secure, comfortable fit.
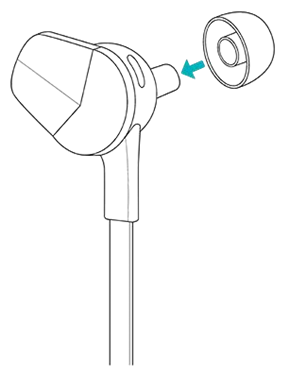
Choosing ear tips
For optimal comfort and sound quality, you should select an ear tip that fits snugly in your ear canal. Flyer comes with 3 sizes (small, medium, and large) of ear tips; we recommend trying all 3 options to see which size works best for you. Choose the ear tip that seals the headphones with your ear canal to reduce outside noise and provides the best overall sound quality.
NOTE: You may want to choose a different sized ear tip for your right and left ears.
To attach an ear tip, hold the earbud in one hand and the ear tip in the other hand. Press the ear tip fully onto the stem of the earbud until it fits snugly against it. To remove an ear tip, pinch it between your fingers and pull it off.
Choosing wings or fins
Flyer comes with 2 pairs of wings and 2 pairs of fins in small and large sizes. We recommend trying both sets of wings and fins to determine which provides the most comfortable and secure fit. Both wings and fins should tuck into the fold of your ear to keep the headphones in place.

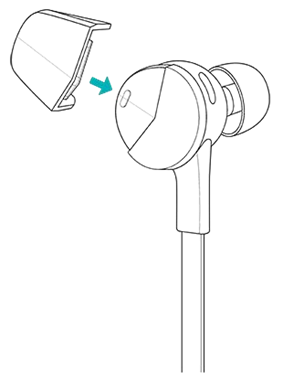
To attach a wing or fin:
- Slide the bottom edge of the wing or fin into the rounded slot of the earbud.
- Press down on the top of the wing or fin to insert it under the metal cap. It snaps into place when inserted correctly.
![]()
To remove a wing or fin, pinch the base of it between your fingers and pull away from the earbud to slide it out of the rounded slot.
NOTE: If the headphones don't tuck into your ears correctly, try switching the right and left fins.
Wearing your headphones
After you select the correct attachments, we recommend wearing Flyer behind your neck with the controls on the right side. Tighten the sliding cable fastener to keep the headphones secure.

For more information on finding the best fit and wearing Flyer, see help.fitbit.com.
Using the controls
Flyer has 3 buttons, located on the control box. Use these buttons to control your audio and phone calls.

Volume
Use the Up and Down buttons to control the volume of audio and phone calls, as shown in the table below.
| Function | Operation |
| Increase volume | Press the Up button |
| Decrease volume | Press the Down button |
Microphones
If you connect Flyer to a phone with a voice assistant such as Siri, Google Assistant, or Cortana, when your phone is nearby you can access the voice assistant with Flyer's microphones. Access to a voice assistant is not available while you're on a phone call. For instructions on accessing your phone's voice assistant, see the table below.
| Function | Operation |
| Turn on voice assistant | Press and hold the Select button |
| Turn off voice assistant | Press and hold the Select button |
Once you turn on a voice assistant, the microphone in Flyer picks up your voice, allowing you to use it as if you were speaking directly into your phone. For more information about accessing a voice assistant with Flyer, see help.fitbit.com.
Power boost
Use power boost to enhance the sound quality of your music. To turn this setting on or off, briefly press the Up and Down buttons at the same time.
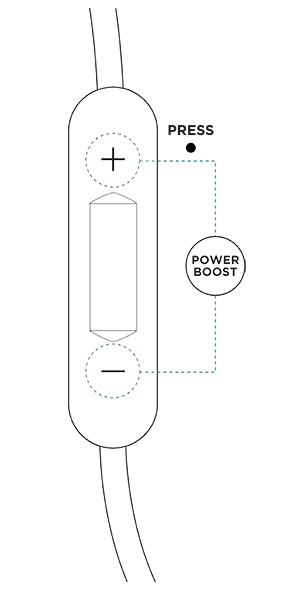
You'll hear an audio notification telling you whether you turned power boost on or off. Flyer uses this power boost setting until you change it again. Turning power boost off helps conserve battery power. For more information about power boost, see help.fitbit.com.
Audio playback
To listen to audio, press play on the device Flyer is connected to. After the audio starts, use Flyer to control it, as shown in the table below.
| Function | Operation |
| Pause/resume | Press the Select button |
| Next track | Press and hold the Up button or double-press the Select button |
| Previous track | Press and hold the Down button or triple-press the Select button |
Phone calls
If Flyer is connected to a phone, use Flyer to answer, dismiss, or switch between calls. If audio is playing on your phone when a call comes in, the audio is automatically paused so you can answer your call. For instructions on how to control phone calls from your Flyer, see the table below.
| Function | Operation |
| Answer incoming call | Press the Select button |
| Dismiss incoming call | Press and hold the Down button |
| End current call | Press and hold the Select button |
| Switch to incoming call; put current call on hold | Press the Select button |
| Switch to incoming call; end current call | Press and hold the Select button |
| Dismiss incoming call; continue current call | Press and hold the Down button |
Battery life and charging
Checking your current battery level
When you turn Flyer on or off, you'll see the battery-level indicator light and hear an audio notification.
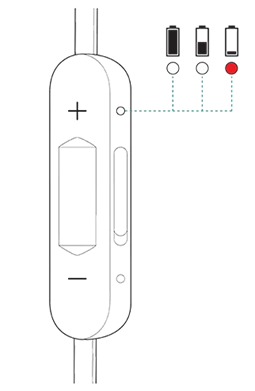
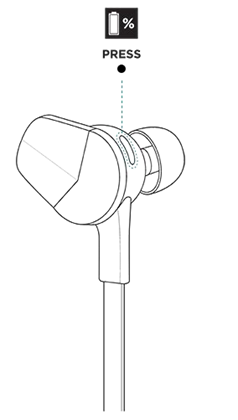
While Flyer is on, check the current battery level at any time by briefly pressing the Power button.
On many devices, Flyer's battery level is shown on the connected device. If Flyer is connected to Ionic, you can check the battery level on the watch's shortcut screen (swipe right from the clock screen).
When the battery level is Low or Very Low, the LED changes to red and a voice prompt notifies you that the battery is low. For information on what the color of the LED represents, see the table below.
| LED color | Battery charge status | Audio notification |
| White light | Charged | "Full battery" |
| White light | Medium | "Medium battery" |
| Red light | Low | "Low battery" |
| Flashing red light | Very low | "Very low battery" |
Charging Flyer
To charge Flyer, plug the Micro-USB 2.0 charging cable into Flyer's charging port, located underneath the cover, and then plug the charging cable into the USB port on your computer or a UL-certified USB wall charger.

When Flyer is charging, the LED changes color depending on the current charge level. Your headphones are fully charged when the LED is white. Charging fully may take up to 2 hours. For information on what the color of the LED represents while Flyer is charging, see the table below.
| LED color | Battery status |
| White light | Fully charged |
| Yellow light | Medium |
| Red light | Low |
Erase Flyer
Erase Flyer to clear all paired devices from memory and set the language for voice prompts and notifications to English. To erase Flyer, press the following buttons in this order:
- Up
- Down
- Up
- Down
- Up
- Select
When the erase is complete, the LED flashes white 5 times and Flyer turns off.
Wear and care
Flyer may require occasional cleaning. For instructions and more information, see https://www.fitbit.com/productcare.
Ear tips, wings, and fins
Remove the ear tips and wings or fins from the device and wash them with water or a wet cloth. Use water only. Allow them to dry completely before reattaching them to the headphones.
Fitbit Flyer
Clean the headphones with a soft, damp cloth. Use water only. The headphones are designed to be rain, sweat, and splash-proof, but shouldn't be submerged in water.
Fitbit Flyer General Info & Specifications
Materials
Flyer is made of a combination of silicone, polycarbonate, polyurethanes, elastomers, and aluminum. These materials allow the headphones to be flexible, durable, and lightweight.
Wireless technology
Flyer contains a Bluetooth 4.2 transceiver.
Battery
Flyer contains a rechargeable lithium-ion battery.
Size
| Weight | Cord Length | |
| Fitbit Flyer | 0.7 oz (20 g) | 19.7 in (50 cm) |
Audio
| Frequency Range | 20 Hz to 20 kHz |
| Input | 2 microphones |
Environmental conditions
| Operating Temperature | -4º to 113º F (-20º to 45º C) |
| Relative Humidity | Up to 90% at 140º F (60º C) without loss of function |
| Non-Operating Temperature | -22º to -4º F (-30º to -20º C) 113º to 140º F (45º to 60º C) |
| Water Resistant | Splash-proof. Do not submerge in water. |


To prevent possible hearing damage, do not listen to audio at high volume levels over an extended period.
Don't attempt to replace batteries yourself—you may damage the batteries, which could cause overheating and injury
Learn more
Troubleshooting and assistance for Flyer may be found at help.fitbit.com.
Return policy and warranty
Warranty information and the Fitbit.com Store Return Policy may be found at fitbit.com/returns.

Documents / Resources
References
![www.fitbit.com]() Fitbit Important Safety and Product Information
Fitbit Important Safety and Product Information![www.fitbit.com]() Fitbit Wear & Care
Fitbit Wear & Carehttp://help.fitbit.com
![help.fitbit.com]() How do I connect Flyer to my audio devices?
How do I connect Flyer to my audio devices?https://help.fitbit.com/articles/en_US/Help_article/2219
https://help.fitbit.com/articles/en_US/Help_article/2212
![help.fitbit.com]() How do I improve the sound quality on Flyer?
How do I improve the sound quality on Flyer?https://help.fitbit.com
![www.fitbit.com]() Fitbit Legal: Limited Warranty
Fitbit Legal: Limited Warranty
Download manual
Here you can download full pdf version of manual, it may contain additional safety instructions, warranty information, FCC rules, etc.
Advertisement


Need help?
Do you have a question about the Flyer and is the answer not in the manual?
Questions and answers