Advertisement
Specifications
| Control Box | Handpiece | |||||||
| Input Voltage | Power | Size (LxWxH) | Weight | Model | Length | Rotation Speed | Torque | Weight |
| 110/220 V 50/60 Hz | 65 W | 5 ⅛ x 5 ½ x 3 ¼ in (13х13,5х8,5 cm) | 2.8 lb (1.3 Kg) | 105L | 6 in (153 mm) | 0-40,000 RPM | 3 Ncm | 7 oz (190 g) |
| 120 | 5 in (129 mm) | 0-35,000 RPM | 3 Ncm | 6 oz (164 g) | ||||
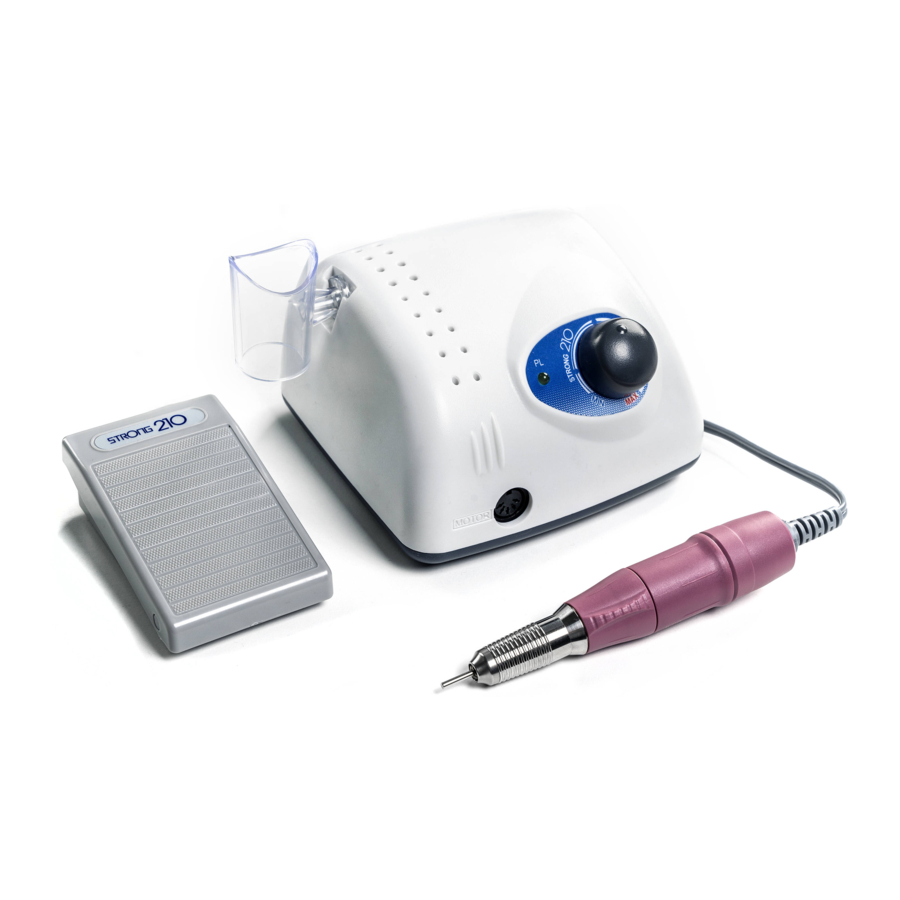
Component Overview

- Speed control knob
- Control box
- Forward/Reverse (FWD/REV) switch
- Voltage selector switch (110/220V)
- ON/OFF switch
- Power cord
- Control switch (Hand/Foot)
- Pedal Connection
- Bit Holders
- Power indicator
- Foot pedal
- Handpiece Connection
- Handpiece
- Handpiece Holder
FOR YOUR SAFETY
- If there is a problem with the handpiece, make sure the problem has been fixed before using.
- Do not turn on the handpiece with the collet chuck open or without a bit installed (this may cause the handpiece to malfunction).
- To avoid unexpected injury from unintentional activation, check that the speed knob is in the "0" position before plugging in the power cord
- Change the bit only when the machine is off (the power button is in the "OFF" position).
- Store the handpiece with the bit or supplied rod clamped in place.
- Do not put the handpiece down until the motor has come to a complete stop.
- Change the direction of rotation only after the motor has come to a complete stop with the speed knob in the "0" position.
- Use balanced bits with a rounded shaft end and a shank diameter of 2.35mm. Never use bits that are out of alignment, rusted or damaged.
- Use only the handpieces and foot pedals designed for this machine.
- Use the rotation speed recommended by the bit manufacturer.
- Use an alcohol-based solution to remove dust from the outside of the machine and avoid getting moisture inside.

* Do not leave the device unattended near children.
* Do not touch the device with wet hands.
* Use the device only with the proper electrical voltage.
* Do not use the device with a defective handpiece, damaged cord, or after dropping the unit or coming in direct contact with water.
* Do not place the unit and handpiece in a humid environment.
* Avoid contact with fire, gas, or incandescent objects.
* Do not lubricate or wash the unit or handpiece.
* Do not drop or bump the unit.
SET-UP AND USE
- Check that the power button (5) on the right side of the machine is in the "OFF"position.
- Plug the power cord into an electrical outlet.
- Carefully plug the handpiece connector into the socket (12) on the front panel.
- Insert the pedal connector into the socket (8) on the back of the unit. Select the appropriate FOOT mode using the switch (7) on the rear panel to put the unit in pedal mode.
- Turn the ring located in the middle of the handpiece to the left until it clicks to open the bit clamping mechanism. Remove the rod, insert the bit into the slot and click the handle ring into place by turning the ring to the right until it clicks.
The distance between the collet chuck and the bit head must be at least 2 mm.

- Make sure that the bit is firmly clamped, and that the collet chuck is locked.
- Turn on the machine by moving the switch (5) on the right side of the machine to the "ON" position.
- Use the speed adjuster (1) on the front of the unit to smoothly adjust the bit rotation speed (making sure that the switch (7) is set to HAND mode).
If you would like to control the handpiece with the foot pedal, place the machine in FOOT mode, set the speed adjuster to the desired value and press the foot pedal to engage the handpiece. - To change the direction of rotation, move the switch (3) on the right panel from "FWD" (right) to "REV" (left) or vice versa.
Change the direction of rotation only when the speed is zero.
Otherwise, the machine can fail quickly. - When you have finished working, turn the machine off by moving the switch (7) to the "OFF" position.
WARRANTY
Saeshin warrants this unit for 1 year from the date of purchase. The warranty covers faults caused by the manufacturer, e.g. defects in material or workmanship.
The warranty does not cover malfunctions caused by improper use, improper installation, improper maintenance and repair, or normal wear and tear of consumable parts such as bearings, spindle housing assembly, armature, etc.
To verify the warranty, you must provide information about the extent of wear and tear and conditions of use. You must also provide the product serial number and a copy of the store invoice.
It is at the manufacturer's discretion and based on a review of product usage to decide whether to repair or replace the warranty product.
Common Problems and Solutions
| CONTROL BOX | |||
| Problem | Description | Possible Cause | Solution |
Motor does not work | ON/OFF switch is in the ON position; power light is not illuminated. | Power cord not plugged in | Plug power cord into outlet. |
| Blown Fuse | Check and replace fuse if necessary. | ||
| Power cord plugged in, Power indicator light illuminated, Handpiece will not turn on. | Overload protection has been triggered. | Unplug and re-connect power cord from outlet. | |
| Bad connection from control box to handpiece. | Check the handpiece connection at the control box. | ||
| Bad connection from control box to pedal. | Check the pedal connection at the control box. | ||
| Handpiece connection cable damaged. | Contact your dealer. | ||
| Carbon brushes worn out. | Replace carbon brushes, or contact your dealer. | ||
Motor works | Unable to adjust speed. | Faulty control box. | Contact your dealer. |
| HANDPIECE | |||
| Problem | Possible Cause | Solution | |
| Handpiece does not work, even if the chuck is locked. | Faulty bearing, carbon brushes, or control box. | Contact your dealer. | |
Handpiece starts, then stops | Faulty bearing. | Contact your dealer. | |
Loud noise and vibration while in use | Faulty bearing or collet chuck. | Contact your dealer. | |
| Bent or broken bit. | Replace the bit. | ||
Dealer:
MASHA'S NAILS SHOP
Tel. +1 (714) 204-5993 (WhatsApp ) |
mail @ 4nails. us
www.4nails.us
SAESHIN PRECISION CO., LTD
52, Secheon-ro 1-gil, Dasa-eup, Dalseong-gun
Daegu, Korea Tel, 82-53-587-2341 / Fax. 82-53-580-0999

Documents / Resources
References
Download manual
Here you can download full pdf version of manual, it may contain additional safety instructions, warranty information, FCC rules, etc.
Advertisement

Need help?
Do you have a question about the 210 and is the answer not in the manual?
Questions and answers