OttLite B22FS - Wireless Charging LED Lamp. Colour Changing Base Manual
- Instructions (2 pages)
Advertisement
Before using
PRODUCT REGISTRATION FORM
Please complete the enclosed Product Registration Form and return it today by mail, or register online by going to: OttLite.com/warranty

To prevent electric shock, make sure the lamp is not plugged in until all steps are complete.
NOTE: THIS UNIT IS FULLY ASSEMBLED


BATTERY SAFETY: This product contains a button battery. If swallowed, it could cause severe injury or death in just 2 hours. Seek medical attention immediately.
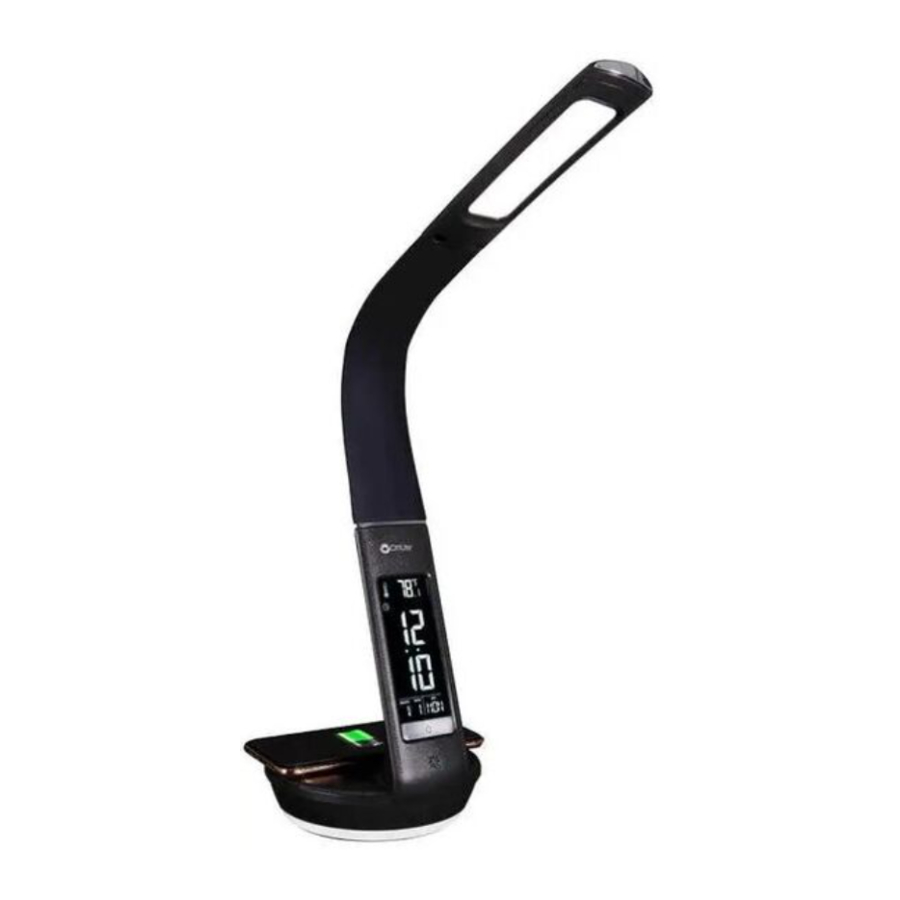
- Remove lamp from packing, placing lamp body base (A) flat on a steady surface.
- Connect power adapter input (J) into connector (K) in the rear-bottom of the lamp.
- Plug the power adapter (L) into a standard household 230V outlet. Note: Only use with the supplied power adapter to avoid damage or fire.
- Power switch (B) is a "touch" switch that controls ON/OFF power, the LED brightness settings and the colour mode function of the lamp.
- To power the main light, slightly touch the switch (B) to achieve the following:
- Turn lamp "ON" to 1st brightness setting; touch the switch "once";
- for 2nd brightness setting; touch the switch "two-times";
- for 3rd brightness setting; touch the switch "three-times";
- to turn lamp "OFF"; touch the switch "four-times".
- This lamp provides three colour modes. To adjust lighting colour mode slightly "press and hold" switch (B) for three seconds to switch light colour temperature mode; 5000°K, 2700°K, 4000°K.
- Touch button (C) to turn on the colour changing base. When desired colour is shown, touch button (C) again briefly to maintain that colour, otherwise colours will shift continuously. Touch and hold button (C) to turn off the colour changing base.
- To reposition the light, hold the lamp base (A) steady and grasp either lamp body (E) or shade (F) depending on needed adjustment.
- Refer to Diagram 1 and 2 for lamp maximum adjustment range. NOTE: DO NOT FORCE the shade outside the allowable adjustment range as excessive adjustment may cause damage.
WIRELESS CHARGING INSTRUCTIONS
Wireless charging requires a Qi-certified device. To determine if your device is Qi-certified, please visit the Wireless Power Consortium website.
To wirelessly charge a device, perform the following:
- Place the device, which supports Qi wireless charging standard, face up on the middle of the Qi wireless charging icon (D).
- When the device is centered on the Qi wireless charging area (D), a solid RED light (P) will come on noting charging mode active. NOTE: If RED light is blinking this indicates the device is not charging. Your device should show charging is taking place.
- Check charge level on your device periodically to determine when device is fully charged.
NOTE: Product DOES NOT provide any indication of when device is fully charged.
Device may become warm during charging. This is normal and part of the process. Charging times vary by device.
CONTROL PANEL
REFER TO THE FOLLOWING ICON LEGEND FOR CONTROL PANEL (M), AS IT PERTAINS TO THE INSTRUCTIONS FOR VARIOUS SETTING FUNCTIONS BELOW.
![]() "SETTING BUTTON" – to set time and calendar; in alarm mode, push to turn off alarm.
"SETTING BUTTON" – to set time and calendar; in alarm mode, push to turn off alarm.
M "MODE BUTTON" – push to set alarm and snooze
 "UP BUTTON" – In setting mode, push to increase.
 "DOWN BUTTON" – In setting mode, push to decrease.
 "DISPLAY KEY" – Push display key for suitable brightness.
CALENDAR AND CLOCK SETTING
NOTE: Control Panel (M) to set Calendar and Clock is located behind lamp body (E).
- Under normal mode, press "SETTING BUTTON" to enter setting mode, press "SETTING BUTTON" again for next setting. The sequence of setting is: HOUR – MINUTE – YEAR – DAY – MONTH.
- Press "SETTING BUTTON" to quit setting, or it will automatically quit to normal mode if idle for 60 seconds.
- Under normal mode, press "UP BUTTON" to switch between "12h" and "24h" display
ALARM & SNOOZE FUNCTION SETTING
- Under normal mode, press "MODE BUTTON" to enter alarm mode.
- Under alarm mode, press "SETTING BUTTON" to enter alarm setting, press "SETTING BUTTON" again for next setting, the sequence of setting is: HOUR – MINUTE – SNOOZE – MUSIC and then exit.
NOTE: There are 8-music tones to select. - Press "UP BUTTON" and "DOWN BUTTON" to adjust alarm time sequence.
- Under alarm mode, press "UP BUTTON" and "DOWN BUTTON" to turn ON/OFF alarm and snooze function. "MUSIC NOTE" icon will light up on the display to indicate alarm is set. "Zz" will appear on the display to indicate snooze is activated. Snooze can be set from 1 to 60 minutes.
- When alarm time reached, alarm will ring for 1-minute, then snooze and ring again. Press "SETTING BUTTON" to turn OFF alarm or touch "UP BUTTON" and "DOWN BUTTON" to activate snooze. NOTE: Snooze defaults to 60-minutes, if loss of power occurs.
TEMPERATURE SWITCH SETTING
- In normal mode, touch "DOWN BUTTON" to switch between ºF and ºC display.
CLOCK DISPLAY BRIGHTNESS
- Press the "DISPLAY KEY" located above the "SETTING BUTTON" and "MODE BUTTON" to change the clock display brightness level.
SAFETY WARNING: TO REDUCE THE RISK OF FIRE, ELECTRIC SHOCK, OR INJURY TO PERSONS
- Turn lamp off and WAIT UNTIL LAMP HEAD (F) IS COOL before handling.
- The LED panel (G) might get hot after several hours of continuous use DO NOT place your hands directly on LED light panel.
- Never use with an extension cord unless the plug can be fully inserted into the receptacles in the extension cord.
- Do not alter the plug.
- The lamp head included with this unit cannot be replaced by the consumer.
- INDOOR USE ONLY.
NOTE: The important safety instructions appearing in this instruction sheet are not meant to cover all possible conditions and situations that may occur. It must be understood that common sense, caution, and care must be used with any electrical product.
BATTERY REPLACEMENT
- This lamp uses a CR2032 battery. For battery replacement see diagram. Battery compartment (N) is located behind lamp body (E).
- To remove/install button cell battery: use a screwdriver to remove battery compartment door (O). Button cell battery is to be installed with the "+" or flat side facing upward.
BATTERY DISPOSAL: Battery disposal should be in compliance with local regulations pertaining to the disposal of hazardous materials. DO NOT INCINERATE.
SAFETY WARNING:
![]()
DO NOT INGEST BATTERY; CHEMICAL BURN HAZARD!- This lamp contains a coin/button cell battery. If the coin/button cell battery is swallowed, it can cause severe internal burns in just two hours and can lead to death.
- Keep new and used batteries away from children.
- If the battery compartment does not close securely, stop using the product and keep it away from children.
- If you think batteries might have been swallowed or placed inside any part of the body, seek immediate medical attention.
NOTE: Coin/button cell batteries are small, single cell devices having a diameter greater than their height.
IF THE EXTERNAL FLEXIBLE CABLE OR CORD OF THIS LUMINAIRE IS DAMAGED, IT SHALL BE EXCLUSIVELY REPLACED BY THE MANUFACTURER OR ITS SERVICE AGENT OR A SIMILAR QUALIFIED PERSON IN ORDER TO AVOID A HAZARD.
THE LIGHT SOURCE OF THIS LUMINAIRE IS NOT REPLACEABLE; WHEN THE LIGHT SOURCE REACHES ITS END OF LIFE THE WHOLE LUMINAIRE SHALL BE REPLACED.
Any change or modification to product not expressly recognized by OttLite Technologies voids OttLite's responsibility for proper function of product.
SPECIFICATION
POWER ADAPTER SPECIFICATION
Input: 100-240 V~, 50/60 Hz, 0.9 A
Output: 12V  2.5A with a Male DC Plug
Qi CHARGER SPECIFICATION
Output: 5V 1A
THIS LAMP CONTAINS a 5V, 2.1A USB output port (Q) located on the bottom rear of lamp. USB port can charge items such as tablets, cellular phones, etc.
The "Qi" symbol is a trademark of the Wireless Power Consortium. All phones with integrated wireless charging support "Qi".
FIRE AND ELECTRIC SHOCK HAZARD
- Do not expose the charger to liquid, moisture, humidity, or rain. Do not use the charger near a bathtub, sink, sauna, pool, or steam room. Exposing of the charger to moisture could result in electric shock.
- Do not drop, disassemble, open, crush, bend, deform, puncture, shred, microwave, incinerate, paint, or insert foreign objects into the charger. Such actions could result in electric shock.
- Clean the charger only with a dry cloth
- Do not expose the charger to extremely high or low temperatures
- Do not expose the charger to sources of excessive heat, such as sunlight, fire, etc. Do not place the charger near open fire sources, such as gas burners, candles, or fireplaces, and avoid contact with direct solar radiation. Do not place any candles or other open-flame sources on the device. Make sure that the charger has sufficient ventilation.
ACCESSORIES AND SOFTWARE INFORMATION
It is recommended that the following accessories should be used:
The product software version is 2250-V1.0. Software updates will be released by the manufacturer to fix bugs or enhance functions after the product has been released. All software versions released by the manufacturer have been verified and are still compliant with the related rules.
All RF parameters (for example, frequency range and output power are not accessible to the user, and cannot be changed by the user.
After evaluation, the product satisfied with RED Directive RF exposure required while used 20cm away from the human body.
EU REGULATORY CONFORMANCE
Frequency bands and power (a) Frequency bands 110-205KHz. (b) Maximum radio- frequency power transmitted in the frequency bands in which the radio equipment operates: The maximum power for all bands is less than the highest limit value specified in the related Harmonized Standard. The frequency bands and transmitting power (radiated and/or conducted) nominal limts applicable to this radio equipment are as follows: 6dBuA/m at 10m distance.
DECLARATION OF CONFORMITY
PRODUCT: B22FS Wireless Charging LED Lamp with Colour Changing Base
MANUFACTURER: OttLite Technologies, Inc.
1715 N. Westshore Blvd. Suite 950, Tampa, FL 33607. USA
Declares CE marking in accordance with the following EU directives and normative standards.
Hereby, OttLite Technologies Inc. declares that the equipment type B22FS is in compliance with Directive 2014/53/EU.
working range: 110-205KHz
Transmitting frequency: -22.4 dBuA/m at 10m distance
| DIRECTIVES: | STANDARDS: | |
| Low Voltage Directive 2014/35/EU | EN 60958-1:2015 +A1:2021 | Luminaires – Part 1: General requirements and tests |
| EN 60598-2-4:2018 | General Purpose Luminaire; Portable Requirements | |
| EN 62031:2008 +A1:2013+A2:2015 | LED modules for general lighting safety specifications | |
| EN 62493:2015 | Assessment of lighting equipment related to human exposure to electromagnetic fields | |
| EN 60950-1:2006 | Information technology equipment. Saftey. General requirements. | |
| EN 61347-2-11:2008 | Lamp Control Gear - Part 2-11: Particular requirements for miscellaneous electronic circuits used with luminaires | |
| EN 61347-1:2015 | General and safety requirements for lamp controlgear for use on D.C. supplies | |
| EN 61347-2-11: 2001 | General and safety requirements for miscellaneous electronic circuits used with luminaires | |
| EMC Directive 2014/30/EU | EN 55015:2020 | EMC for Luminaires |
| EN 61547:2009 | EMC Immunity | |
| EN 61000-3-2:2021 | Current Harmonics | |
| EN 61000-3-3:2019 | Voltage Fluctuations | |
| EN 62311:2008 | Exposure Restrictions for EMF (0Hz - 300 GHz) | |
| RED Directive 2014/53/EU | Saftey and Health (Article 3.1a) | EN 62311: 2020 |
| EN 60598-1: 2015 + A1:2018 | ||
| EN 60598-2-4: 2018 | ||
| EN 62368-1:2014+A11:2017 | ||
| EMC (Article 3.1b) | EN IEC 55015:2019/A11:2020 | |
| EN 61547: 2009 | ||
| EN 61000-3-2: 2014 | ||
| EN 61000-3-3: 2013 | ||
| ETSI EN 301 489-1 V2.2.3 (2019-11) | ||
| ETSI EN 301 489-3 V2.1.1 (2019-03) | ||
| Radio (Article 3.2) | ETSI EN 303 417 V1.1.1 (2017-09) | |
Tampa, May 2021 | K. Albinus | Quality Assurance

Documents / Resources
References
Download manual
Here you can download full pdf version of manual, it may contain additional safety instructions, warranty information, FCC rules, etc.
Download OttLite B22FS - Wireless Charging LED Lamp. Colour Changing Base Manual
Advertisement


Need help?
Do you have a question about the B22FS and is the answer not in the manual?
Questions and answers