Advertisement
Description
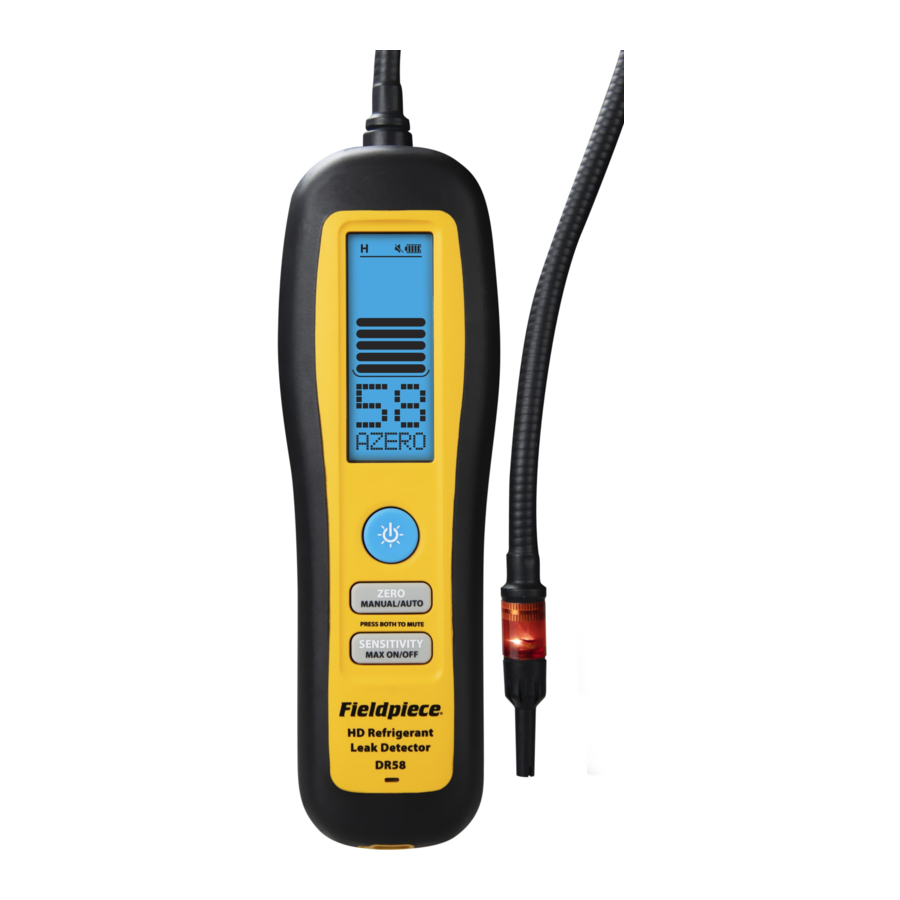
Compact and rugged, the DR58 Heated Diode Refrigerant Leak Detector helps you find leaks fast in the field. Its heated diode sensor detects all HFC, HCFC, CFC, HFO, H2N2 (tracer gas), and blends.
Multiple indicators and sensitivity 20x higher than soap bubbles make it easy to track down even the smallest leaks in various environments. A red LED flashes at the tip so you can keep your eyes on the target. The large bars on the backlit LCD are easy to see in bright sunlight or low light, and the numerical value provides an extra digit of resolution.
Unlike conventional leak detectors, you have full control with both an automatic (AZERO) and manual (MZERO) zero mode.
The large Li-ion rechargable battery provides over 18 hours of continuous operation and is convenient to charge via USB-C. Replaceable tips filter out water and dust while getting into tight spots. All wrapped up in a ruggedized IP54 housing, it's built for the field.
What's Included
DR58 Heated Diode Refrigerant Leak Detector
Heated Diode Sensor (RHD1)
Blow Molded Carrying Case (ABM2)
AC Charger and USB-C Cable (RCA3)
5 x Filter Tips and Gaskets (RFT6)
Operator's Manual
1 Year Limited Warranty
Specifications
Sensor Type: Heated diode
Sensor Life: 300 hours typical
Sensitivity Levels: High, medium, low (selectable)
Maximum Sensitivity: 0.03 oz/yr (1g/a), stationary; 0.1 oz/yr (3g/a), in motion
Detection Feedback: Red tip LED, LCD bar graph, LCD digits, beeper
Refrigerants: HFC, HCFC, CFC, HFOs, H2N2(tracer gas), and blends
Response Time: <1 seconds typical
Recovery Time: <10 seconds typical
Battery Type: 3.7 VDC (nominal) 2550mAh, non-replaceable
Charge Time: 6 hours typical with included charger.
Battery Life: 18 hours typical, backlight off
Auto Power Off: 10 minutes without detection or button press
Operating Environment: 32°F to 104°F (0°C to 40°C); < 75% RH (non-condensing)
Storage Temperature: -4°F to 140°F (-20°C to 60°C); < 80% RH
Weight: 14 oz (400g)
Water Resistance: Designed to IP54
US Patent: www.fieldpiece.com/patents
WARNINGS

Inhalation of high concentrations of refrigerant vapor can block oxygen to the brain causing injury or death.
Do not use this device in a combustible gas atmosphere or with A3 refrigerants such as R-290, propane or R-600, isobutane.
Do not block exhaust port or device or will not function properly.
Quick Start
- Install sensor (see next panel for details).
- Move to a refrigerant-free environment and hold
![]() until your DR58 powers on.
until your DR58 powers on. - Allow warm-up (calibration) to complete.
Total used sensor hours is also displayed. - Begin searching for the leak source.
Move the tip slowly (~3 inches/sec) and as closely as possible to the suspected refrigerant line. - Search until refrigerant gas is detected.
Red light flashes, audible alarm triggers, and the display indicates the relative gas concentration. - Confirm leak source.
Move tip away from alarm location for a few seconds to clear the sensor. Return tip back to suspected leak, looking for the highest value.
Sensor Installation
- Ensure your DR58 is powered off.
- Remove the 3 screws of the sensor cap.
- Pull the sensor cap away from the back case.
- If replacing, pull out the old sensor.
- Push new sensor (RHD1) into pin holes. Pin orientation does not matter.
- Push sensor cap back onto back case and secure with the 3 screws.
- If replacing, hold
![]() and SENSITIVITY 5 sec to reset sensor hours. Hold ZERO to confirm or
and SENSITIVITY 5 sec to reset sensor hours. Hold ZERO to confirm or ![]() to cancel.
to cancel.


Maintenance
CLEANING: Clean the exterior with a damp cloth. Do not use detergents or solvents.
BATTERY CHARGING: Recharge the internal battery as needed using the USB-C cable. In addition to the AC plug, most generic USB ports supply enough power to charge. The long life Li-ion rechargable battery is permanently installed. To maximize battery life, minimize time spent at 100% full or 0% full.
SENSOR REPLACEMENT: Depending on gas exposure, the RHD1 sensor should be replaced after approximately 300 hours of use.
FILTER REPLACEMENT: The hydrophobic filter is built into the replaceable tip and should be replaced periodically to maximize sensor life and performance. Five filtered tips (RFT6) are included. Unscrew the tip to remove.

Functionality Test
Use a refrigerant tank and a cap to check if your DR58 is detecting refrigerant properly.
- Tightly cap a refrigerant tank port to seal it.

- Open valve to coat the inside of the cap, then close the valve.

- With DR58 set to high sensitivity (H), remove the cap and wave the tip over the cap. You should see a very large leak size of approximately "99" and a full bar graph. If not, the filtered tip or sensor may need to be replaced.


Operation

Power
Press  >1 second to toggle power.
Backlight
Press to toggle the blue backlight.
Zero Modes (AZERO/MZERO)
DR58 starts up in automatic zero mode (AZERO) which sets a new zero point every two seconds, indicated by AZERO blinking twice.
Moving closer to the leak source will show the relative increase in concentration, triggering the alarm. Conversely, stopping at or moving away from the leak source will not trigger a response.
Press MANUAL/AUTO >1 second to toggle manual zero mode (MZERO). DR58 does not zero automatically while MZERO is displayed and will continue to alarm and display the relative leak size.
Zero Set
Press ZERO to manually set the currently measured concentration to 0, indicated by AZERO/MZERO blinking twice.
Numerical Leak Size Indicator with Bar Graph
The number is the relative concentration of refrigerant gas (0-99 units). The bar graph shows the same measurement in steps of 10 units for easy monitoring. The higher the number, the higher the concentration of gas being measured and the closer you are to the exact leak location.
Maximum Mode
Press MAX ON/OFF >1 second to toggle max mode. When max mode is on, the highest leak size detected is continually recorded.
The recorded max is cleared when the sensitivity is changed or if manually zeroed.
Sensitivity (H/M/L)
DR58 starts up in high sensitivity (H) which is recommended for most situations. When leaks are difficult to pinpoint due to excess triggering or sensor saturation, press SENSITIVITY to cycle to a lower sensitivity (Medium/Low).
Mute (  )
)
Press ZERO and SENSITIVITY simultaneously to toggle the speaker.
Red Leak Indicator LED
In most situations, the red LED at the tip is easier to monitor than the display. Because the blink rate increases as the relative concentration increases, many leaks can be found without ever viewing the display.

Limited Warranty
This leak detector is warranted against defects in material and workmanship for one year from date of purchase from an authorized Fieldpiece dealer. Fieldpiece will replace or repair the defective unit, at its option, subject to verification of the defect.
This warranty does not apply to defects resulting from abuse, neglect, accident, unauthorized repair, alteration, or unreasonable use of the instrument.
Any implied warranties arising from the sale of a Fieldpiece product, including but not limited to implied warranties of merchantability and fitness for a particular purpose, are limited to the above. Fieldpiece shall not be liable for loss of use of the instrument or other incidental or consequential damages, expenses, or economic loss, or for any claim of such damage, expenses, or economic loss.
State laws vary. The above limitations or exclusions may not apply to you.
Obtaining Service
For international customers, warranty for products purchased outside of the U.S. should be handled through local distributors. Visit our website to find your local distributor.
Safety First
For use only by qualified and certified technicians in the safe use, handling, and transporting of refrigerants. Please refer to flammable refrigerant safety guides, regional codes and legislation for more information.
failure to heed these hazards and actions can result in serious injury or death
- Always use a grounded outlet
- Always wear Proper Protective Equipment (PPE), which includes gloves and safety glasses
- Know proper safety and handling requirements of the refrigerant in the Safety Data Sheet (SDS)
- Avoid breathing refrigerant and oil vapors
- Handle hoses and equipment carefully as refrigerant is under high pressure and can cause frost bite
- Do not operate in or near explosive atmospheres
- Perform leak detection in accordance with recommended practice to verify working environment is free from leaking refrigerant as it can be toxic and or flammable
- Only work in well-ventilated areas (minimum of 4 air exchanges per hour)
- Ensure power and extension cords are in good working condition to prevent shock and spark hazards
Additional safety instructions for recovering A2L refrigerants (e.g. R-32, R-1234yf, R-1234ze):
- Adhere to local occupational safety codes and possess detailed knowledge and skills when handling mildly flammable refrigerants
- Have emergency, evacuation, and fire protection plans
- Designate and monitor a Temporary Flammable Zone with a 3-meter perimeter
- Identify and disable all possible ignition sources within this Zone
- Monitor air with a flammable refrigerant leak detector within this Zone
- Use a ventilation fan to maintain 5 air exchanges per hour within this Zone
- Make power connection of the recovery machine and other equipment outside of the Temporary Hazard Zone
- Bond the recovery machine outlet port to the recovery tank's unpainted fitting with a grounding strap to dissipate static electricity buildup during recovery process
- Ensure area around machine is free of debris that could enter air vents and fan and cause accidental sparking
- Always remain in attendance and observant when the machine is running
- Do not mix flammable refrigerants with air
- Use an evacuated DOT recovery tank
- If system has a suspected leak, stop recovery at 0 psig/bar to prevent air from entering the recovery tank
- After recovery, purge system with 100% nitrogen before opening system for repair

failure to heed these conditions can cause equipment damage.
- Ensure that recovery machine, hoses, tank and other equipment are in good working condition
- Avoid overfilling recovery tanks by following refrigerant manufacturer's filling instructions and using a weight scale
- Avoid cross contamination by not mixing refrigerants
Certifications and Compliance

EN 14624

Restriction of Hazardous Substances Compliant

UK Conformity Assessed

Regulatory Compliance Mark

Waste Electrical and Electronic Equipment

Documents / Resources
References
Download manual
Here you can download full pdf version of manual, it may contain additional safety instructions, warranty information, FCC rules, etc.
Download Fieldpiece DR58 - Heated Diode Refrigerant Leak Detector Manual
Advertisement


Need help?
Do you have a question about the DR58 and is the answer not in the manual?
Questions and answers