Advertisement
IMPORTANT SAFEGUARDS
The Elite Brand takes consumer safety very seriously. Products are designed and manufactured with our valued consumers' safety in mind. Additionally, we ask that you exercise a level of caution when using any electrical appliance by following all instructions and important safeguards.
READ ALL INSTRUCTIONS BEFORE USE AND SAVE FOR FUTURE REFERENCE

When using electrical appliances, basic safety precautions should always be followed as below:
- Do not touch hot surfaces. Use handles or knobs.
- To protect against electrical shock, do not place any part of the toaster in water or other liquid.
- Clean all parts before first use. See instructions for cleaning.
- Close supervision is necessary when any appliance is used by or near children.
- Always unplug from outlet when not in use and before cleaning. Allow all parts to cool down completely before disassembling the appliance and before cleaning.
- Do not operate any appliance with a damaged cord or plug or after the appliance malfunctions or has been damaged in any manner. Return the appliance to the nearest authorized service facility for examination, repair or adjustment.
- The use of accessory attachments not recommended by the manufacturer may cause injury.
- Do not use outdoors.
- Do not let cord hang over the edge of the table or countertop or touch hot surfaces.
- Do not place toaster on or near a hot gas or electric burner or in a heated oven.
- Do not use this toaster for other than its intended use.
- Oversize foods, metal foil packages or utensils must not be inserted into the toaster, as they may involve a risk of fire or electric shock.
- A fire may occur if the toaster is covered or touched with flammable materials, such as curtains, draperies or walls when in operation. Do not operate under wall cabinets.
- Do not attempt to dislodge food when the toaster is plugged into electrical outlet.
- To avoid possibility of fire, do not leave toaster unattended during use.
- Do not place paper, cardboard, plastic and the like in the toaster.
- Always attach plug to appliance first, then plug cord into the wall outlet. To disconnect, turn all controls OFF before removing the plug from the electrical outlet.
- Do not attempt to move the product while it is in operation.
- Some countertop and table surfaces, such as Corian®, wood and/or laminates, are not designed to withstand prolonged heat generated by certain appliances. It is recommended by countertop manufacturers that a hot pad or trivet be placed under your appliance to prevent possible damage to the surface.
- Never leave the toaster unattended. Especially when toasting 1-2-slices or smaller, less dense pieces of bread. They tend to toast faster than larger, more dense breads and may burn and forcefully eject when very hot.
SHORT CORD PURPOSE
 Note: A short power cord is provided to reduce the risk of personal injury resulting from becoming entangled in or tripping over a long cord.
Longer power-supply cords or extension cords may be used if care is exercised in their use.
If an extension cord is used:
- the marked electrical rating of the extension cord should be at least as great as the electrical rating of the product;
- the extension cord should be arranged so that it will not drape over the counter top or tabletop where it can unintentionally be pulled on or tripped over by children or pets.
POLARIZED PLUG
If this appliance is equipped with a polarized plug (one blade is wider than the other), please follow the below instructions:
To reduce the risk of electrical shock, this plug is intended to fit into a polarized outlet only one way. If you are unable to fit the plug into the electrical outlet, try reversing the plug.
If the plug still does not fit, contact a qualified electrician. Never use the plug with an extension cord unless the plug can be fully inserted into the extension cord. Do not alter the plug of the product or any extension cord being used with this product. Do not attempt to defeat the safety purpose of the polarized plug.
SAVE THESE INSTRUCTIONS.
THIS PRODUCT IS FOR HOUSEHOLD USE ONLY.
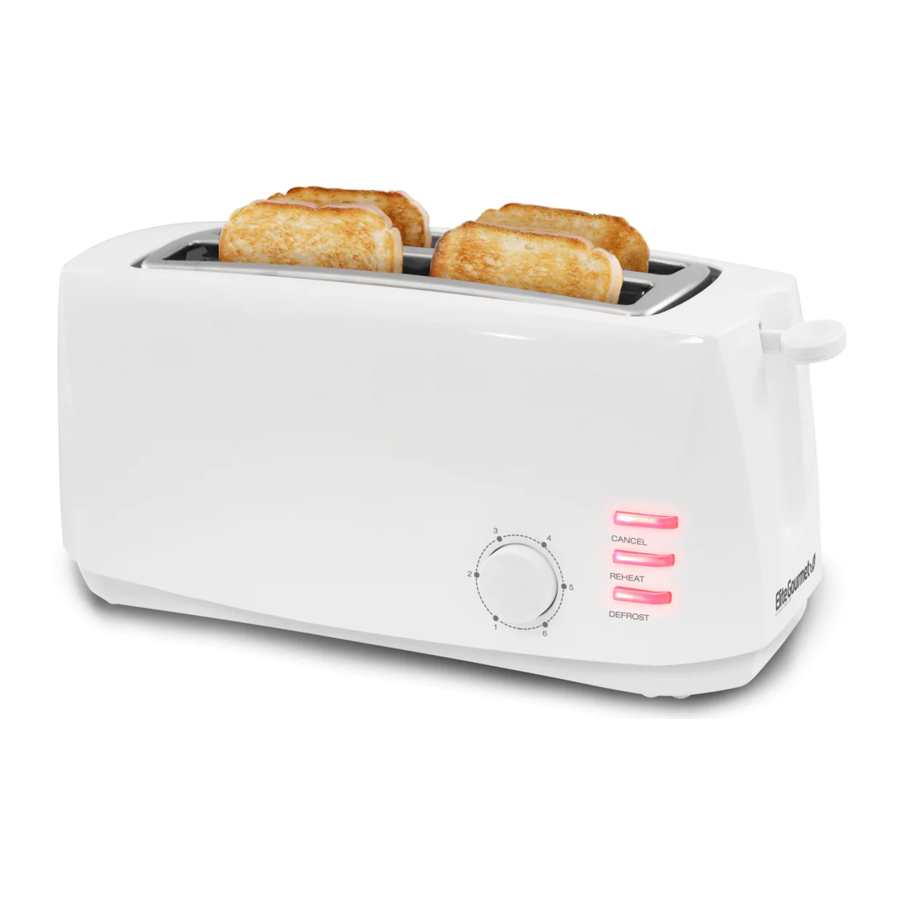
PARTS IDENTIFICATION

- DUAL LONG TOAST SLOTS: Long toast slots to give you versatility by accommodating a wide variety of breads.
- POP-UP LEVER: Makes it easier to remove even the smallest items. Initiates the toasting process when pushed down and locked in position.
- BROWNING CONTROL: Features six browning levels for toasting.
- DEFROST BUTTON: Defrosts and toasts frozen bread. (LED will light up red when selected.)
- REHEAT BUTTON: Reheats without browning or toasting. (LED will light up red when selected.)
- CANCEL BUTTON: Stops the toasting process.
![warning]() *NOTE: the cancel button LED will light up once the pop-up lever is pushed down and will remain lit until the toasting cycle is finished.
*NOTE: the cancel button LED will light up once the pop-up lever is pushed down and will remain lit until the toasting cycle is finished. - SLIDE-OUT CRUMB TRAY: Easy to clean removable tray located on the bottom of the side opposite to all of the toasting controls.
BEFORE FIRST USE
- Carefully unpack the product and remove all packaging materials. Clean the toaster before using for the first time. Wipe the toaster's exterior with a clean, damp cloth. Remove and clean the crumb tray.
- DRY ALL PARTS THOROUGHLY BEFORE OPERATING THE TOASTER. (See "CLEANING AND MAINTENANCE" section for more instructions.)
- Do not use any abrasive detergents, soaps, or cleaning materials to clean the toaster.
- NEVER immerse the toaster or power cord in water or any other liquid.
- During the first few minutes of initial use you may notice smoke and/or a slight odor. This is normal and should disappear with subsequent use.
NOTE: The "CANCEL/EJECT" button can be used at any point of the toasting cycle to interrupt the toasting process.
HOW TO USE
Ensure that the crumb tray is always in place before using the toaster. Do not force foods into the toaster, foods should easily and freely fit into the toast slots. Always be sure not to place multiple slices in one toast slot; and, that the carriage inside the toast slot is up, before placing any food items inside.
BROWNING CONTROL GUIDE
| SETTING | TOAST SHADE |
| 1-2 | LIGHT |
| 3-4 | MEDIUM |
| 5-6 | DARK |
TOASTING
- Insert the items into the toast slots.
- Select your desired toast shade by setting the browning control.
- Push down the Pop-up Lever, locking it into position.
- When finished, the items will pop up from the toaster.
- Unplug the toaster when done.

- Do not place buttered breads, breads or items with excess sugar, or pastries with fillings or frostings, torn slices of bread or small sized breads, baguettes or breadsticks in this toaster; doing so may create a fire hazard.
- Never leave the toaster unattended. Especially when toasting 1-2-slices or smaller, less dense pieces of bread. They tend to toast faster than larger, more dense breads and may burn and forcefully eject when very hot.
- You may need to adjust the Browning Control Knob to a lighter shade when toasting 1-2-slices or smaller, less dense pieces of bread. They tend to toast faster than larger, more dense breads and may burn and be ejected when very hot.
DEFROST SETTING
Uses a slightly longer toasting cycle to prepare your favorite frozen pastries.
- Insert the frozen items into the toast slots.
- Set the browning control:
| SETTING | FOOD |
| 1-2 | Thinner frozen items: i.e. frozen waffles. |
| 3-5 | Frozen waffles, bagels, or French toast. |
| 6-7 | Thicker frozen items: i.e. bagels, thick or hand-cut bread |
- Push down the pop-up lever, locking it into position.
- Press the "DEFROST" button. The indicator will light up.
- When finished, the items will pop up from the toaster.
- Unplug the toaster when done.
REHEAT SETTING
Reheat bread, waffles, bagels, etc. without toasting the items.
- Insert items into the toasting slots.
- Select your desired toast shade by setting the browning control.
- Push down the Pop up Lever, locking it into position.
- Press the "REHEAT" button. The indicator will light up.
- When finished, the items will pop up from the toaster.
- Unplug the toaster when done.
TIPS
- Differences in toasting times depend on the moisture level of each item being toasted.
- Extra thick bread may require two cycles.
- When toasting items with pieces of fruit (i.e. cinnamon raisin bagels), remove any loose pieces of fruit so that they don't fall into and get stuck inside of the toaster.
Do not place buttered breads, breads or items with a lot of sugar, or pastries with fillings or frostings in this toaster; doing so may create a fire hazard.
CLEANING & MAINTENANCE
- Be sure the toaster is unplugged from the electrical outlet and that it has completely cooled before cleaning.
- Wipe the toaster exterior with a clean, damp, soapy cloth. Do not use abrasive cleansers or cleaning materials.
- DRY THOROUGHLY BEFORE REASSEMBLING FOR USE OR FOR STORAGE.
NOTE: Toaster must be completely cool and not in operation or plugged into an electrical outlet before cleaning or removing the crumb tray.
TO CLEAN/REMOVE THE CRUMB TRAY
- Hold the toaster in the upright position; pull the crumb tray out from the side opposite of the toasting controls by sliding it out and away from the toaster bottom (Fig 1).

- Empty the crumbs over a garbage can or sink as crumbs will fall upon release of the tray.
- To replace crumb tray, slide back into toaster. A click will sound when the tray has locked into place properly.
- It is recommended to clean the crumb tray regularly.

TO REMOVE LODGED TOAST
If a piece of toast becomes lodged in the toaster, unplug the toaster and allow it to cool. Turn the toaster upside down, and shake whatever is stuck loose.
- Never immerse the toaster or plug in water or any other liquid.
- Never use a fork or sharp-edged utensil to remove toast or try to remove anything that is stuck inside the toaster while it is in operation or plugged in. Doing so may damage the heating element and cause severe personal injury.
Questions?
Elite's customer service team is ready to help. For more Elite products, visit us at shopelitegourmet.com.

Documents / Resources
References

Download manual
Here you can download full pdf version of manual, it may contain additional safety instructions, warranty information, FCC rules, etc.
Download Elite Gourmet ECT-4829 - 4 Slice Cool-Touch Long Slot Toaster Manual
Advertisement


Need help?
Do you have a question about the ECT-4829 and is the answer not in the manual?
Questions and answers