Breville VDF108, VDF109 - Easy Clean Digital Fryer Manual
- User manual (21 pages)
Advertisement
product safety
READ CAREFULLY AND KEEP FOR FUTURE REFERENCE
This appliance can be used by children aged from 8 years and above and persons with reduced physical, sensory or mental capabilities or lack of experience and knowledge if they have been given supervision or instruction concerning use of the appliance in a safe way and understand the hazards involved. Children shall not play with the appliance. Children and user maintenance must not be done by children without supervision.
Keep the product and its cord out of reach of children aged less than 8 years.
This product must be positioned on a stable surface with the handles positioned to avoid the spillage of hot liquids.
Surfaces of the product are liable to get hot during use.
Never operate the product by means of an external timer or separate remote-control system.
If the supply cord is damaged, it must be replaced by the manufacturer, its service agent or similarly qualified persons in order to avoid a hazard.
 Never use this appliance for anything other than its intended use. This appliance is for household use only. Do not use this appliance outdoors.
Always ensure that hands are dry before handling the plug or switching on the appliance.
Always use the appliance on a stable, secure, dry and level surface.
Ensure the appliance is switched off and unplugged from the supply socket if it is left unattended, when it is not in use or before cleaning. Never leave the appliance unattended when it is in use.
Always allow the appliance to fully cool down before cleaning or storing.
Do not use the appliance if it has been dropped, if there are any visible signs of damage or if it is leaking.
Never immerse any part of the appliance or power cord and plug in water or any other liquid.
Never let the power cord hang over the edge of a work top, touch hot surfaces or become knotted, trapped or pinched.
Do not touch the external surfaces of the appliance during use as they may become very hot.
Only use spares or accessories that are recommended by the manufacturer.
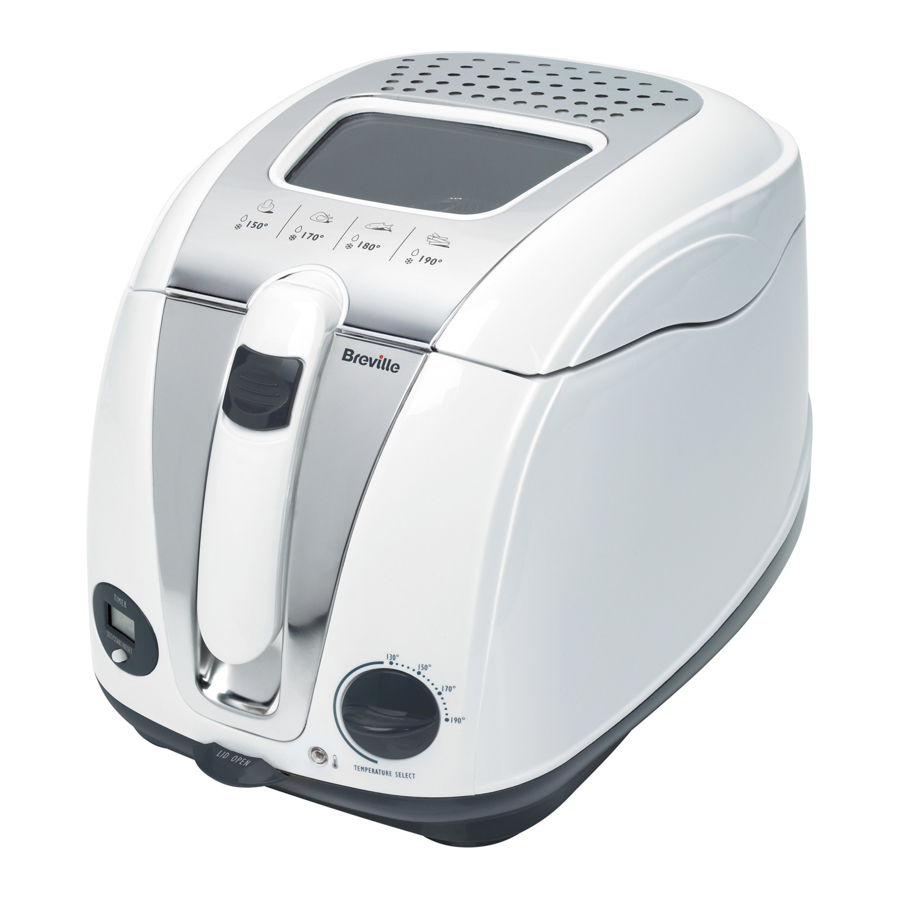
features

- Lid release button
- Timer button
- Timer display
- Basket handle lock button
- Basket
- Removable lid
- Viewing window
- Non-stick removable bowl
- Body
- Temperature control
Due to our policy of continuous improvement, the actual product may differ slightly from the one illustrated in these instructions.
before first use
Unpacking
- Carefully remove your fryer from its packaging. Keep the packaging until you are happy that the fryer is working properly. Retain this instruction booklet for reference in the future.
- Check that there is no packaging under the lid.
Clean your device
Make sure that your fryer is switched off and unplugged from the mains supply socket before cleaning it. Never immerse your fryer or its mains plug in water or any other liquid. Never use harsh abrasives, chemicals or oven cleaners.
- Wipe over the main body of your fryer with a damp almost dry cloth. Dry with a soft clean cloth.
- Remove and wash the basket and bowl in warm soapy water. Rinse and dry thoroughly.
Positioning your device for use
- Position your fryer on a dry, flat, secure, heat resistant surface.
![burn hazard]() Do not position it underneath anything such as a shelf or cupboard, and place away from curtains wall coverings, or other flammable materials and never cover. Apart from the possible risk of fire, the steam given off by the cooking process may mark or damage anything above the fryer.
Do not position it underneath anything such as a shelf or cupboard, and place away from curtains wall coverings, or other flammable materials and never cover. Apart from the possible risk of fire, the steam given off by the cooking process may mark or damage anything above the fryer.- Leave a clear space of at least 50mm (2") all around your fryer and keep it as far back from the edge of the work surface as possible.
- Do not put your fryer or its mains lead close to any other cooking or heating appliance because external heat could damage it.
- Place your fryer close to a wall socket. Ensure that the mains lead does not overhang the work surface or is positioned where it might be accidentally caught.
 Do not position it underneath anything such as a shelf or cupboard, and place away from curtains wall coverings, or other flammable materials and never cover. Apart from the possible risk of fire, the steam given off by the cooking process may mark or damage anything above the fryer.
preparing your unit
Filling your fryer with oil
Make sure that your fryer is switched off and unplugged from the mains supply socket before filling it with oil. Never fill your fryer above the MAX indicator mark on the fryer bowl, or below the MIN indicator mark. Over or under filling your fryer could cause damage or injury.
- We recommend that you use good quality oil in your fryer.
- Save the empty oil bottle to use when you remove the old oil from your fryer.
- Always use sunflower, vegetable, groundnut, rapeseed or corn oil. Never use hard fats, olive oil or oil with a high water content. Do not use butter or margarine.
- If you are using oil that has been previously used, check the condition of the oil and replace as necessary. Oil needs to be replaced after 8-10 uses or as required. Do not mix different types of oil together.
- With the basket removed from the fryer, add oil to the fryer bowl. Ensure that you do not add less than the minimum capacity or exceed the maximum capacity.
using your device
Always use your fryer on a stable, secure, dry and level surface.
Allow adequate space above and on all sides for air circulation.
Do not allow the appliance to touch any flammable material during use (such as curtains or wall coverings).
Care is required when using the appliance on surfaces that may be damaged by heat. The use of an insulated pad is recommended.
Using the timer
The timer serves as a cooking time reminder only and does not switch on or switch off your fryer. Always use the temperature control to control the operation of your fryer. When your fryer is not in use, set the temperature control fully anticlockwise and unplug your fryer from the mains supply socket.
- Press the timer button once to switch the timer on '00' will appear in the display.
- To set the timer, repeatedly press the timer button until the required cooking time (in minutes) appears on the display. For example: to set the timer for 5 minutes, press the timer button 5 times ('05' will be displayed). Press and hold the timer button to advance the timer more rapidly.
- After a few seconds, the timer will flash and then begin to count down in minutes. When the timer reaches 1 minute, it will count down in seconds.
- When the time has elapsed the timer will beep continuously. Press the timer button to clear the alarm. The timer will switch off automatically after 30 seconds of inactivity.
- To clear or reset the timer, press and hold the timer button until 00 is shown.
Preparation
- Make sure the fryer is switched off and unplugged from the mains supply socket.
- Turn the temperature control fully anticlockwise.
- Press the lid release button to open the lid. Check that you have an appropriate quantity of oil in the fryer bowl.
- As previously described, install the basket inside the fryer and lower into the cold oil. Close the lid.
Switching on and preheating
- Plug in and switch on the fryer from the mains supply.
- To set the temperature, rotate the temperature dial until the pointer aligns with the required temperature. The temperature indicator will illuminate red. The maximum temperature is 190°C.The fryer will automatically control the oil temperature to prevent overheating.
- When the temperature indicator turns green the fryer has preheated to the correct temperature and is ready to use. Only start cooking when the oil in the fryer is at the correct temperature.
Cooking
- From the bottom, lift the basket handle up to the horizontal position. You will feel the basket handle lock into position when it is fully raised.
- Stand back from the fryer as there may be a build up of steam, and press the lid release button to open the lid.
- Taking care, add the desired quantity of food to the basket. Do not add too much food at one time.
- Close the lid then release the basket lock and fold the handle downwards to lower the basket into the hot oil.
- If desired, set the timer to the required cooking time. Alternatively, the fryer can be used without the timer.
- Cook food thoroughly - the outside of the food may look cooked before the inside is completely cooked. Always follow cooking timings and guidelines on packet foods or recipes.
- When the food is cooked, lift the basket handle to the horizontal position until it is locked. Allow any excess oil to drain away.
- Stand back from the fryer, as there may be a build up of steam, and press the lid release button to open the lid.
- Remove the basket from the fryer and serve the food. Always soak up excess oil with kitchen paper. Replace the basket in the fryer. Always use the basket handle to hold or carry the basket. The basket itself will be very hot during and after cooking.
After use
Never move the fryer until it has fully cooled.
- When you have finished cooking, turn the temperature control fully anticlockwise.
- Switch off and unplug the fryer from the mains supply.
- Allow the fryer to cool down (this can take 2-3 hours).
how to remove oil from your device
Before removing oil from your fryer ALWAYS turn the temperature control fully anticlockwise, unplug your fryer from the mains supply socket and allow the oil to cool completely.
- You will need a slotted spoon, a suitable tray or large plate, kitchen paper, a funnel or jug with a pouring lip, muslin (if reusing the oil), and the original oil bottle you saved earlier. If you've thrown it away, any suitable sized bottle with a lid will do.
- Using a slotted spoon, skim off any food scraps floating on the surface of the oil.
- Remove the basket from your fryer and place it on kitchen paper to drain.
- Lift the bowl out of the fryer body. Pour the oil from the bowl slowly into the bottle through the funnel. Alternatively, pour the oil into a jug with a pouring lip and use this to transfer the oil into the bottle.
- When all the oil has been poured into the bottle, remove the funnel (discard the muslin, if used), and replace the bottle cap. The oil can now either be stored for reuse, or discarded safely and cleanly.
- You can now clean your fryer.
Always dispose of the oil in an environmentally safe way. Never pour the oil into drains. Contact your recycling centre for advice on the disposal of the oil.
frying guidelines
Oil
Oils recommended for use in the fryer include:
- Sunflower
- Vegetable
- Groundnut
- Rape seed
- Corn
Oils and fats not recommended:
- Hard fats
- Olive oil (any type)
Oil quantity:
Always use the recommended (MAX) quantity of oil when deep frying. Never exceed this amount, and never use the fryer without any oil in it. Always fill above the MIN mark with oil before using the fryer.
Utensils
Select your cooking utensils carefully. Do not use utensils which may melt (e.g. plastic). Take care when using metal utensils as not to damage the heating element. Also metal handles might get hot. Use oven gloves, or buy utensils with insulated handles.
Suitable utensils include metal or heat resistant plastic, slotted spoons, slotted fish slices, or tongs.
Not suitable: wooden or plastic non-heat resistant utensils, knives or other sharp implements.
Cooking guidelines
The following table is a guide to the temperature and cooking times for various foods. Experiment to find the cooking temperature and times that produce the results most suited to your taste.
Always make sure that meat and fish are thouroughly cooked before eating.
| Food Type | Temperature (ºC) | Time (minutes) |
| Breaded fillet of fish | 170 | 5 - 6 |
| Scampi | 170 | 3 - 5 |
| Chicken breast | 175 | 3 - 4 |
| Breaded chicken pieces | 170 | 12 - 15 |
| Onion rings | 180 | 3 |
| Breaded mushrooms | 180 | 2 - 3 |
| Broccoli fritters | 185 | 2 - 3 |
| Courgette fritters | 185 | 2 - 3 |
| Celery in batter | 180 - 190 | 2 - 3 |
| Frozen chips | Refer to the manufacturer's guidelines | |
- For even frying, cut food items such as chips to the same size and choose similar sized pieces of fish and chicken.
- Always make sure that the food you are frying is as dry as possible (battered foods are the exception) to avoid spitting and overflowing. Take care.
- It is important to take into account the food to be cooked and the temperature it requires. Use the cooking guidelines table, manufacturer's cooking instructions and your own expertise to guide you.
- Don't overload the fryer basket. Doing so will cause the oil temperature to drop, causing your food to become greasy rather than crispy.
Also, food in an over full basket will not cook evenly as the oil may not reach all of the items. Cook large quantities in batches. - Make sure that you check that food has cooked through to the centre. If your oil temperature is too hot, the outside may brown quickly while the food inside is still uncooked.
To check food has heated through, use this quick test:
Take a knife or metal skewer and push it into the centre of the food. Hold it there for a few seconds then remove it. If the skewer or knife is hot to the touch, the food is hot in the middle.
Alternatively use a food thermometer. Chicken is cooked when the juices run clear and the meat is no longer pink in the centre.
care and cleaning
Always make sure that the fryer has completely cooled down before cleaning it. This can take 2-3 hours.
Make sure that your fryer is switched off and unplugged from the mains supply socket. Never immerse your fryer or its mains plug in water or any other liquid.
Never use harsh abrasives, chemicals or oven cleaners
Cleaning the cooking basket
- Remove the basket and let the excess oil drain off.
- Wash the basket in warm soapy water and dry thoroughly.
Cleaning the main body
Using a mild detergent solution, wipe the exterior of the main body with a damp cloth. Dry thoroughly.
Cleaning the fryer bowl
- Remove the bowl from the fryer body and pour away any oil as described earlier.
- Soak up any remaining oil and wipe dry with kitchen paper. Stubborn stains or residues may be removed with a little washing-up liquid applied with a soft cloth. Remove all traces of the washing-up liquid with a soft damp cloth, then dry the bowl thoroughly with kitchen paper.
- The bowl may also be washed in a dishwasher.
Cleaning the lid
The lid is removable for easy cleaning. Open the lid and pull it upwards away from the fryer body. Clean the lid with warm soapy water. Dry the lid thoroughly.

Filtering and disposing of the cooking oil
- The oil should be filtered regularly and replaced after 8-10 uses.
- Filter the cooled oil through a fine sieve (e.g. a coffee filter or cotton material) then store in an airtight container. If you retain your original oil bottle this can then be used to dispose of the old oil.
- Because oil absorbs food flavours, it's a good idea to label the container with the type of food the oil was used to cook in. For example, you wouldn't want to deep fry a dessert in oil previously used for cooking fish.
- When replacing oil, never mix different oil types.
connection to the mains supply
This appliance must be earthed.
This appliance is fitted with either a moulded or rewirable BS1363, 13 amp plug. The fuse should be rated at 13 amps and be ASTA approved to BS1362.
If the fuse in a moulded plug needs to be changed, the fuse cover must be refitted. The appliance must not be used without the fuse cover fitted.
If the plug is unsuitable, it should be dismantled and removed from the supply cord and an appropriate plug fitted as detailed below. If you remove the plug it must not be connected to a 13 amp socket and the plug must be disposed of immediately.
The wires of the mains lead are coloured in accordance with the following code:
GREEN/YELLOW = EARTH
BLUE = NEUTRAL
BROWN = LIVE
The wire which is coloured GREEN/YELLOW must be connected to the terminal in your plug which is marked with an E or by the earth symbol ( ![]() ) or coloured GREEN or GREEN /YELLOW.
) or coloured GREEN or GREEN /YELLOW.
The wire which is coloured BLUE must be connected to the terminal in your plug which is marked with the letter N or coloured BLACK.
The wire which is coloured BROWN must be connected to the terminal in your plug which is marked with the letter L or coloured RED.
If any other plug is used, a 13 amp fuse must be fitted either in the plug or adaptor or at the distributor board.
Plug should be BS1363 approved Fit a 13 Amp Fuse

Ensure that the outer sheath of the cable is firmly held by the clamp
after sales service
These appliances are built to the very highest of standards. There are no user serviceable parts. Follow these steps if the unit fails to operate:
- Check the instructions have been followed correctly.
- Check that the fuse has not blown.
- Check that the mains supply is functional.
If the appliance will still not operate, return the appliance to the place it was purchased for a replacement. To return the appliance to the Customer Service Department, follow the steps below:
- Pack it carefully (preferably in the original carton). Ensure the unit is clean.
- Enclose your name and address and quote the model number on all correspondence.
- Give the reason why you are returning it.
- If within the guarantee period, state when and where it was purchased and include proof of purchase (e.g. till receipt).
- Send it to our Customer Service Department at the address below:
Customer Service Department
Jarden Consumer Solutions (Europe) Limited
Middleton Road
Royton
Oldham
OL2 5LN, UK.
Telephone: 0161 621 6900 Fax: 0161 626 0391
e-mail: enquiriesEurope@jardencs.com
Turn on your Creativity
Let the Breville team help you turn on your creativity with a gateway to a world of food and drinks without limits. You don't have to travel far—just to your computer, tablet or mobile—where you will discover our FREE website with top tips and recipes to inspire your imagination. Join us now at: www.turnonyourcreativity.com


Documents / Resources
References
Download manual
Here you can download full pdf version of manual, it may contain additional safety instructions, warranty information, FCC rules, etc.
Download Breville VDF108, VDF109 - Easy Clean Digital Fryer Manual
Advertisement


Need help?
Do you have a question about the VDF108 and is the answer not in the manual?
Questions and answers