Uclear AMP Series - Headset User Manual
- User manual (2 pages) ,
- User manual (2 pages)
Advertisement
- 1 MOUNTING
- 2 INSTALL CONTROL UNIT
- 3 REMOVE CONTROL UNIT
- 4 PULSE PRO & BOOST PRO PLACEMENT
- 5 BOOST PLUS PLACEMENT
- 6 SPEAKER USB PLUG
- 7 TECHNICAL DATA
- 8 BUTTON CONFIGURATION REFERENCE
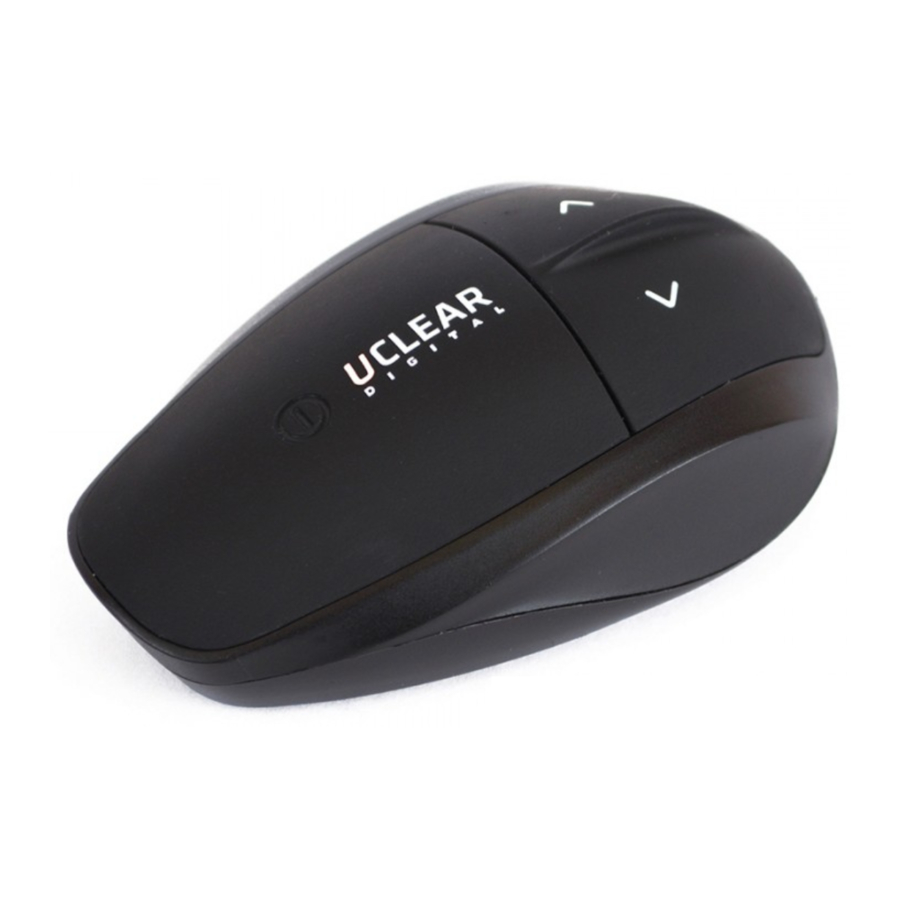
- 9 BUTTONS
- 10 PAIRING TO SMARTPHONE
- 11 PHONE FUNCTIONS
- 12 MUSIC PLAYBACK
- 13 MUSIC SHARE
- 14 GROUP INTERCOM
- 15 ENABLE 2 PARTY PRIVATE INTERCOM WITHIN GROUP INTERCOM
- 16 CROSS-BRAND INTERCOM PAIRING
- 17 GROUP & CROSSBRAND INTERCOM USE
- 18 STATUS INDICATOR REFERENCE
- 19 WARRANTY
- 20 CORRECT DISPOSAL OF THIS PRODUCT
- 21 PRODUCT INFORMATION
- 22 PERSONAL SAFETY
- 23 CONTACT AND SUPPORT INFORMATION
- 24 Documents / Resources
![]()
MOUNTING
PERMANENT MOUNT
- Locate and clean a position on the left side of helmet close to lower edge of the helmet.
- Peel off the 3M double sided tape protective film and place the mount with logo on bottom and place Mount to the position in step 1.
![]()
- Apply pressure to the metal bracket to ensure that the bracket is firmly secured. Note: It takes 24hours for adhesive to set.
![]()


TEMPORARY MOUNT
- Position and fasten the clip bracket onto the helmet.
![]()
- Remove the metal handles after clip bracket has been installed.

- Use additional anti-slip rubber patch provided if required.


INSTALL CONTROL UNIT
- From the top, slide AMP unit onto the bracket. You should hear a 'click' sound when fully inserted.
![]()
- Fully insert the speaker USB connector.

REMOVE CONTROL UNIT
- Remove USB speaker connector.
- Slide AMP upward to release from
PULSE PRO & BOOST PRO PLACEMENT


MIC MINIMUM PLACEMENT
BOOST PLUS PLACEMENT

Both mics should be placed parallel to each other
SPEAKER USB PLUG

Insert the speaker USB wire into the control unit until you can no longer see the 3 ribs on the USB speaker wire plug.
TECHNICAL DATA
Bluetooth: V4.2 (BR/EDR/BLE), Class 1
Profiles: HSP, HFP, A2DP
Intercom: AVRCP
Carrier Frequency: 2.402 - 2.480 GHz
Range: Up to 700m (0.43mi)
AMP Pro Multi-Hop Intercom: 2 Users and Up
AMP Plus Multi-Hop Intercom: 2-6 Users
AMP Multi-Hop Intercom: 2 Users
Battery: 3.7V, 500mAh Lithium-ion
Talk Time: Up to 10 Hours
Stand by Time: 400 Hours
Operating Temp: -30C(-4F) to 60C(140F)
Required Charging Temp: 0°C(32F) to 45°C(+113 F°)
Controller Unit Size: 60 x 40 x 18mm(2.9 x 1.75 x 1")
ClearLink: Android 4.4 or Later. Apple iOS 8 or Later
BUTTON CONFIGURATION REFERENCE
| BASIC COMMANDS | |
| Power On | Hold Press "Power" once for 2 seconds |
| Power Off | Hold "Power" for 5 seconds |
| Activate Bluetooth Pairing | Hold "Up" and "Down" for 2 seconds |
| Volume Up | Press "Up" once per volume level |
| Volume Down | Press "Down" once per volume level |
| Reset | Press "Power", "Up" and "Down" once simultaneously |
| PHONE CALLS | |
| Pick up Incoming Call | Press "Power" Once |
| End Call In Progress | Hold "Power" for 2 Seconds |
| Reject Incoming Call | Hold "Power" for 2 Seconds |
| Voice Dial | Hold "Power" and Down for 2 Seconds |
| Last Number Redial | Hold "Power" and Up for 2 Seconds |
| MUSIC | |
| Play | Press "Power" 2 Times |
| Stop | Press "Power" 1 Time |
| Fast Forward Track | Press "Up" Button 2 Times |
| Backtrack | Press "Down" Button 2 Times |
| GROUP INTERCOM | |
| Pairing as Unit 1 | Unit is off, "Power" and "Down" for 3 seconds |
| Pairing as Unit 2 | Unit is off, "Power" and "Up" for 3 seconds |
| Connect intercom | Hold "Up" for 2 Seconds |
| Disconnect intercom | Hold "Down" for 2 Seconds |
| OPEN INTERCOM | |
| Activate Open Pairing | Unit is off, hold "Power" for 10 seconds |
| Activate [other brand] Pairing | Refer to the Respective Manufacturer User Manual |
| Connect intercom | Hold "Up' for 2 Seconds |
| Disconnect intercom | Hold "Down" for 2 Seconds |
| PRIVATE INTERCOM | |
| Set Up | While all units are connected, hold "Power" and "Up" |
| Switch To Group Intercom | Press "Power" 1 Time |
| Switch To Private Intercom | Press "Power" 1 Time |
BUTTONS
POWER ON

Press & Hold "Power" for 2 seconds
POWER OFF

Press & Hold "Power" for 5 seconds
VOLUME UP

Press & Release "Up" once per level
VOLUME DOWN

Press & Release "Down" once per level
RESET

Press all 3 buttons for 2 seconds
PAIRING TO SMARTPHONE
- Power on the unit. Hold "Up" and "Down"2 seconds until LED alternately blinks blue and red.

- Turn on the phone's Bluetooth, search Bluetooth device list and select/connect your AMP model.
- After successful Pairing power off Unit to store Phone into Memory. When AMP Pro, AMP Plus or Amp is powered on, it will auto connect to the phone.

PHONE FUNCTIONS

ANSWER INCOMING CALL
Say "Hello"or Press "Power" once

REDIAL LAST NUMBER
Hold "Power" and "Up" 2 seconds

REJECT OR END CALL
Hold "Power" 2 Seconds

VOICE DIAL
Hold "Power" and "Down" 2 seconds
MUSIC PLAYBACK

PLAY MUSIC
Press "Power" twice

STOP/PAUSE MUSIC
Press "Power" once

BACKTRACK
Press "Down" twice

FAST FORWARD
Press "Up" twice
MUSIC SHARE
AMP PRO & AMP PLUS ONLY
- Pair Units for Group Intercom(See Above)
- On Unit 1 quickly press "Power" & Down" two times.
![]()
- On Unit 2 quickly press "Power" & Up" two times.
![]()
- Both Units will blink blue and red until paired. On successful pairing units will blink Blue.


Unit 1 will now share it's music to unit 2
GROUP INTERCOM
- Power off all the units.
- On the 1st unit, hold "Power" and "Down" 5 seconds, LED will blink purple.
![]()
- On the 2nd unit, hold "Power" and "Up" button 5 seconds, LED will blink purple, wait until the previous unit blinks blue, then proceed to next step.

- Repeat step 3 if you have more units. Go to step 5 if no more units.
- To end the pairing process, press "Power" on the last unit in the chain.
![]()
- Power Off all Units to store pairing into memory.


ENABLE 2 PARTY PRIVATE INTERCOM WITHIN GROUP INTERCOM
- Make sure all intercom units are powered on and Paired for Group Intercom(see group intercom) and are in Intercom Mode.
- On unit 1 and unit 2 press "Power" and "Up" until indicator blinks purple.
![]()
- After both units are blinking purple press "Power" on unit 2 to end the pairing process.
![]()
Note: You will only need to pair this ONCE and you can create multiple private groups in a Group Intercom.


TO ENTER GROUP INTERCOM FROM PRIVATE INTERCOM
Press "Power" once. A single "Beep" will sound.
TO ENTER PRIVATE INTERCOM FROM GROUP INTERCOM
Press "Power" once. A double "Beep" will sound.
CROSS-BRAND INTERCOM PAIRING
- Set your [Other brand] intercom device in pairing mode.
- Power on the AMP unit by pressing the power button 10 seconds until LED blinks purple. Pairing is successful when AMP LED blinks blue.
- Power Off AMP unit to store pairing into memory.
GROUP & CROSSBRAND INTERCOM USE

START INTERCOM
Hold "Up" 2 seconds

STOP INTERCOM
Hold "Down" 2 seconds
STATUS INDICATOR REFERENCE
| 1 | Off (No Power) | N/A |
| 2 | On (Bluetooth not connected) | Blinks Blue Quickly |
| 3 | On (Bluetooth connected) | Blink Blue Slowly |
| 4 | Phone & Music Device Pairing Mode | Blinks Blue and Red Alternately |
| 5 | Call in Progress | Blinks Blue Very Slowly |
| 6 | In-coming Call | Blinks Blue and Red Alternately |
| 7 | Battery Low | Blinks Red Every 2 Seconds |
| 8 | Power Down | Blinks Red 5 Times |
| 9 | Intercom Connected | Blinks Blue Twice Every 2 Seconds |
| 10 | Intercom Pairing Mode (first unit) | Blinks Purple Fast |
| 11 | Intercom Pairing Mode (subsequent unit) | Blinks Purple Slowly |
| 12 | Battery Charging | Solid Red |
| 13 | Battery Fully Charged | Solid Blue |
| 14 | Battery Faulty | Solid Purple |
WARRANTY
Without prejudice of legal warranty, the AMP Unit is covered under a (2) Two year warranty and a (1) One Year Warranty for Accessories by manufacturer from the date of purchase. Please provide the proof of purchase when you return the item to the supplier.
Your product must be registered at uclear-digital.com upon purchase.
CORRECT DISPOSAL OF THIS PRODUCT
Do not dispose this product with other household wastes at the end of its working life. There is a separate collection system for used electronic products in accordance with legislation that requires proper treatment, recovery and recycling. Household users should contact either the retailer where they purchased this product, or their local government office, for details of where and how they can take this item for environmentally safe recycling. Business users should contact their suppliers and refer to the terms and conditions of the purchase contract. This product should not be mixed with other commercial wastes for disposal.
PRODUCT INFORMATION
BITwave, and all their representatives, agents, distributors, suppliers or resellers shall not be held responsible for any consequences arising from any errors or omissions in the guide or resulting directly or indirectly from the use of the information herein. BITwave reserves the right to amend or improve the product design or user guide without any restrictions and without any obligation to notify users. All information here is accurate as of the date of printing.
Please periodically check for the latest firmware version to receive feature enhancements on ClearLink App. Download Clearlink App at the Google Play or Apple App store.


PERSONAL SAFETY

Do not open the seal of the hardware, tamper, repair or modify any parts. Do not touch the product with metal objects or parts or chemical products. Violation of the above will lead to potential fire hazards and mishaps. Please contact UCLEAR Digital technical support or your if your product malfunctions.
Always comply with the local law and traffic regulations. Where use of the product is not permitted or allowed by any laws and regulations including the traffic laws of your country, we warn you not to go against such restrictions. You will bear the full responsibilities of any breaches of Law and Regulations.
You should not allow the operations or use of the product or any attempts to use it by any persons including yourself to compromise anyone's safety including your own or to cause harm to any vehicles, property, objects, livestock, inventories, assets and the like under any circumstances. You or any users of the product are to take all necessary safety measures and precautions and to remain alert to all surrounding conditions. You are warned not to operate the product if you are not physically capable of doing so in a safe manner, if you have or will consume any alcohol or any mind-altering substance during its operation so that your alertness is compromised or if you have any medical conditions or needs that may compromise your abilities to do so in a safe manner. We warn you of the inherent, unforeseeable and unlimited risks and dangers in using the product while in traffic, including injury or illness, strains, fractures, partial and/or total paralysis, death or other ailments that could cause serious disability due to any causes. This product is only for use by persons eighteen (18) years of age and above who have understood the warnings, risks and the terms of use. You confirm that you have read this release of liability and fully understand its terms and that you have given up substantial rights by using or attempting to use the product.
 ATTENTION
PLEASE READ THROUGH THE OPERATING INSTRUCTIONS TO UNDERSTAND HOW TO OPERATE THE AMP SYSTEM, IN PARTICULAR THE SAFETY INSTRUCTIONS.
- Please note that there are some countries that by law disallow the rider to set the UCLEAR Digital Amp unit to a volume that prevents you hearing your surroundings.
- Please note that in some countries the use of both speakers simultaneously is authorized only out of public traffic conditions.
- Please check with the relevant authorities for local safety legislation before using UCLEAR Digital Amp unit on the road.
- Please learn how to use the buttons by looking into the mirror before using the UCLEAR Digital Amp unit on the road.
- Prolonged exposure to loud sounds may lead to permanent hearing damage.
- Speaker volume is greater than 90 dB may lead to permanent hearing damage.
- Do not attempt to place an outgoing call through the mobile phone while riding on the motorcycle, ATV/UTV at any point of time.
- Please do not use the UCLEAR Digital Amp unit in anyway that may distract you or hinder your judgement while on the move. Never compromise your safety and the safety of others.

![burn hazard]() Charging and handling rechargeable battery products incorrectly may cause them to overheat, catch fire or explode. To prevent this please follow the instructions below:
Charging and handling rechargeable battery products incorrectly may cause them to overheat, catch fire or explode. To prevent this please follow the instructions below:

- Never change the batteries yourself, always contact UCLEAR Digital to perform the replacement for you.
- When charging, use ONLY the charging cable provided or a replacement cable from a UCLEAR Digital dealer. Using similar, compatible or any other cables may lead to permanent product damage and will void the product warranty.
- Never make any modifications to any part of the UCLEAR Digital Amp unit in any way as it may cause the system to malfunction causing hurt to you.
- Do not modify your helmet to use with this system - it is not necessary to do so.
CONTACT AND SUPPORT INFORMATION
For USA Tech support and warranty department.
M-F 8am-5pm MST.
1-855-248-9283
BITwave USA LLC
1488 E lron Eagle Dr.
Eagle, ID 83616
For additional information please visit our website at www.uclear-digital.com
LICENCES
The UCLEAR trademark and logo is exclusively owned by BITwave Pte Ltd. Any use of the mark by any other parties without prior written permission of BITwave Pte Ltd constitutes an infringement of legal rights. The Bluetooth trademark is owned by Bluetooth SIG and is used under licence by BITwave Pte Ltd.
COPYRIGHTS
Copyright © 2016 BITwave Pte Ltd. All rights reserved. No part of this guide may be reproduced in any form or by any process whatsoever without prior written consent from BITwave Pte Ltd.

Documents / Resources
References
UClear Digital Helmet Audio Systems for Motorcycle, ATV, Snowmobile, etc
![www.apple.com]() App Store - Apple
App Store - Apple![play.google.com]() Google Play
Google PlayUClear Digital Helmet Audio Systems for Motorcycle, ATV, Snowmobile, etc
Download manual
Here you can download full pdf version of manual, it may contain additional safety instructions, warranty information, FCC rules, etc.
Advertisement


Need help?
Do you have a question about the AMP Series and is the answer not in the manual?
Questions and answers