
Related Manuals for PreppComm MMX ZERO


Summary of Contents for PreppComm MMX ZERO
- Page 1 MMX ZERO Morse Code Decoder/Encoder REFERENCE MANUAL By Eric C Anderson PreppComm Version 1.1, July 2023 Copyright © 2023 PreppComm. All rights reserved...
- Page 2 Page 2 Copyright © 2023 PreppComm...
- Page 3 Morse Made Easy™ MMX ZERO Morse Code Decoder/Encoder REFERENCE MANUAL By Eric C Anderson PreppComm Version 1.1, July 2023 Copyright © 2023 PreppComm. All rights reserved . Page 3 Copyright © 2023 PreppComm...
- Page 4 Page 4 Copyright © 2023 PreppComm...
-
Page 5: Table Of Contents
8.5 Setting up your transceiver ...............33 9. CALLING ---------------------------------------------------------------------------37 9.2 General Calling ..................37 9.3 Setting Transmit Speed ................38 9.4 Setting a New Default Transmit Speed .............39 9.5 The CALL Sequence .................39 9.6 Setting Up a Directed Call .................40 Page 5 Copyright © 2023 PreppComm... - Page 6 15. Appendix VI: Keyboard and RPL Command Layouts --------------------------68 16. Appendix VII: Common CW Abbreviations -------------------------------------74 17. Appendix VIII: The Tuning Rule Graphically Explained -------------------------76 18. Appendix IX: Alternate USB Keyboards -----------------------------------------78 19. Wiring the 3.5 mm Jacks ---------------------------------------------------------79 Page 6 Copyright © 2023 PreppComm...
-
Page 7: Overview
10. Word wrap display for easy reading of incoming and outgoing text. Thus, for the more advanced user, the MMX ZERO can provide an excellent choice for enabling or enhancing their CW communication. It can also easily be placed into an EMP protective container for the purpose of having it available in case of an EMP event, as well. - Page 8 For those of you with technical interest, the MMX is based on a triple-processor real-time multi- tasking system architecture. A complex dance of real-time interaction between three interrupt- driven real-time processors makes the magic of the MMX possible. Page 8 Copyright © 2023 PreppComm...
-
Page 9: Warranty And Cautions
IC-7300 on the website. Locate the Blog menu item along the top of the home page, and click. You will see several blogs. Scroll until you see the IC-7300 image. That’s the one. Here is the link if you are reading this on PDF: https://www.preppcomm.com/blogs/news/setting-up-an-icom-7300-for-1300-hz-tones Page 9 Copyright © 2023 PreppComm... -
Page 10: Getting Started
As always, we love to hear from our customers, so if you have questions, comments, or suggestions, please use the Contact Us page on our website: https://PreppComm.com You can also get help from the PreppComm Community at: http://PreppComm.mn.co Page 10... -
Page 11: Getting Acquainted
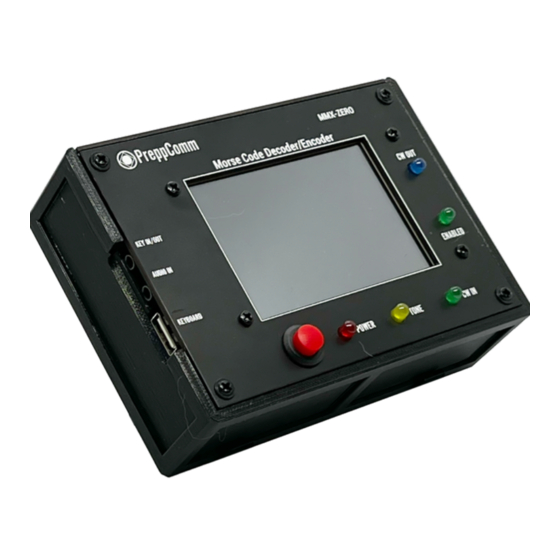
3. Getting Acquainted Figure 1 is a labeled diagram of the MMX ZERO: FIGURE 1. MMX ZERO 3.5" Color LCD Display At the center is the 3.5" color LCD display, which is also a touch screen input device. Key In/Out Jack ... - Page 12 The ZERO is powered by 5V via an included USB cable. The USB A plug can be powered from a laptop, a computer, an outlet strip with a USB output, or a wall plug with USB outputs. Total current draw is about 0.25A. Page 12 Copyright © 2023 PreppComm...
-
Page 13: Setup With Your External Transceiver
If you wish to use paddles or an iambic paddle, an external keyer that converts from those dual-contact formats into pure Morse is required. Page 13 Copyright © 2023 PreppComm... -
Page 14: Power On Walk Through
This screen will be present for a few seconds, and will then be followed by the Main Screen, shown in Figure 4. Each item on this screen is described below. FIGURE 4: MAIN SCREEN Page 14 Copyright © 2023 PreppComm... - Page 15 Most of the screen is dedicated for text - both for received text from other stations, and transmitted text from you. The initial screen shows the PreppComm logo, but this will disappear as soon as the space is needed. Text you transmit is shown in blue. Text you receive is shown in light gray. The text area is 37 characters wide and 10 lines high, and is fully word-wrapped - i.e., automatic...
- Page 16 A pop-up "window" for typing your message ahead of the transmitter will appear near the top of the text area on the screen. This is a two-line buffer containing up to 76 characters. This pop-up is described in more detail in Section 10.4. Page 16 Copyright © 2023 PreppComm...
-
Page 17: Menus
This feature prevents starving the transmitter from your text input, which would generate badly timed Morse code output. More details Section 8.3. Page 17 Copyright © 2023 PreppComm... -
Page 18: Local Station Setup
Pressing the NEXT Button will bring you a very similar screen, but in this case, it is asking for your handle, or name. The progression of entry screens in Local Station Setup is as follows: 1. Call Letters Page 18 Copyright © 2023 PreppComm... -
Page 19: Typing Speed
Any value will do. Press FINISH to return to the main screen. 6.2 Typing Speed This function will bring up the following screen, shown in Figure 8 below: FIGURE 8: TYPING SPEED TEST Page 19 Copyright © 2023 PreppComm... - Page 20 That is because - even though told to relax and type at a comfortable rate, I typed at a "speed to the death" rate. There is something about how our minds work: YIKES! This is a TEST! Gotta type it fast! Page 20 Copyright © 2023 PreppComm...
-
Page 21: Microprogramming
When pressing the MICROPROGRAMMING Button in the Main Menu, the first of 3 screens showing quick views of the 12 microprograms is displayed, as shown in Figure 11 below FIGURE 11: PAGE 1 OF MICROPROGRAMS LIST Page 21 Copyright © 2023 PreppComm... - Page 22 2. F1-F10 Keys: These keys execute the specified microprogram 3. Shift F1-F10 Keys: These keys take you directly to the Microprogram Editor for the specified microprogram. More information on the Microprogram Editor is provided in Section 14.7. Page 22 Copyright © 2023 PreppComm...
-
Page 23: Keyboard Controls
If you use the shift key with an alphabetic character out of habit, no harm done. The computer will then not have to capitalize it. However, in future enhancements, a shift-letter may be detected for control purposes. Page 23 Copyright © 2023 PreppComm... -
Page 24: Decoder Mode Control Keys
Where NN indicate the current decode speed of NN words per minute. The displayed speed will update over time if it changes, or as the decoder refines its estimate. When in CTX mode, the status line will show Page 24 Copyright © 2023 PreppComm... -
Page 25: Gain Control Keys
(Note that when transmitting, this is ONLY TRUE if the mistake is still visible on the type ahead buffer). Page 25 Copyright © 2023 PreppComm... -
Page 26: Function Keys
7.10 Transmit Keyboard Controls There are fewer control keys available during transmit mode, as most keys are required to send your messages. These control keys are shown in Table 3 below: Page 26 Copyright © 2023 PreppComm... - Page 27 This can fool you sometimes if you forgot the limit you set, and you are trying to set a higher speed. No, it’s not broken. It’s applying the limit you set. ANS WHO? Page 27 Copyright © 2023 PreppComm...
- Page 28 This prompt will appear in the Status Line display when a call sign is required when processing an ANS Button press. Refer to Section 10 for more information. When you see this prompt, you must enter the station call sign you are answering. Page 28 Copyright © 2023 PreppComm...
-
Page 29: Decoder Operation
When enough data is available, it will calculate and estimate the sender’s speed in words per minute (WPM), using a complex algorithm looking at dit times, dah times, and each of three different space times (spaces within characters, space between characters, and space between words). These Page 29 Copyright © 2023 PreppComm... - Page 30 Finally, the HCW decoder can also automatically restart the decoder if it finds a series of T’s and E’s and spaces. This indicates the timing is way off, usually due to a new signal being received. Page 30 Copyright © 2023 PreppComm...
-
Page 31: Ctx Mode
4. The output is fed to the HCW decoder pre-processor, which figures out the speed of the CW as well as 5 major parameters for the senders hand. This is followed by the actual CW to text conversion step. Page 31 Copyright © 2023 PreppComm... - Page 32 4. Press the SPACE bar to restart the decoder. Within a few seconds, the decoded characters will be displayed, along with the senders speed. Of course if you are in CTX mode, characters will be displayed immediately. Page 32 Copyright © 2023 PreppComm...
-
Page 33: Setting Up Your Transceiver
(VFO) 1300 Hz above the displayed frequency, and turn off the 1300 Hz offset when transmitting. We have only achieved 900 Hz so far, and we will add the extra 400 Hz later, Step 2: Selecting a Filter Page 33 Copyright © 2023 PreppComm... - Page 34 - SHARP will introduce too much ringing and other artifacts into the signal, interfering with the signal processing in the ZERO. Step 3. Selecting Bandwidth Edit Press the BW button to the left of FIL1, as shown in Figure 17 below: FIGURE 17: SELECTING BW Page 34 Copyright © 2023 PreppComm...
- Page 35 So no changes are needed between transmit and receive! For PreppComm products, more than 900 Hz is needed, so we add in 400 more with RIT. If you could turn off CW PITCH, or make it zero, then RIT would need to be 1.3, or 1300 Hz.
- Page 36 So a little experimenting over time, you may discover that the correct setting for your PreppComm decoder is actually 0.42 or 0.39, for example. However, each station you are communicating with, depending on how close they are transmitting to your frequency, may require you to make a fine adjustment for best results.
-
Page 37: Calling
As you can see, entering your information in Local Station Setup has now come in handy. The transceiver computer knows what your call letters are, so it automatically inserts them into the calling sequence for you. Thus, to call, no typing is required. Page 37 Copyright © 2023 PreppComm... -
Page 38: Setting Transmit Speed
This is why when you restart the decode in the example above the speed drops to 15 WPM: the decoder speed was cleared, but you have set 15 WPM as the current Page 38 Copyright © 2023 PreppComm... -
Page 39: Setting A New Default Transmit Speed
CALL Button will return to the first inactive CALL Button state, and the Receive Mode will be restored. However, you will find yourself in RIT Mode (Receiver Incremental Tuning Mode) at that point. The “#C” microprogram can be used to press the CALL button. Page 39 Copyright © 2023 PreppComm... -
Page 40: Setting Up A Directed Call
For a Directed Call it does. Of course if you don’t get a response after 5 minutes of calling, pausing every 30 seconds or so to listen, that could be the band, or your friend is not available. 9.7 Three Ways For Establishing a CCS Page 40 Copyright © 2023 PreppComm... - Page 41 Note that the CALL function will never request a call sign. Rather, if none is defined, it will simply default to a General Call. Thus, manually entering a CCS is required for a Directed Call. Page 41 Copyright © 2023 PreppComm...
-
Page 42: What Happens After You Call
W1?? for example. When you answer using W1?? the W1 station will come back, the other will not, and you will get the correct call sign, typically automatically loaded by the decoder, for your next transmission. Page 42 Copyright © 2023 PreppComm... -
Page 43: Answering
2. the decoder recovering a call sign from the decoded stream then no additional action will be required. However, if there is no defined CCS, you will be asked to enter one on the Status Line: ANSWER WHO? Page 43 Copyright © 2023 PreppComm... -
Page 44: The Answer Validate And Answer Microprogram
This can be due to differences in the amount of transmitted power or antenna configuration, as well as the ionosphere status at your two locations. For example, they may be in a Page 44 Copyright © 2023 PreppComm... -
Page 45: The Answer Start Component
Note: A space is automatically included at the end of the ANS Start component, so you don’t need to remember to include one at the beginning of your message. Page 45 Copyright © 2023 PreppComm... -
Page 46: The Pop-Up Type-Ahead Buffer
FIGURE 19B: TYPING DONE, TRANSMITTING AND THEN ENDING Page 46 Copyright © 2023 PreppComm... -
Page 47: Sending Your Message
S key when asked for a speed. Just press ESC twice to clear the transmitter speed, and press CALL. Type in your typing speed, press S to save it as the new default, then ESC to terminate the CALL. Page 47 Copyright © 2023 PreppComm... -
Page 48: The Answer Ending Component
Type-Ahead Buffer, but when it disappears to the left, the encoder will execute the INFO microprogram before "eating" any more of your typed characters. This is another opportunity to type additional message text, while the encoder is busy with the INFO Page 48 Copyright © 2023 PreppComm... -
Page 49: What Happens After An Answer
The decoder knows most or all of these, and will display a useful indicator for you when they are decoded. A list of such pro-signs is provided in Section Section 10 Appendix Page 49 Copyright © 2023 PreppComm... -
Page 50: Appendix I: Pro-Signs And No-Signs
If a series of dit’s and dah’s are decoded that cannot be recognized, the [?] symbol is displayed on the screen. We refer to this a s "No-Sign." This can be caused by band noise, fading on the band, or bad spacing by the sender. Page 50 Copyright © 2023 PreppComm... -
Page 51: Appendix Ii: Special Characters
Naturally, if you send these characters, no one except another MMX owner will know how to decode them! But who knows? They might just take on a life of their own someday! Character Code Character Code .--..- -.---. -.-..-.-.. & ..-.-. ..--.- Page 51 Copyright © 2023 PreppComm... - Page 52 I live in Sandpoint (Idaho) with my dog. Of course when communicating with another MMX, you can actually use both ( and ) and they will see it correctly. :) If you disapprove of these added characters, simply don’t use them. Page 52 Copyright © 2023 PreppComm...
-
Page 53: Appendix Iv: Terminology
HF stands for High Frequency. This designation was created many many years ago, and now, really stands for fairly low frequencies, starting just above the AM broadcast band. The 80 meter band includes from 3.5 MHz to 4.0 MHz, for example. Page 53 Copyright © 2023 PreppComm... - Page 54 WWV is a US standards radio station at 10 MHz. Its frequency is controlled extremely accurately by atomic clock, and can be used as a reference for correcting frequency errors in any unit capable of tuning it in. It is also a very accurate time standard. Page 54 Copyright © 2023 PreppComm...
-
Page 55: Appendix V: Rpl And User Microprograms
Mode. Only control microprograms (which can of course include text) can be executed from Receive Mode. 14.2 The Built-In Microprograms So what do the Built-In microprograms look like? The Built-in CALL Microprogram looks like this: Page 55 Copyright © 2023 PreppComm... -
Page 56: Microprogram Types
MMX transceiver operation to your hearts desire, and enable you to operate exactly the way you want. You will be able to optimize it for contests, for calling friends at their favorite CW speeds, and much more. Page 56 Copyright © 2023 PreppComm... -
Page 57: Rpl Control Characters
CALl mode ends when the microprogram completes execution. This command is ignored if either a CALL or ANS mode is already in progress. Page 57 Copyright © 2023 PreppComm... - Page 58 However, multiple repeats may be used in a single microprogram. Thus, if a repeat is in process, a [ character is ignored, and the second ] character is also ignored. The repeat will run between the first [ and the first ]. Page 58 Copyright © 2023 PreppComm...
- Page 59 Inserts the built-in INFO microprogram. Define the CCS. Use BEFORE ? or ! command. {CCS} Set transmit speed to nn, where nn is from 05 to 60, in words per minute (WPM). Use BEFORE ? or ! command. Page 59 Copyright © 2023 PreppComm...
-
Page 60: Built-In Microprogram Review
Delete <[@ @ @ @ DE * * ]KN% and > What remains is [CQ CQ CQ CQ DE * * ]K Start the repeat Send CQ CQ CQ CQ DE to encoder CQ.. DE Send user call sign to encoder twice (including spaces) Page 60 Copyright © 2023 PreppComm... - Page 61 Send DE to encoder with spaces Insert user call sign with spaces Send KN to encoder Terminate ANS mode, return to receive mode, engage RIT tuning (end) TABLE 6: BREAKDOWN OF BUILT-IN ANS MICROPROGRAM Page 61 Copyright © 2023 PreppComm...
-
Page 62: Inserting Into A Running Call Or Ans Microprogram
14.7 The Microprogram Editor The microprogram editor is designed to make it easy to enter and edit your microprograms. The Microprogram Editor screen is shown in Figure 22a below: Page 62 Copyright © 2023 PreppComm... - Page 63 The left-arrow and right-arrow Keys move the cursor left FIGURE 22B: TEXT EDITOR AFTER TYPING IN CHARACTERS and right. Since the two lines actually represent a single long string of characters, moving to the Page 63 Copyright © 2023 PreppComm...
- Page 64 The FINISH Button is also the way out if you have not changed anything, i.e., it is also the EXIT Button. The HELP Button takes you to the same Microprogramming Help Screens that are accessible from the HELP Menus, covered in more detail below. Page 64 Copyright © 2023 PreppComm...
-
Page 65: Microprogram Help
field trip and want to create a new microprogram. Note that the EXIT Buttons on these Help Screens do not return to the Main Screen, like they do if you access them from the Help System. Rather, they return you to the Microprogram Editor - just like you need! Page 65 Copyright © 2023 PreppComm... -
Page 66: Some Examples
17 minutes (probably because it is 13 minutes past the hour or 17 minutes before the hour when it was started) which will repeat every 30 minutes, on the hour and half hour. The message begins with DE W2OL BULLETIN as station ID and identification of the Page 66 Copyright © 2023 PreppComm... -
Page 67: The Starter Set
4. F4: _@ DE *_ The _ are showing were spaces are included, or “ @ DE * “. Pressing F4 sends a station ID during a long transmission. Those four are great starters and #3 is very useful for breaking back and forth quickly w/o station ID’s. Page 67 Copyright © 2023 PreppComm... -
Page 68: Appendix Vi: Keyboard And Rpl Command Layouts
Unfortunately, the printable summary of the RPL commands do not include the four counting variable commands, FYI.. Page 68 Copyright © 2023 PreppComm... - Page 69 19.1 Page 69 Copyright © 2023 PreppComm...
- Page 70 19.2 Page 70 Copyright © 2023 PreppComm...
- Page 71 19.3 Page 71 Copyright © 2023 PreppComm...
- Page 72 19.4 Page 72 Copyright © 2023 PreppComm...
- Page 73 Page 73 Copyright © 2023 PreppComm...
-
Page 74: Appendix Vii: Common Cw Abbreviations
MNI--Many NR--Near, Number NW--Now O 0--(usually used when stating transmitter output of 100 Watts. If using a straight key it is also OK to use a very long dah to represent 0.) OM--Old Man Page 74 Copyright © 2023 PreppComm... - Page 75 TU--Thank You (usually used at end of contact, meaning "Thanks for the contact".) TX--Transmit U--You UR--Your, You Are URS--Yours VY--Very WID--With WL--Well, will, we'll WTS--Watts WUD--Would WX--Weather XCVR--Transceiver XMTR--Transmitter XYL--Wife YL--Girlfriend ("Young Lady") YRS--(Years) Page 75 Copyright © 2023 PreppComm...
-
Page 76: Appendix Viii: The Tuning Rule Graphically Explained
7,101,300, where it will disappear at a very low frequency. As you continue up in frequency, the tone will rise up again, and will reach 1300 Hz when you tune to 7,102,600 Hz as shown below: Page 76 Copyright © 2023 PreppComm... - Page 77 So, the Tuning Rule for finding a signal while tuning around is simple: Step up the receiver frequency 10 Hz. If the tone goes lower, you are set. If not, drop down 2600 Hz by pressing the D key. Page 77 Copyright © 2023 PreppComm...
-
Page 78: Appendix Ix: Alternate Usb Keyboards
MMX, but feel free to look around for a different one if your heart so desires. Let us know if you find one you think is better! Page 78 Copyright © 2023 PreppComm... -
Page 79: Wiring The 3.5 Mm Jacks
PLEASE NOTE that SHIELDED WIRE MUST BE USED to prevent RF from getting into the internal circuitry. This may cause your MMX to lose it’s mind, so to speak. Avoid problems by using shielded wire! Page 79 Copyright © 2023 PreppComm... - Page 80 130 McGhee Road, Ste 220 Sandpoint, ID 83864 (208)-215-2585 preppcomm.com Copyright © 2023 PreppComm Cover Image: iStockPhoto.com Page 80 Copyright © 2023 PreppComm...
Need help?
Do you have a question about the MMX ZERO and is the answer not in the manual?
Questions and answers