Advertisement
Quick Links
CONTACT US FIRST
CONTACT US FIRST
sauder.com
sauder.com
sauder.com
BEFORE MAKING ANY RETURNS TO THE STORE.
BEFORE MAKING ANY RETURNS TO THE RETAILER.
How can we help you? To reach our customer service, visit
to chat with a live rep or email us.
Prefer the phone? Give us a ring at
Our award-winning team is available Monday-Friday - 8:30 a.m. to 5 p.m. EST (except holidays).
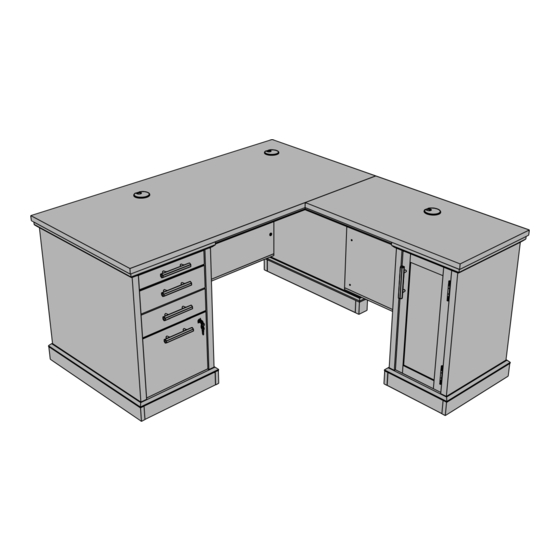
L-Shaped Desk
Prime Oak finish | Model 427803
Sauder.com
Share your journey!
sauder.com/commercial-office/service
877-996-7539
.
MASON PEAK COLLECTION
NOTE: THIS INSTRUCTION
BOOKLET CONTAINS IMPORTANT
SAFETY INFORMATION.
PLEASE READ AND KEEP FOR
FUTURE REFERENCE.
English pg 1-32
Français pg 33-38
Español pg 39-44
Lot # 560861
Purchased: __________________
03/16/21
Advertisement

Related Manuals for SA MASON PEAK woorksense 427803

Summary of Contents for SA MASON PEAK woorksense 427803
- Page 1 CONTACT US FIRST CONTACT US FIRST sauder.com sauder.com sauder.com BEFORE MAKING ANY RETURNS TO THE STORE. BEFORE MAKING ANY RETURNS TO THE RETAILER. sauder.com/commercial-office/service How can we help you? To reach our customer service, visit to chat with a live rep or email us. 877-996-7539 Prefer the phone? Give us a ring at Our award-winning team is available Monday-Friday - 8:30 a.m.
- Page 2 Table of Contents Assembly Tools Required Part Identification No. 2 Phillips Screwdriver Hardware Identification Tip Shown Actual Size Hardware Usage Guide 8, 11, 15 Assembly Steps 7-32 Hammer Not actual size Français 33-38 Español 39-44 Safety 45-46 Warranty Page 2 427803 www.sauder.com/commercial-office/service...
- Page 3 Now you know Part Identification our ABCs. å While not all parts are labeled, some of the parts will have a label or an inked letter on the edge to help distinguish similar parts from each other. Use this part identification to help identify similar parts. SMALL DRAWER (1) CENTER SKIRT (1) ADJUSTABLE SHELF (1)
- Page 4 Hardware Identification å Screws are shown actual size. You may receive extra hardware with your unit. HIDDEN 6B FILE GLIDE - 2 8B FILE ROD - 2 CAM SCREW - 10 CAM - 14 TWIST-LOCK® LONG 15F WOOD DOWEL - 13 41G PLATE - 2 23J KEY SET - 1 FASTENER - 2...
- Page 5 Hardware Identification å Screws are shown actual size. You may receive extra hardware with your unit. 10S SILVER 1-1/8" FLAT HEAD SCREW - 19 BLACK 9/16" LARGE HEAD SCREW - 8 37S BLACK 7/8" MACHINE SCREW - 8 39S GRAY 1-3/8" MACHINE SCREW - 2 113S 144S BLACK 1-15/16"...
- Page 6 Optional Accessories (sold separately) å This piece of furniture accommodates one or more of the following optional accessories (sold separately). Powered Grommet (Item 427829) å The powered grommet is designed to replace any existing grommet provided with your furniture. å To purchase the Powered Grommet, scan this QR code.
- Page 7 Step 1 Look for this icon. It means a video assembly tip is available at www.sauder.com/service/tips Find the numbered video or scan the QR code. å Assemble your unit on a carpeted floor or on the empty carton to avoid scratching your unit or the floor. Save some Pro Tip: You will need packing material for support to be used later in assembly.
- Page 8 Hardware Usage Guide HOW TO USE A HIDDEN CAM & LONG DOWEL Insert the small end of the LONG DOWEL into the HIDDEN CAM. Long Dowel Arrow Hole Small end Push a HIDDEN CAM into the part. The arrow in the HIDDEN CAM must point toward the Hidden Cam hole in the edge of the board.
- Page 9 Step 3 å Stand the LONG MODESTY PANEL (M) on its edge with the LONG MODESTY PANEL MOLDING (T) on the floor. Some assembly å Fasten the LONG TOP MOLDING (V) to the LONG (and snacks) required. MODESTY PANEL (M). Use three BLACK 2-9/16" FLAT HEAD SCREWS (147S).
- Page 10 Step 4 å Insert two LONG DOWELS (40F) through the panel in the LEFT PEDESTAL. å Insert two WOOD DOWELS (15F) into the LEFT PEDESTAL. å NOTE: You may need someone's help to hold the LONG MODESTY PANEL (M) or use packing material for support as shown. å...
- Page 11 Hardware Usage Guide HOW TO USE A HIDDEN CAM & CAM SCREW Cam Screw Arrow Turn the CAM SCREW until the shoulder is against the surface of the part. Hidden Cam Push a HIDDEN CAM into Insert the CAM SCREW into the HIDDEN CAM. the part.
- Page 12 Step 6 å Fasten the END SUPPPORT BOTTOM MOLDING (EE) to the END SUPPORT (X). Use three BLACK 1-15/16" FLAT HEAD SCREWS (113S). Meet Part (X). This component has been engineered to be lighter, stronger, faster… well ok. Not technically faster. But definitely makes for a sturdier L-DESK that’...
- Page 13 Step 7 å Fasten the CENTER SKIRT (S) to the END SUPPORT BOTTOM MOLDING (EE). Tighten three HIDDEN CAMS. å Fasten the SHORT SKIRTS (BB) to the CENTER SKIRT (S). Tighten four HIDDEN CAMS. D E N H I D i t h f a c S u r...
- Page 14 Step 8 å First, fasten the INNER SKIRT (FF) to the CENTER SKIRT (S). Use three SILVER 1-5/8" FLAT HEAD SCREWS (152S). 177M å NOTE: You should start each SCREW a few turns before completely tightening any of them. å Next, fill the holes in the OUTER SKIRT (R) 1/4 to 1/2 full with GLUE (177M).
- Page 15 Hardware Usage Guide HOW TO USE A TWIST-LOCK FASTENER ® Push a TWIST-LOCK® FASTENER 1. Insert the dowel end of the FASTENER into the into the large hole in the part. hole of the adjoining part. NOTE: The dowel end of the FASTENER must remain fully inserted in the hole of the adjoining part while locking the FASTENER.
- Page 16 Step 10 å Insert six WOOD DOWELS (15F) into the END SUPPORT (X). å Fasten the END SUPPORT (X) to the LONG MODESTY PANEL (M). Tighten three HIDDEN CAMS. å NOTE: Be sure the WOOD DOWELS in the END SUPPORT insert into the LONG MODESTY PANEL. Page 16 427803 www.sauder.com/commercial-office/service...
- Page 17 Step 11 å Fasten one PULL (191K) to the SMALL DRAWER (B). Use two GRAY 1-3/8" MACHINE SCREWS (39S). å Fasten three PULLS (191K) to the DRAWERS (C and D). Use six BLACK 7/8" MACHINE SCREWS (37S). GRAY 1-3/8" MACHINE SCREW (2 used for the SMALL DRAWER) 191K BLACK 7/8"...
- Page 18 Step 12 å Fasten the LONG TOP BRACES (Q) to the LONG TOP (G). Use eight SILVER 1-1/8" FLAT HEAD SCREWS (10S). å NOTE: You should start each SCREW a few turns before completely tightening any of them. å NOTE: The angled edge of the BRACE should face down and toward the back edge of the TOP. å...
- Page 19 Step 13 å With your hands, separate three LOCK MECHANISM SETS (193M). Be careful of any sharp edges after separating each set. å Fasten the LOCK MECHANISM SETS (193M) to the LONG TOP (G) exactly as shown. Use three BLACK 15/16" SHOULDER SCREWS (144S). å...
- Page 20 Step 14 å With someone's help, carefully turn the LONG TOP (G) over, and hook the angled edges of the BRACES on the LONG TOP into the angled edge of the LONG TOP MOLDING (V) and LEFT PEDESTAL BRACE. å Fasten the LONG TOP (G) to the END SUPPORT (X).
- Page 21 Step 15 å Fasten the LONG TOP MOLDING (V) to the LONG TOP (G). Use three SILVER 1-5/8" FLAT HEAD SCREWS (152S). å NOTE: You should start each SCREW a few turns before completely tightening any of them. å Turn the two LOCK MECHANISMS inside the LEFT PEDESTAL toward each other until they stop moving. å...
- Page 22 Step 16 å To insert the SMALL DRAWER back into your unit, line up the EXTENSION SLIDES on the drawer with the EXTENSION RAILS on the unit and push the drawer into the unit until the drawer is fully inserted. The drawer will push in hard until it is all the way in, then it will slide in and out easier.
- Page 23 Step 17 å Place the WASHER (82S) into one of the MOLDING CONNECTOR CLIPS (173M) as shown in the enlarged diagram. Using your hammer, gently tap on the WASHER to insert the MOLDING CONNECTOR CLIP into the hole in the SHORT MODESTY PANEL (U).
- Page 24 Step 18 å Push two HIDDEN CAMS (1F) into the SHORT MODESTY PANEL (U). å Stand the SHORT MODESTY PANEL (U) on its edge with the SHORT MODESTY PANEL MOLDING (Z) on the floor. å Fasten the SHORT TOP MOLDING (DD) to the SHORT MODESTY PANEL (U).
- Page 25 Step 19 å Insert two LONG DOWELS (40F) through the panel in the RIGHT PEDESTAL. å Insert two WOOD DOWELS (15F) into the RIGHT PEDESTAL. å NOTE: You may need someone's help to hold the SHORT MODESTY PANEL (U) or use packing material for support as shown. å...
- Page 26 Step 20 å Fasten the SHORT MODESTY PANEL (U) to the END SUPPORT (X). Use three SILVER 1-1/8" FLAT HEAD Don't worry. It isn't SCREWS (10S). Rome. This can be built in a day. å Insert the SMALL GROMMET (10P) into the large hole in the RIGHT PEDESTAL.
- Page 27 Step 21 å Fasten the SHORT TOP BRACES (CC) to the SHORT TOP (H). Use eight SILVER 1-1/8" FLAT HEAD SCREWS (10S). å NOTE: You should start each SCREW a few turns before completely tightening any of them. å NOTE: The angled edge of the BRACE should face down and toward the back edge of the TOP.
- Page 28 Step 22 å With your hands, separate the remaining LOCK MECHANISM SETS (193M). Be careful of any sharp edges after separating each set. å Fasten the LOCK MECHANISM SETS (193M) to the SHORT TOP (H) exactly as shown. Use three BLACK 15/16" SHOULDER SCREWS (144S). å...
- Page 29 Step 23 å Fasten the SHORT TOP (H) to the PLATES on the LONG TOP (G). Use four BLACK 9/16" LARGE HEAD SCREWS (1S). å NOTE: The angled edges of the BRACES on the SHORT TOP will hook into the angled edge of the SHORT TOP MOLDING (DD) and RIGHT PEDESTAL BRACE.
- Page 30 Step 24 å Fasten the TOP MOLDING (W) to the SHORT TOP (H). Use two SILVER 1-5/8" FLAT HEAD SCREWS (152S). å NOTE: You should start each SCREW a few turns before completely tightening any of them. å Turn the two LOCK MECHANISMS inside the RIGHT PEDESTAL exactly as shown until they stop moving. å...
- Page 31 Step 25 å Pull the LARGE DRAWER (D) completely open. If necessary, unlock the LARGE DRAWER with the KEY SET (23J). å Push a FILE GLIDE (6B) onto the LARGE RIGHT DRAWER SIDE. å Slide the FILE RODS (8B) into the FILE GLIDE (6B) on the LARGE RIGHT DRAWER SIDE. å...
- Page 32 Step 26 å Insert a LARGE GROMMET (2P) and GROMMET CAP (3P) into each large hole in the TOPS (G and H). å Insert the HOLE PLUGS (104P) into the two unused holes in the LEFT PEDESTAL. å Center a SCREW COVER (74P) over the head of each SCREW and gently tap in with your hammer. å...
- Page 33 Modèle 427803 Bureau en L Utilisez les instructions d’ a ssemblage en français avec les NOUS CONTACTER EN PREMIER schémas étape par étape du manuel d’instruction en anglais. AVANT D'EFFECTUER TOUT RETOUR AU MAGASIN. Chaque étape en français correspond à la même étape en Nous faisons de notre mieux pour nous assurer que votre meuble anglais.
- Page 34 ÉTAPE 4 Accessoires optionnels (vendus séparément) Ce meuble peut être complété par un ou plusieurs des Insérer deux CHEVILLES LONGUES (40F) à travers le panneau accessoires optionnels suivants (vendus séparément). dans le CAISSON GAUCHE. Prise électrique pour oeillet (article 427829) Insérer deux CHEVILLES EN BOIS (15F) dans le Cette prise électrique est conçue pour remplacer n'importe quel CAISSON GAUCHE.
- Page 35 Guide d'utilisation de la visserie ÉTAPE 5 UTILISATION DE LA FIXATION TWIST-LOCK® Faire tourner sept VIS D'EXCENTRIQUE (8F) dans la MOULURE INFÉRIEURE DE SUPPORT D'EXTRÉMITÉ (EE) et les 1. Enfoncer une FIXATION TWIST-LOCK® dans le gros trou PLINTHES COURTES (BB). de la pièce.
- Page 36 ÉTAPE 11 ÉTAPE 14 Fixer une POIGNÉE (191K) sur le PETIT TIROIR (B). Utiliser deux Avec l'aide d'une autre personne, retourner soigneusement VIS À MÉTAUX 35 mm GRISES (39S). le DESSUS LONG (G) et accrocher les bords inclinés des ENTRETOISES du DESSUS LONG dans le bord incliné de Fixer trois POIGNÉES (191K) aux TIROIRS (C et D).
- Page 37 ÉTAPE 17 ÉTAPE 20 Placer la RONDELLE (82S) dans l’un des CLIPS DE Fixer les ENTRETOISES SUPÉRIEURES COURTES (CC) sur CONNECTEUR DE MOULURE (173M) comme l'indique le schéma le DESSUS COURT (H). Utiliser huit VIS TÊTE PLATE 28 mm agrandi. À l'aide d'un marteau, taper légèrement sur la RONDELLE ARGENTÉES (10S).
- Page 38 ÉTAPE 23 ÉTAPE 25 Fixer le DESSUS COURT (H) aux PLAQUES sur le DESSUS LONG (G). Tirer le GRAND TIROIR (D) complètement ouvert. Si nécessaire, Utiliser quatre VIS TÊTE LARGE 14 mm NOIRES (1S). déverrouiller le GRAND TIROIR avec le JEU DE CLÉS (23J). REMARQUE : Les bords inclinés des ENTRETOISES du DESSUS Enfoncer une ARMATURE POUR DOSSIERS (6B) sur le CÔTÉ...
- Page 39 Modelo 427803 Escritorio en L Use estas instrucciones de ensamblaje en español junto con las CONTÁCTENOS PRIMERO figuras paso-a-paso provistas en el folleto inglés. Cada paso en ANTES DE HACER DEVOLUCIONES A LA TIENDA. español corresponde al mismo paso en inglés. Compare la “Lista Tratamos de asegurar que su mueble llega en condición excelente.
- Page 40 Guía de uso de herraje Accesorios Opcionales CÓMO UTILIZAR EL EXCÉNTRICO ESCONDIDO Y (vendidos por separado) EL PASADOR LARGO Este mueble acomoda uno o más de los siguientes accesorios 1. Empuje un EXCÉNTRICO ESCONDIDO dentro de la parte. La opcionales (vendidos por separado). flecha en el EXCÉNTRICO ESCONDIDO debe apuntar hacia el agujero en el borde de la tabla.
- Page 41 PASO 4 PASO 7 Inserte dos PASADORES LARGOS (40F) a través el panel del Fije el FALDÓN CENTRAL (S) a la MOLDURA INFERIOR DE PEDESTAL IZQUIERDO. SOPORTE DE EXTREMO (EE). Apriete tres EXCÉNTRICOS ESCONDIDOS. Inserte dos PASADORES DE MADERA (15F) en el PEDESTAL IZQUIERDO.
- Page 42 PASO 9 PASO 13 No apriete los SUJETADORES TWIST-LOCK® en este paso. Con las manos, separe tres CONJUNTOS DE MECANISMO DE CERRADURA (193M). Tenga cuidado con los bordes afilados Empuje dos SUJETADORES TWIST-LOCK® SAUDER (37F) en los después de separar cada conjunto. agujeros grandes del SOPORTE DE EXTREMO (X).
- Page 43 PASO 16 PASO 19 Para insertar el CAJÓN PEQUEÑO dentro de la unidad, alinee las Empuje dos EXCÉNTRICOS ESCONDIDOS (1F) en el VELO DE CORREDERAS DE EXTENSIÓN sujetadas al cajón con los RIELES FONDO CORTO (U). DE EXTENSIÓN sujetados a la unidad y empuje el cajón dentro Coloque el VELO DE FONDO CORTO (U) en su borde con la de la unidad hasta que el cajón está...
- Page 44 PASO 22 PASO 25 Con las manos, separe los otros CONJUNTOS DE MECANISMO Abra completamente el CAJÓN GRANDE (D). Si es necesario, DE CERRADURA (193M). Tenga cuidado con los bordes afilados desbloquee el CAJÓN GRANDE con el JUEGO DE LLAVES (23J). después de separar cada conjunto.
- Page 45 WARNING Please use your furniture correctly and safely. Improper use can cause safety hazards, or damage to your furniture or household items. Carefully read the following chart. Look out for: What can happen: How to avoid the problem: • Overloaded shelves or drawers. •...
- Page 46 ADVERTENCIA Por favor use el mobiliario correcta y seguramente. El mal uso puede causar riesgos de seguridad o daño a las unidades o artículos domésticos. Cuidadosamente lea la tabla a continuación. Esté alerto de: Puede ocurrir: Evitar el problema: • Estantes o cajones sobrecargados. •...
- Page 47 à la durée d’une garantie implicite, la limite ci-dessus peut donc ne pas être applicable. remplacera ou rembourser (sur sa seule décision) la valeur de toute composante de mobilier défectueuse. Sauder peut exiger une confirmation indépendante du défaut 6.
- Page 48 CONTACT US FIRST BEFORE MAKING ANY RETURNS TO THE RETAILER. Dear Valued Customer: Register your new product online Thanks so much for choosing Sauder® furniture. I hope the For immediate service, our website is available 24 purchase and set up of your Worksense office solution was hours per day, 7 days per week to register your product, a positive experience and you feel good about the furniture access assembly tips and view other Sauder products.
Need help?
Do you have a question about the MASON PEAK woorksense 427803 and is the answer not in the manual?
Questions and answers