
Related Manuals for Pure Design Fitness AB10


Summary of Contents for Pure Design Fitness AB10
- Page 1 OWNER’S MANUAL PLEASE READ THIS INSTRUCTION MANUAL CONTACT INFO BEFORE YOU BEGIN EXERCISING Address: 72 South Street, Rydalmere, NSW 2112 ITEM NO.: AB10 Phone: 02 9808 1405...
- Page 2 Safety Information Assembly Instruction Features Instroduction Console Instroduction Exploded Diagrams Parts List...
-
Page 3: Safety Information
Safety Information PLEASE READ THIS INSTRUCTION MANUAL BEFORE YOU BEGIN EXERCISING. GREAT CARE HAS BEEN TAKEN TO DESIGN THESE INSTRUCTIONS AND FOLLOWING THEM WILL HELP YOU FOR QUICK ASSEMBLY AND MINIMIZE THE RISK OF INJURY. • Always assemble and operate the product on a level surface. •... -
Page 4: Assembly Instruction
Assembly Instruction Before you start 1. Prepare your work area 2. Work with a friend 3. Open the carton 4. Unpack the carton It is important you assemble We recommend you have Check all the warnings on Make sure you have the product in a clean and someone assist you with the carton and make sure you... - Page 5 Step 1: Front Stabilizer Assembly (1) Remove the cardboard tube from the front stabilizer bracket Loosen two Button Head Hex Screw M10*20 (#108) from the front stabilizer bracket and remove the cardboard t ube. The cardboard tube is used for packaging protection purpose, and will not be used again during the assembly. cardboard tube (2) Attach the Front Stabilizer Attach the Front Stabilizer Tube (#40) to the Main Frame (#01), with four Button Head Hex Screw M10*20 (#108) and Arc Washer (#117). Use Allen Wrench 6mm (#113) to tighten ...
- Page 6 Step 2: Rear Stabilizer Assembly (1) Remove the cardboard tube from the rear stabilizer bracket Loosen two Button Head Hex Screw M10*20 (#108) from the rear stabilizer bracket and remove the cardboard tube. The cardboard tube is used for packaging protection purpose, and will not be used again during the assembly. cardboard tube (2) Attach the Rear Stabilizer Attach the Rear Stabilizer Tube (#44) to the Main Frame (#01), with four Button Head Hex Screw M10*20 (#108) and Arc J4 Washer (#117). Use Allen Wrench 6mm (#113) to tighten all screws and washers. Be sure to fit the parts in the same order as the diagrams shown. Make sure the screws are fully tightened. 7 ...
- Page 7 Step 3: Dual Action Handlebar Assembly (1) Attach the Left Dual Action Handlebar Attach the Left Dual Action Handlebar (#51) onto the pivot axle carefully. Install the Feet Peg (#83) on. Attach the Feet Peg Cap (#84) onto the Feet Peg (#83). Be sure to fit the parts in the same order as the diagrams shown. Make sure the foot peg is fully tightened. (2) Assemble the Left Swing Arm Linkage Connect the Left Dual Action Handlebar (#51) and Connection Bracket (#74), with Conical Sleeve (#75), Head Hex Screw J2 M8*30 (#105), and Nylon Nut M8 (#93). Use Allen Wrench 5mm (#113) and Multifunction Wrench (#114)to tighten all screws. Double secure the Connection Bracket (#74) onto the Left Swing Arm Linkage (#26), with three Flat Head Hex Screw M6*15 (#107) by Allen Wrench 4mm (#113). Be sure to fit the parts in the same order as the diagrams shown. Part Make sure the screws are fully tightened. 8 ...
- Page 8 (3) Attach the Right Dual Action Handlebar Attach the Right Dual Action Handlebar (#58) onto the pivot axle carefully. Install the Foot Peg (#83) on. Attach the Feet Peg Cap (#84) onto the Feet Peg (#83). Be sure to fit the parts in the same order as the diagrams shown. Make sure the foot peg is fully tightened. (4) Assemble the Left Swing Arm Linkage Connect the Right Dual Action Handlebar (#58) and Part Connection Bracket (#74), with Conical Sleeve (#75), Head J2 Hex Screw M8*30 (#105), and Nylon Nut M8 (#93). Use Allen Wrench 5mm (#113) and Multifunction Wrench (#114) to tighten all the screws. Double secure the Connection Bracket (#74) onto the Left Swing Arm Linkage (#26), with t hree Flat Head Hex Screw M6*15 (#107) by Allen Wrench 4mm (#113). Be sure to fit the parts in the same order as the diagrams shown. Part Make sure the screws are fully tightened. Part ...
-
Page 9: Step 4: Pedal Assembly
Step 4: Pedal Assembly (1) Attach the Left Pedal Loosen the Socket Head Screw M6*10 (#109) installed on the Left Crank Arm. Attach the Left Pedal (#38) to the Left Crank Arm. Fasten the pedal with Socket Head Screw M6*10 (#109) by Allen Wrench 5mm (#113). Be sure to fit the parts in the same order as the diagrams shown. This pedal will be threaded on clockwisely. Make sure the screw is fully tightened. (2) Attach the Right Pedal Loosen the Socket Head Screw M6*10 (#109) installed on the Right Crank Arm. Attach the Right Pedal (#39) to the Right Crank Arm. Fasten the pedal with Socket Head Screw M6*10 (#109) by Allen Wrench 5mm (#113). Be sure to fit the parts in the same order as the diagrams shown. This pedal will be threaded on clockwisely. Make sure the screw is fully ... -
Page 10: Step 5: Console Support Assembly
Step 5: Console Support Assembly FIXINGS: Connect the Bottom Sensor Wire and Middle Sensor Part Wire together, and then attach the Console Support D4 Tube (#48) to the front end of the Main Frame (#01), with two Flat Head Hex Screw M8*30 (#105). Be sure to fit the parts in the same order as the diagrams shown. Middle Sensor Wire Make sure the cables are fully connected. Bottom Sensor Wire Make sure the screws are fully tightened with the allen key. Step 6: Console Assembly Remove the four Button Head Phillips Screw M5*12 (#106) which are located on the back of the Console (#85). Connect the Console Cable and Middle Sensor Wire together. Then attach the Console (#85) to the Console Support Tube (#48), with four Button Head Phillips Screw . M5*12 (#106) Be sure to fit the parts in the same order as the diagrams shown. Make sure the cables and wires are fully connected. Make sure the screws are fully ... - Page 11 Step 7: Water Bottle Holder Assembly Attach the Water Bottle Holder (#78) to the Console Support Tube (#48) and fasten it with two Button Head Phillips Screw M5*12 (#106). Then place the Water Bottle (#118) in. 12 ...
- Page 12 Features Introduc�on (1) Horizontal Adjustment Hold and li� up the Horizontal Adjustment Bracket (#62) to adjust the posi�on of Seat Cushion. Release the Horizontal Adjustment Bracket (#62) a�er the adjustment is completed. (2) Ver�cal Adjustment Pull up the Pressure Handle (#76) and adjust the height of Seat Cushion.
- Page 13 Console Introduc�on Interval Target time Target distance Target calories Target WARNING: Heart rate monitoring systems may be inaccurate.If you feel pain, faintness,or dizziness, stop exercising immediately. STOP ENTER START...
-
Page 14: Operating The Console
Operating the console: 1. QUICK START OPERATION Under STAND BY display, the user can enter “QUICK START” mode by pressing the “START” button. And then “TIME, DISTANCE, CALORIES” will ready to count up from zero. After starting the machine, the lever of resistance can be adjusted manually. - Page 15 3. TARGET TIME – PROGRAM Under STANDBY DISPLAY, pressing “TIME” program will enter the operation of this program. (1). Setting TIME When choosing TIME PROGRAM and pressing “ENTER”, the program switch to the default time of 30 seconds in blinking display. Press “UP/DOWN”...
-
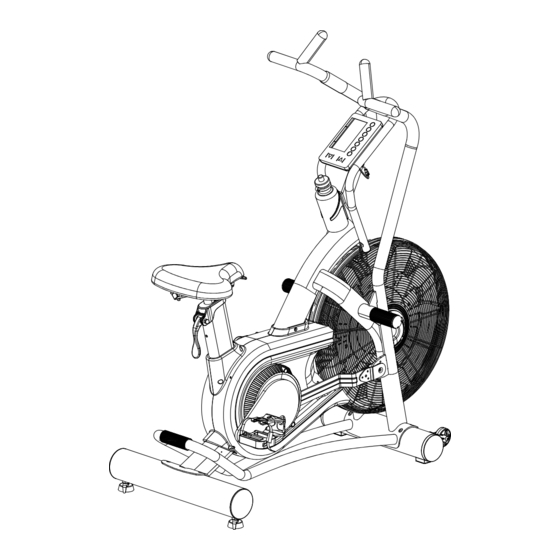
Page 16: Exploded Diagram
Exploded Diagram... -
Page 17: Parts List
Parts List DESCRIPTION OF PARTS Q'TY DESCRIPTION OF PARTS Q'TY Main Frame Adjustment Feet Fan Wheel Hub Set Round Feet Pad Fan Wheel Rear Stabilizer Cap Fan Wheel Spacer Φ16 Console Support Tube Fan Wheel Spacer Φ19 Support Tube Cap Fan Axle Wire Plug Bearing 6301Z... - Page 18 DESCRIPTION OF PARTS Q’TY DESCRIPTION OF PARTS Q’TY Hex Nut M12 Button Head Phillips Screw M5*12 Socket Head Screw M6*12 Flat Head Hex Screw M6*15 Socket Head Screw M10*40 Button Head Hex Screw M10*20 Socket Head Screw M6*20 Socket Head Screw M6*10 Nylon Nut M8 Button Head Hex Screw M8*50...
Need help?
Do you have a question about the AB10 and is the answer not in the manual?
Questions and answers