Advertisement
HE5030-A
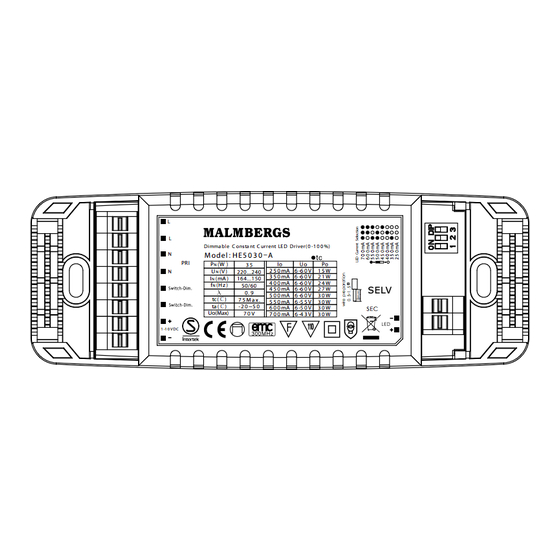
LED, 30W
L
L
Dimma ble C onsta nt C urrent LE D Driver( 0 -1 0 0 %)
N
M odel:H E 5 0 3 0 - A
PRI
P
(W )
3 5
Io
U o
Po
N
2 5 0 mA
6 -6 0 V
N
U
(V )
220...240
1 5 W
N
I
(mA )
3 5 0 mA
6 -6 0 V
2 1 W
N
164...150
4 0 0 mA
6 -6 0 V
2 4 W
f
(H z )
50/60
N
4 5 0 mA
6 -6 0 V
2 7 W
0.9
5 0 0 mA
6 -6 0 V
3 0 W
tc(℃)
7 5 M a x.
5 5 0 mA
6 -5 5 V
3 0 W
ta (℃)
-2 0 ~5 0
6 0 0 mA
6 -5 0 V
3 0 W
Uo(Max)
7 0 V
7 0 0 mA
6 -4 3 V
3 0 W
1 -1 0 V DC
Gebrauchsanweisung / Instruction
Manual / Käyttöohje / Manuel
d'utilisation / Manuale d'istruzioni /
Gebruiksaanwijzing / Bruksanvisning
Malmbergs Elektriska AB (publ)
Po Box 144, SE-692 23
Kumla, SWEDEn
Phone: +46 (0)19 58 77 00
fax:
+46 (0)19 57 11 77
info@malmbergs.com
www.malmbergs.com
99 740 67
A
I
II
III
IV
V
VI
VII
VIII
B
L
L
N
N
Switch
-Dim.
Switch
-Dim.
1-10V +
1-10V -
SEC
1
DE
Druckschalter für Lichtregulierung
EN
Push button switch for dimming
FI
Painokytkin valon säätämiseksi
FR
Bouton poussoir pour variation
I
Interruttore a pulsante per dimmeraggio
NL
Drukschakelaar voor dimmen
DE
SE
Tryckströmbrytare för ljusreglering
EN
2
FI
DE
Hebelschalter (für Einstellung von Ausgangsstrom)
EN
DIP switches (for LED current selection)
FR
FI
Vipukytkin (lähtevän virran säätämiseen)
I
FR
Commutateurs DIP (pour sélection du courant de la LED)
I
Interruttori DIP (per la selezione corrente LED)
NL
NL
DIP-schakelaars (voor LED-stroomselectie)
SE
SE
Vippbrytare (för inställning av utström)
DE
Dimmbarer Treiber LED, 30W
Hinweis. Drucken Sie kurz sollte zwischen 120ms und 1s und der zeit
abstand zwischen zwei kurzen Druck sollte länger als 120ms sein.
AnSCHLuSS
1. Einstellung von Ausgangsstrom zuerst machen. Der Ausgangsstrom wird mit
den Hebelschaler eingestellt (siehe Tabelle, Bild A).
2. Die Armaturen an den Treiber gemäß Anschlusschema anschließen (siehe Bild B).
TASTEr für LICHTrEGuLIErunG
Ein/aus: Kurzer Druck auf den Schalter.
Dimmung: Der Schalter drucken und einhalten.
feinabstimmung des Lichtniveaus: Bei jedem zweite lange Druck geht das
Lichtniveau in entgegengesetzter richtung.
Memoryfunktion: Das Licht geht bei Ausschaltung und Wiedereinschaltung zu
vorigem Dimmungsniveau zurück, auch bei Stromunterbrechung.
SynCHronISATIon
Dank dem MCu-Programm gibt von Anzahl Treiber, wann sie zu demselben
Schalter angeschlossen sind, keine Begrenzung. Dies bedeutet, dass kein weitere
Synchronisierkabel in großen Installationen, wo viele Treiber von demselben Schal-
ter kontrolliert wird, benötigt ist.
um korrekte funktion der Synchronisation, wann mehrere Treiber an denselben
Druckschalter angeschaltet sind, zu erreichen, muss, nachdem die Treiber einge-
schaltet sind, folgendes gemacht wird:
Der Druckschalter für mehr als eine Sekunde einschalten, erzeuge dann eine
kurze Einschaltung.
Danach muss die Treiber ausgeschaltet werden, mache danach eine lange Ein-
schaltung mit dem Druckschalter. Das System ist nun auf null gestellt.
Achtung: Versichern Sie sich, dass korrekter Strom eingestellt ist ehe der
Treiber gestartet ist!
SPEzIfIKATIonEn
Modell
reihenspannung
nennstrom
Ausgangsspannung 70V
Arbeitstemperatur
Ausgangsstrom
und Belastung
Sicherung
Temperaturschalter Temperaturschalter mit automatischer rückstellung
EMC Standard
Sicherheitsstandard En61347-1, En61347-2-13
zertifikat
Masse
Schutzklasse
350mA
1
2
3
mA
250
350
400
450
500mA
500
550
600
700
2
LED +
(nr. 1 Bild B und C)
(siehe Anschlusschema Bild C)
HE5030-A, 1x30W
220-240V AC, 50/60Hz
0,16A
Ta: -20~50ºC Tc: 75ºC
250mA: 15W, 6-60V
500mA: 30W, 6-60V
350mA: 21W, 6-60V
550mA: 30W, 6-55V
400mA: 24W, 6-60V
600mA: 30W, 6-50V
450mA: 27W, 6-60V
700mA: 30W, 6-43V
Ausgang mit automatischer rückstellung
En55015, En61547
SEMKo, CE, EMC
Siehe Bild D
IP20, unterputz
C
1
L
n
L
n
LED -
D
150
EN
Dimmable LED driver, 30W
Note: Short push should be a time period between 120ms to 1s, and the
time interval between two short pushes should be longer than 120ms.
ConnECTIon
1. Start with setting the output current. The current can be easily configured by
choosing the correct combination of the DIP switches (see table, fig. A).
2. Connect the luminaires to the driver according to the wiring diagram (see fig. B).
PuSH BuTTon SWITCH for DIMMInG
on/off: Short push on the switch.
Stepless dimming: Long push on the switch.
for fine tuning of light level: With every other long push, the light level goes the
opposite direction.
Built-in with permanent memory: Light returns to the previous dimming level
when switched off and on again, even at power failure.
SynCHronIzATIon
(see wiring diagram, fig. C)
no limitation on the number of drivers when connected to the same switch, thanks
to the MCu programme. This means there is no need for any additional synchrony
wire in larger installations, where many drivers should be controlled by one switch.
for the resynchronization to work correctly when more than one driver is con-
nected to the same push button, please follow the steps below after the drivers are
connected:
Press the push button for more than one second (long push), followed by a short
push (<1s).
now that the devices are switched off, do a long push, the system will now be
resynchronized.
Warning: Please make sure the correct current is set before starting the
driver!
SPECIfICATIonS
Model
HE5030-A, 1x30W
rated voltage
220-240V AC, 50/60Hz
rated current
0.16A
output voltage
70V
operating
Ta: -20~50ºC Tc: 75ºC
temperature
output current
250mA: 15W, 6-60V
& load
350mA: 21W, 6-60V
400mA: 24W, 6-60V
450mA: 27W, 6-60V
Abnormal protection output short-circuit protection with auto reset
overheating
overheating protection with auto-reset
protection
EMC standard
En55015, En61547
Safety standard
En61347-1, En61347-2-13
Certification
SEMKo, CE, EMC
Dims
See fig. D.
Protection class
IP20, built-in type
99 740 67
99 740 67
n*Driver
99 740 67
99 740 67
n*Driver
(mm)
(no. 1 fig. B and C)
500mA: 30W, 6-60V
550mA: 30W, 6-55V
600mA: 30W, 6-50V
700mA: 30W, 6-43V
Advertisement
Table of Contents

Related Manuals for Malmbergs HE5030-A


Summary of Contents for Malmbergs HE5030-A
- Page 1 450mA: 27W, 6-60V 700mA: 30W, 6-43V Sicherung Ausgang mit automatischer rückstellung Abnormal protection output short-circuit protection with auto reset Temperaturschalter Temperaturschalter mit automatischer rückstellung Malmbergs Elektriska AB (publ) overheating overheating protection with auto-reset protection Po Box 144, SE-692 23 EMC Standard...
- Page 2 Avertissement : S’assurer que le courant approprié a été configuré avant de corrente giusta! TEKnISET TIEDoT démarrer le pilote. SPECIfICHE SPéCIfICATIonS Malli HE5030-A, 1x30W Modello HE5030-A, 1x30W Modèle HE5030-A, 1x30W nimellisjännite 220-240V AC, 50/60Hz Tensione nominale 220-240V AC, 50/60Hz...
Need help?
Do you have a question about the HE5030-A and is the answer not in the manual?
Questions and answers