Advertisement
Quick Links
Advertisement

Related Manuals for SMARSECUR WS-S6A

Summary of Contents for SMARSECUR WS-S6A
- Page 1 WS-S6A Indoor Siren www.smarsecur.com...
-
Page 2: Box Content
Features The ES-S6A can be used either as an additional siren connected to your alarm system or as an independent siren connected to a remote control and/or wireless detectors. Wireless connection for an easy installation Radio-frequency security of the accessories: more than one million of codes combinations Can be connected to all of eTiger Secual accessories Built-in 4.2V / 600 mAh lithium batteries: 8-hour battery life in standby mode... -
Page 3: General Information
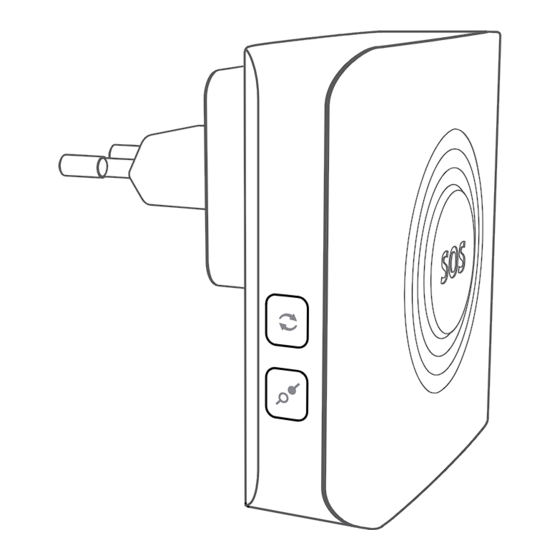
Layout Switch / Power Connect General information The ES-S6A is powered by its built-in AC 110-220V plug. Several ES-S6A can be installed throughout your home and connected to your alarm system. When the alarm of your system is triggered, the ES-S6A rings out and its LEDs switch on. - Page 4 Power on You hear a long beep: the siren is on. You can also turn the siren on by long pressing (6 seconds) the Power button on the siren. Enter Setup Mode by pressing the Power button once. Press again the Power button for 6 Siren and light indications When arming the system The siren beeps once, the LED lights blink once and switch on.
- Page 5 Use as an additional siren If the siren is used as an additional siren, it must be registered to your alarm’s control panel. If the alarm is triggered, the ES-S6A will ring out and its LED lights will turn on. Register the ES-S6A in the control panel Press the Connect button on the siren.
- Page 6 Use as a standalone alarm system Before using the ES-S6A as a standalone alarm system, it must be connected to a remote control or an accessory (e.g. motion detector, door / window contact). When the system is armed, if a sensor is triggered, the siren will ring out and the LED lights will turn on.
- Page 7 Test a) Test the connection to a remote control Press the “Arm” button on the remote control. The siren beeps once: the connection of the remote control is successful. If not, the connection has failed, try registering the remote control again. b) Test the connection to a wireless sensor Arm the system.
-
Page 8: Entry / Exit Delay
Entry / Exit Delay A delay before activation can be set for the siren if the sensor is assigned to the Delay Zone*. If the Entry / Exit Delay is activated, the siren beeps once every second until the system is armed, during the period of delay set. If one of your system’s sensors triggers the alarm, the ringing out of the siren will be delayed accordingly. - Page 9 been assigned to the Delay Zone. To assign a sensor to the Delay Zone, open its cover and move the jumpers on the circuit board according to the opposite drawing. For more information, refer to the manual of your alarm system. Night Lamp mode When used as a standalone alarm system, the ES-S6A can also be used as an LED night lamp.
- Page 10 Power supply Radio frequency 110-220V 433MHz (±75KHz) Volume Housing material 90dB ABS plastic Backup battery Operating conditions 4.2V / 600mA Lithium Temperature: -10°C ~ +55°C Relative Humidity: ≤80% (non- Static current condensing) < 13mA Dimensions Alarm current 81 x 80 x 76 mm <...
Need help?
Do you have a question about the WS-S6A and is the answer not in the manual?
Questions and answers