Table of Contents
Advertisement
Quick Links
Advertisement
Table of Contents

Related Manuals for Sinexcel INTERSTELLAR Series

Summary of Contents for Sinexcel INTERSTELLAR Series
- Page 1 INTERSTELLAR EV AC CHARGER User manual...
-
Page 2: Table Of Contents
About the document .........3 Symbol conventions .........4 1. Safety ............5 2. Description ...........6 3. Operation Ⅰ ..........15 4. Sinexcel AC APP ........28 5. Maintenance and cleaning ......34 6. Troubleshooting ......... 38 7. Cyber security ..........41 8. Warranty .............42... -
Page 3: About The Document
The copyright of contents, pictures, logos, symbols, etc. used in this manual are all owned by Sinexcel. Without authorization, it is forbidden to disclose, excerpt and copy part or all of the contents of this manual (including materials and publications). -
Page 4: Symbol Conventions
Symbol conventions Symbol Description Warning If you do not obey the instruction it might cause injury or death. Danger Risk of electrocution Caution of fire Note A note gives more details for easy use. It means that the machine cannot be discarded randomly after use and should be delivered to a dedicated recycling place, otherwise it may cause environmental pollution. -
Page 5: Safety
1. Safety 1.1 General safety instructions ●This product is an integrated charger that can charge electric vehicles in indoor and outdoor areas. ●Please use and save the product information and accessories that are shipped with the device properly. ●If any problem or failure occurs during use, please consult the manufacturer directly. If the user resorts to a third party or a non-professional person for maintenance during the warranty period, any security consequences shall be borne by the user. -
Page 6: Description
2. Description 2.1 General description Interstellar is an AC charger supplies electricity to the EV. The product adopts DLM system and IMD technology which makes strong charging performance with great quality. It has multiple safety protection functions with a protection rating of IP65, suitable for indoor or outdoor use. 2.2 Overview 2.2.1 Overview of EVSE, outside emergency button... - Page 7 2.2.2 Overview of EVSE, inside Light board Smart meter(optional) Mainboard Circuitbreaker Maintenance cover Terminal block RFIDreader Part Function Maintenance cover For maintenance and operation of on&off For short circuit protection, overload protection and leakage Circuit breaker protection Smart meter For metering Mainboard To control the EVSE RFID reader...
- Page 8 2.2.3 Pedestal 2.2.4 Nameplate...
- Page 9 2.3 Specification Interstellar (Residential Use) Rated Power 22kW Input/Output Single-Phase 230V Three-Phase 400V Voltage Input/Output Current Weight 7.5KG W406*H450*D162 Dimensions Frequency 50Hz Connector IEC Type 2 Cable Length 3m(5m optional) Charging Status Information Authorization Plug and Charge Metering MID Meter(optional) Installation Floor-mounted/Wall-mounted Over current protection, over/under voltage...
- Page 10 Interstellar (Commercial Use) Rated Power 22kW Input/Output Single-Phase 230V Three-Phase 400V Voltage Input/Output Current Weight 7.5KG Dimensions W406*H450*D162 Frequency 50Hz Connector IEC Type 2 Cable Length 3m (5m optional) Charging Status LED/Display(optional) Information Authorization NFC/RFID/Plug and Charge/APP(optional) Metering MID Meter(optional) Communication LAN/Wifi/4G(optional) Method...
- Page 11 2.4 Parts included in the delivery Wall-mounted Parameter Specification Quantity EVSE Materials:PBT+PC Wall-mounted template L160*W299*D15mm RFID card Sabotage-proof hexalobular Stainless steel M4X10 socket screw Cable ties Product manual & installation manual Product certification Wrench Stainless steel T20 Expansion tube ¢6*30mm(PE) Cross recessed pan head self- Type C stainless steel drilling screw...
- Page 12 2.5 Product model numberS S E A 400/32-Y-E-P S E A 230/32-Y-E-P...
- Page 13 2.6 Standards Interstellar is designed according to the European standard and meets the industrial standards in terms of function and performance. The specific technical standards are shown in the table below. Standard Title number BS EN Electric vehicleconductive charging system. General IEC61851-1:2019 requirements Plugs, socket - outlets, vehicle connectors and vehicle inlets -...
- Page 14 Assessment of electronic and electrical equipment related to human exposure restrictions for electromagnetic fields (0 Hz - EN 62311:2008 300 GHz) Assessment of the compliance of low power electronic and electrical equipment with the basic restrictions related to EN 62479:2010 human exposure to electromagnetic fields (10 MHz to 300 GHz) Electric vehicle conductive charging system- Part 1: General...
-
Page 15: Operation Ⅰ
3. Operation Ⅰ 3.1 Preparation before operation 1)Ensure that there is no fire around the EVSE and the surrounding space is not blocked. 2)Ensure there is no damage on the cable. 3)Ensure that the EVSE is maintained regularly. Refer to section 4. 4)No need to set network or change any system settings following section 3.2/3.3. - Page 16 3.2.3 Prepare to charge screen Authorize the use of EVSE by RFID card, password and operator APP. 3.2.4 Start to charge screen The interface jumps to charging information screen when the EVSE start to charge, as shown in the 1) figure below.
- Page 17 3.2.5 Stop charging screen During the charging session, use RFID CARD, password and operator APP can stop charging. 1) Whenfully charged, the EVSE will automatically stop charging. In an emergency, it is able to cut off the powerby pressing the emergency stop button. When the charging cycle is completed, the display as shown in the figure below.
- Page 18 3.3 Charging procedure (EVSE without display) 3.3.1 Connect to the connector Take out the connector from the enclosure or the hanger installed on the pedestal (refer to section 3.5) 1) and connect it to the EV. After the connector is plugged in correctly, the EVSE will be ready for charge. 2)...
- Page 19 3.4 Description of the display screens (optional) 3.4.1 How to enter the administrator interface Tap the top of the screen, as the green arrow shows, twice. The numeric keypad will show up. Then enter the password 123456 to get into the administrator interface.
- Page 20 3.4.2 How to set time Choose manufacturer setting. Tap the Set Time button and the numeric keypad will show up. Enter the correct time in the sequence of year, month, day, hour, minute and second (yyyy.MM.dd.HH.mm.ss). Please note that dots should be entered between each data. For example, for 2021/12/1 17:30:19, enter 21.12.1.17.30.19...
- Page 21 3.4.3 How to set time zone Choose manufacturer setting. Enter the parameter to set the time zone. The first and second digits means hours The third and fourth digits means minutes The last digit means either increment(1) or subtraction(0) For example: 12001: Subtract 12 hours and 0 minutes for UTC -12:00 8300: Increase 8 hours 30 minutes for UTC +8:30...
- Page 22 3.4.4 How to connect to a WiFi network Choose the manufacture setting to enter the setting interface and tap WiFi button. Enter “1” to turn on WiFi.
- Page 23 Get back to the Administrator interface and tap the Net Setting button. Enter the name and the password of WiFi to connect to the WiFi network.
- Page 24 3.4.5 How to connect to 4G or Ethernet Choose Net Setting to enter the Network interface and tap the network type button. Set the parameter to choose the network type. “0” means connect to 4G; “1” means connect to Ethernet. Enter the number to choose the network type that you want to connect to.
- Page 25 EVSE on your own vehicle. Turn on Bluetooth on the vehicle you want to connect to, then the device lists will be showed up on the Bluetooth screen on the vehicle, and choose the device named as “sinexcel charger” to connect the Bluetooth between the two.
- Page 26 3.4.7 Description of icons of idle screen These icons mean the EVSE has connected to 4G/Ethernet/Bluetooth/WiFi 1) These icons mean the EVSE has connected to 4G/Ethernet/Bluetooth/WiFi and the platform. 2) These icons mean the EVSE fails to connect to 4G/Ethernet/Bluetooth/ WiFi 3)...
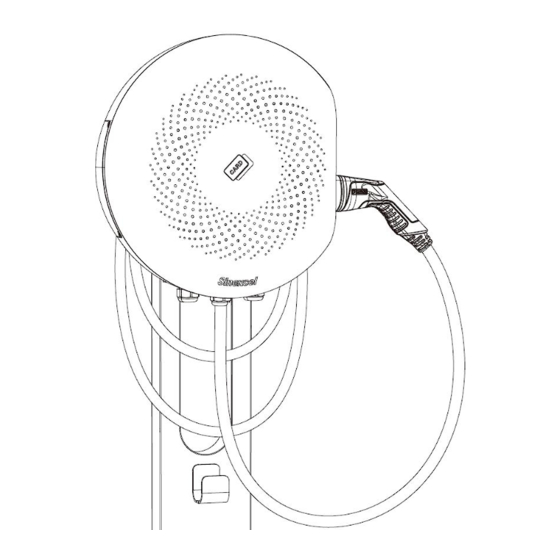
- Page 27 3.5 Cable Management System The cable management system is designed to hang the cable up and keep it clean. The user can wrap the EV charge cable around the hanger which is installed on the pedestal for storage.
-
Page 28: Sinexcel Ac App
4. Sinexcel AC APP 4.1 Download APP Apple users should search for Sinexcel AC download and installation in Apple Store, and Android users should search for Sinexcel AC download and installation in Google Store. 4.2 Register/Sign in You need to register to log in to Sinexcel AC APP for the first time. - Page 29 4.3 Binding Enter the App interface, as shown in the figure, and click "+" in the upper right corner to enter the binding page. Enter the user-defined name, click the charger model and select interstellar; the Charger number is bound by scanning the code, and the specified QR code is scanned to automatically obtain the charger number;...
- Page 30 4.4 Unbinding...
- Page 31 4.5 Authorization management Click "Authorization Management" in the "Device Details" interface, click "Add Authorization" in the upper right corner, enter the email account of the authorized user (registered), and click "Save and Apply" to complete the authorization; The authorized user has some functions such as start/stop charging, timed charging, plug and play charging and data analysis.
- Page 32 4.6 Parameter query Click "parameter setting" under the "equipment details" interface, and the following parameters can be viewed or set under this interface (note: users should not modify parameters without authorization to avoid unnecessary trouble)
- Page 33 Firmware update Click "Firmware Upgrade" under the "Device Details" interface. Select the version, upgrade or downgrade to the corresponding version of software as required, and then click Upgrade or downgrade. When you are in the process of software upgrade, please wait patiently for the completion of the upgrade process, which is estimated to be 2-3 minutes.
-
Page 34: Maintenance And Cleaning
5. Maintenance and cleaning 5.1 Maintenance and cleaning 1)Please check whether there is damage on the cabinet cover, outlets, cables and connectors every time before use. 2)Please check whether there is damage on the display every time before use. 3)Please use low pressure water to clean the enclosure of the EVSE every 4 months. In case of stubborn dirt, please apply a cleaning agent and clean it manually. - Page 35 2) Unscrew screw B on 2PIN connector A. Disconnect CP/PP cable.
- Page 36 7kW: Unscrew screw C,D on circuit board and G on copper busbar. Disconnect neutral wire (H), L1(I) and earth wire(L). 22kW:Unscrew screw C, D, E, F on circuit board and G on copper busbar. Disconnect the neutral wire (H), L1 (I), L2 (J), L3 (K), and the earth wire (L). 4) Unscrew screw N and O which are used to fix hose clamp M.
- Page 37 5.3 Assemble the connector cable Reverse to the process documented in 5.2.
-
Page 38: Troubleshooting
6. Troubleshooting 6.1 Error code Error Problem Possible cause Possible solution code In an emergency 1. Check whether the emergency situation, the stop button is pressed. If it is Emergency Error 1 emergency button is pressed, reset the emergency stop; shutdown pressed 2. - Page 39 RFID card reader Error 8 Damage on the RFID card communication Reseat and unplug the reader reader failure communication cable The internal Error 9 temperature is higher Over temperature Contact technical support than the protection threshold value. The Residual Current Contact technical support Monitor fails or residual Error 10...
- Page 40 6.2 LED description Status Light description Standby Green -constant light Connection Blue-constant light Charging Blue-breathing light Emergency Red-constant light shutdown Blue-2s flashing light; Red -constant light Over/under voltage RCD fault Red-2s flashing light Over current Red-500ms flashing light Relay adhesion Red-constant light;...
-
Page 41: Cyber Security
7.2 Operator platform As the EVSE starts to work, it is connected to the Sinexcel charging facility platform, which can realize functions such as remote management, diagnosis, configuration, maintenance, and upgrade. Sinexcel requires the use of secure communication protocols (HTTPS/TLS1.2 or higher secure cryptographic algorithms) for product communication. -
Page 42: Warranty
●Prepare the installation environment according to the requirements described in this manual. ●Ensure that the EVSE has enough space for passage and maintenance. ●It is necessary to be fully aware that changes and changes without the permission of Sinexcel may affect the user's operating authorization and may also affect the warranty. - Page 43 8.4 Disclaimer The EVSE needs to be used normally within a certain range of conditions. Sinexcel will not be responsible for accidents or damage caused by one of the following situations: ●Products and accessories not marked by our company; ●The product or component has exceeded the warranty period of our company;...
-
Page 44: Contact Us
Our company provides customers with a full range of technical support, if you have any questions about the product or technical problems, please feel free to contact us. Shenzhen Sinexcel Electric Co., Ltd. Address: 1002 Songbai Rd, Nanshan, Shenzhen, China Website: https://en.sinexcel.com/... - Page 45 Sinexcel Shenzhen Sinexcel Electric Co, .Ltd. Stock code: 300693 Address: 6th Building 2nd District Baiwangxin High-tech Industry Park, Songbai Road, Nanshan District, Shenzhen.
Need help?
Do you have a question about the INTERSTELLAR Series and is the answer not in the manual?
Questions and answers