
Related Manuals for Norden NVS-PA0029006CP


Summary of Contents for Norden NVS-PA0029006CP
- Page 1 NVS-PA0029006CP/NVS-PA0030006CP 6 Zone Integrated PA Host with Amplifier User Manual...
- Page 2 Thank you for using our public address system. Please read this User Manual carefully to make better use of this equipment...
-
Page 3: Table Of Contents
Contents Profile of Product…………………………………………………..…………………………………………3 Description……………………………………………………………………………………………3 Features…..…………………………………………..………………………………………………. 3 Appearance.….…………………………………………..……………………………………………………..4 Front Panel………………………..……………………………..……………………………………4 Rear Panel……………………………………………….…………………………………………….7 Operating Instructions……………………………………………………………………………………..9 Remote Controller……………………………………………………………………………… 12 Specifications………………….……………………………………………………………………………..14... -
Page 4: Profile Of Product
Profile of Product Description The NVS-PA0029006CP is a Digital Mixer Amplifier can be used in conjunction with the NVS-PA0032006PM Remote Paging Station. It supports 2-channel RJ-45 remote paging microphone. The amplifier has a screen for intuitive display, with input sources such as 4 MIC, 4 AUX, USB, FM, Bluetooth, and TF. It also provides protection function when overload, clipping, short circuit, and abnormal working temperature occur. -
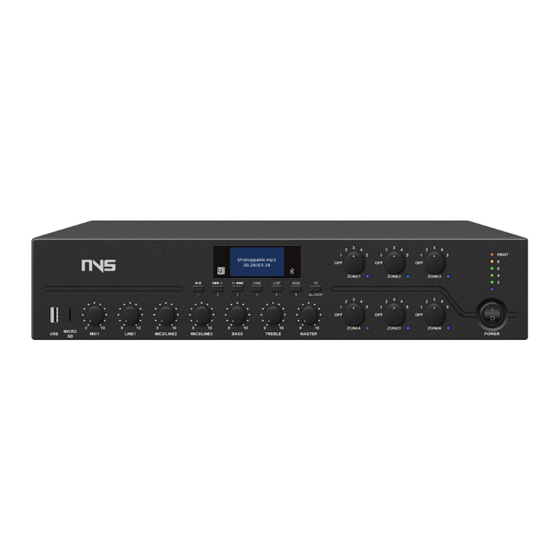
Page 5: Appearance
Appearance Front Panel 1. USB Insert a USB flash drive here to provide programs to the built-in MP3, whose memory is 32GB 2. SD Card 3. MIC1 Volume Adjustment Knob Adjust the volume of the MIC1, clockwise to volume up and counter clockwise to volume down 4. - Page 6 8. Treble Volume Adjustment Knob With the center position as the reference, clockwise to volume up and counter clockwise to volume down 9. Main Volume Adjustment Knob Adjust the volume of all signals (except the emergency input signal on the rear panel), clockwise to volume up and counter clockwise to volume down;...
- Page 7 In FM, AUX, USB, SD, and Bluetooth modes, long press this button to turn down the volume of MP3 sources (including FM, SD, USB, and Bluetooth) Infrared Remote Control Receiving Previous Song / (FM mode for previous program) In USB and Bluetooth modes, press this button to the "Previous song" ...
-
Page 8: Rear Panel
Rear Panel 1. Power Input Connector AC230V Access the power plug to this connector. When connecting, please insert the plug of this device first, and then connect to the grid. 2. 6-zone Output 3. LINE Output 4. LINE1 Input 5. MIC1 Balanced Input 6. - Page 9 LINE2/ MIC2 Phantom Voltage Switch Toggling the switch to left and right (Note: When toggle this switch, you need to turn down the volume of the device or turn off the power of the device first) MIC1 Phantom Voltage Switch Toggling the switch to left and right (Note: When toggle this switch, you need to turn down the volume of the device or turn off the power of the device first)
-
Page 10: Operating Instructions
Operating Instructions 1. Initial Start-up When starting up the stereo amplifier for the first time, do as follows: Turn down the total volume. Turn down the zone volume. Connect the stereo amplifier to the power supply; Turn on the amplifier till the power indicator is on. - Page 11 Random Play Directory Loop Single Loop 5. Line Mode Press the MODE button until the digital screen displays AUX to enter Line Mode, as shown below. 6. FM Mode For button description, please refer to the instructions in "Front Panel" above, sections 20, 22 and 23.
- Page 12 7. 6-zone Control Switch Short Press the button FN to enter the zone setting interface, and the "1", "2", "3", "4", "5" and "6" buttons on the panel can be used to turn on or off the corresponding zones as shown in the figure below. Press and hold the FN button for more than 1s to open all zones.
-
Page 13: Remote Controller
9. Phantom Power Switch on the phantom power switch to provide phantom power (+ 48V) to all green terminal microphone inputs. It is not recommended to switch on for normal use but only used for MIC1, MIC2/LINE2, MIC3/LINE2, MIC4/LINE2. Remote Controller As shown in the following figure, remote controller keys are introduced in detail. -
Page 14: Specifications
Specifications Characteristics NVS-PA0029006CP NVS-PA0030006CP Power Supply AC230V 50/ 60Hz MIC1 10mV ±1mv MIC1 10mV ±1mv (Balanced XLR Input) (Balanced XLR Input) MIC2/MIC3/MIC4 MIC2/MIC3/MIC4 10mV ±1mv (Unbalanced 10mV ±1mv Phoenix Jacks) (Unbalanced Phoenix Input Jacks) Sensitivity AUX1 350mV±50mv AUX1 350mV±50mv (Unbalanced RCA Input)
Need help?
Do you have a question about the NVS-PA0029006CP and is the answer not in the manual?
Questions and answers