LaCie d2 Quadra USB 3.0 User Manual
Hide thumbs
Also See for d2 Quadra USB 3.0:
- User manual (24 pages) ,
- Quick installation manual (22 pages) ,
- Datasheet (2 pages)
Table of Contents
Advertisement
Quick Links
Advertisement
Table of Contents

Related Manuals for LaCie d2 Quadra USB 3.0


Summary of Contents for LaCie d2 Quadra USB 3.0
- Page 1 D2 QUADRA USB 3.0 USER MANUAL CLICK HERE TO ACCESS UP-TO-DATE ONLINE VERSION of this document for the most recent content as well as for features such as expandable illustrations, easier navigation, and search capability. d2 Quadra USB 3.0 User Manual...
-
Page 2: Box Content
These pages will guide you through the process of connecting your LaCie product and will explain its features. If this manual doesn't answer your questions or if you are having trouble, consult the Getting Help page. -
Page 3: Minimum System Requirements
MINIMUM SYSTEM REQUIREMENTS Your system must meet certain requirements in order for your LaCie product to function properly. For a list of these requirements, please refer to the product packaging or consult the product support web page at www.lacie.com/support/. Note: USB 3.0 Connection: For optimal performance through the USB connection, the drive must be connected to a USB 3.0 host port. -
Page 4: Views Of The Drive
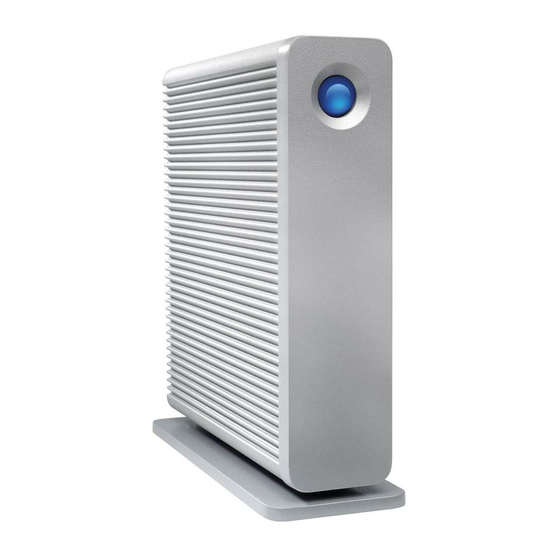
VIEWS OF THE DRIVE Front View Shortcut Button with Activity LED Removable stand d2 Quadra USB 3.0 User Manual... -
Page 5: Rear View
Rear View Power switch FireWire 800 ports USB 3.0 port eSATA port Power supply connection Chain lock option d2 Quadra USB 3.0 User Manual... -
Page 6: Hard Disk Heat Management
HARD DISK HEAT MANAGEMENT Heat Dissipation Design This LaCie product's metal body is ideal for naturally dissipating internal drive heat. Its unique design actually draws heat away from the internal drive toward the external casing. The large surface area of the heat sink casing absorbs internal heat and dissipates it, keeping the drive safe and prolonging its life and reliability. -
Page 7: Led Information
LED INFORMATION Your LaCie hard drive features a multi-functional LED on the front of the drive. LED STATES Power LED Behavior State Button The product is turned off or the computer is in sleep mode. The product is not connected to a host computer via one of the interfaces. If... -
Page 8: Cables And Connectors
Your LaCie drive is shipped with a SuperSpeed USB 3.0 cable to ensure maximum data transfer performance when connected to a compatible USB 3.0 port. The cable will also work when connected to a USB 2.0 or 1.1 port, but drive performance will be limited to their respective transfer rates. - Page 9 Note: FireWire 800 is backwards compatible with FireWire 400, which means that if you have an adapter cable, you can connect your LaCie FireWire 800 product to a FireWire 400 port on your computer. In this case, file transfers will be limited to FireWire 400 speeds. If your product does not include an adapter cable in the package, you can purchase one from www.lacie.com/accessories/.
- Page 10 ESATA Your LaCie product offers the latest in SATA technology, allowing interface (or bus) transfer rates of up to 3 Gbits/s. SATA technology was originally developed to serve as an internal interface, delivering improved performance to internal connections. Soon after, eSATA, or external SATA was developed, allowing for the use of shielded cables outside the PC.
-
Page 11: Getting Connected
GETTING CONNECTED Installing your LaCie hard drive is easy for all users thanks to LaCie Setup Assistant. Please follow the setup steps in the order they are given to ensure that your LaCie hard drive's volume mounts correctly on your computer. -
Page 12: Step 2 - Connect The Interface Cable
FireWire 800 is backwards-compatible with FireWire 400, which means that if you have an adapter cable, you can connect your LaCie FireWire 800 product to a FireWire 400 port on your computer. In this case, file transfers will be limited to FireWire 400 speeds. If your product does not include an adapter cable in the package, you can purchase one from www.lacie.com/accessories/. -
Page 13: Step 3 - Turn On The Drive
Note: If the drive does not mount on your computer, first make sure you have installed USB 3.0 drivers on your computer (see the note on USB 3.0 connections at Introduction). If the drive still does not mount, see troubleshooting topics at Getting Help. d2 Quadra USB 3.0 User Manual... -
Page 14: Step 4 - Launch Lacie Setup Assistant
Launch LaCie Setup Assistant Windows users AutoPlay: Windows AutoPlay may detect your LaCie hard drive as soon as it is connected to your computer. If the AutoPlay window appears, choose Open folder to view files using Windows Explorer and double-click LaCie Setup. - Page 15 Manual access: Open the LACIE SETUP volume in Computer (My Computer for Windows XP) and double-click LaCie Setup. Mac users Open the LACIE SETUP volume on your desktop and then double-click LaCie Setup d2 Quadra USB 3.0 User Manual...
- Page 16 Setup LaCie Setup Assistant does not prevent you from using your computer's native disk utility program to format or partition your LaCie drive. Simply follow the Setup Assistant through completion, then use Disk Management for Windows or Disk Utility for Mac to reformat your drive.
- Page 17 Use the slider to partition your LaCie hard drive. Moving the slider to the left will reduce the size of the Compatible volume (called LaCie Share on some products) (for Windows and Mac). If you do not want the Compatible / LaCie Share volume, move the slider all the way to the left. The LaCie volume will be formatted for your operating system, NTFS for Windows and HFS+ for Mac.
- Page 18 A window prompt alerts you that the disk will be formatted. Select Yes to continue. Windows LaCie Setup Assistant will format the hard drive. Register your LaCie device. Choose Next to continue. New Account d2 Quadra USB 3.0 User Manual...
-
Page 19: Step 5 - Install Lacie Desktop Manager
STEP 5 - INSTALL LACIE DESKTOP MANAGER You can now choose to install and run LaCie Desktop Manager after you run LaCie Setup Assistant. This software allows you to set up an action when you click the front blue button (shortcut button), view advanced information on your drive, and to configure power-saving. -
Page 20: Lacie Desktop Manager
LACIE DESKTOP MANAGER LaCie Desktop Manager unlocks the full potential of your Lacie hard drive. It will allow you to see advanced information on your drive and to configure Eco Mode and the shortcut button. Note: LaCie Desktop Manager is not compatible with all LaCie devices. Only compatible LaCie devices will appear in LaCie Desktop Manager. - Page 21 INFO TAB When you run LaCie Desktop Manager, you will see that all compatible connected LaCie devices will appear in the left-hand column. Choose the drive you wish to manage and make sure the Info tab is selected. On this page you will see advanced information on your drive, such as device name, the internal hard disk serial number (not the LaCie product serial number), available capacity, connection type, etc.
-
Page 22: Shortcut Tab
Eco Mode. Eco Mode and Mac OS X: Based upon your LaCie hard drive, Eco Mode may be managed by Mac OS X. If prompted, please click on Energy Saver Settings to enter the System Preferences. Select “Put the hard disk(s) to sleep when possible”... - Page 23 Select the Shortcut tab. If the drive is locked, you will be asked to authenticate. You can configure the short click action by dragging and dropping or by using the Change button (choose any application or document). Note that if LaCie backup software is installed, it will appear as the default action.
-
Page 24: Unmounting Your Drive
USB, FireWire, Thunderbolt, and eSATA external devices feature “plug & play” connectivity, which means that your LaCie storage can be connected and disconnected while the computer is running. To prevent failures, however, it is important to follow these steps when disconnecting your device. -
Page 25: Mac Users
MAC USERS Drag the storage device icon to the Trash. (The icon pictured below is a generic USB device icon. Your LaCie storage may be represented by an icon that looks like the device itself.) When the icon disappears from the desktop, the storage device can be disconnected. -
Page 26: Optional Formatting And Partitioning
OPTIONAL FORMATTING AND PARTITIONING Standard LaCie storage devices will prompt you to run LaCie Setup Assistant when they are first connected to a computer (Windows or Mac). LaCie Setup Assistant helps you to quickly format the storage device according to your needs. -
Page 27: Formatting Instructions
MS-DOS File System (FAT 32): This is the Microsoft file system, more typically known as FAT 32. Use FAT 32 if you are going to be sharing your LaCie storage device between Mac and Window computers. See the table below for a comparison between HFS+ and FAT 32 (MS-DOS). - Page 28 Right-click on Computer and choose Manage. From the Manage window select Disk Management. From the list of storage devices in the middle of the Disk Management window, locate your LaCie device. By default, a partition is already created on the device with LaCie software utilities. Follow your operating system instructions to reset the existing partition.
-
Page 29: Getting Help
GETTING HELP If you are having problems with your LaCie product, consult the table below for a list of available resources. Order Source Description Location Concise steps to Quick follow for getting your Either a printed leaflet or accessory box and included in the... -
Page 30: Troubleshooting Topics
A: If your computer has a low-performance internal hard drive (typically a notebook or netbook computer), it will limit the transfer speed since the internal drive's transfer speed will be significantly less than that of your LaCie USB hard drive. -
Page 31: Problem: I'm Receiving File Transfer Error Messages
Q: Did you get an error message telling you that the drive has been disconnected when coming out of sleep mode? A: Simply ignore this message. The drive will remount to the desktop. LaCie drives conserve power by spinning down when you set your computer to sleep mode, and when the computer is awoken from sleep, it may not give the drive enough time to spin-up from its sleep mode. -
Page 32: Windows Xp, 2000, Vista, And Windows 7 Users
+ on the left side. If you're not sure if your drive is listed, unplug it, then reconnect it. The entry that changes is your LaCie drive. Q: Does your disk not appear at all? A: Proceed to physical troubleshooting topics above. - Page 33 Q: Is your operating system Windows XP and the disk size is greater than 2TB? A: Windows XP does not support disks larger than 2TB. Please refer to the note for Windows users in Formatting Instructions. d2 Quadra USB 3.0 User Manual...
-
Page 34: Health And Safety Precautions
II). Do not expose the LaCie hard drive to temperatures outside the range of 5º C to 30º C (41º F to 86º F); or to operational humidity beyond 10-80%, non-condensing, or non-operating humidity beyond 10-90%, non-condensing. - Page 35 Never use excessive force on your LaCie hard drive. If you detect a problem, consult the troubleshooting section in this manual. Protect your LaCie hard drive from excessive exposure to dust during use or storage. Dust can build up inside the device, increasing the risk of damage or malfunction.
-
Page 36: Warranty Information
LaCie (“LaCie”) warrants, to the original purchaser, that this equipment shall be free of defects in materials and workmanship for a period of one (1), two (2), three (3), or five (5) years, depending on the model, from LaCie's date of original shipment when the equipment is used normally and is properly serviced when needed. If you discover a defect covered by the warranty set forth above, your sole and exclusive remedy will be for LaCie, in its sole discretion to (i) repair or replace the product at no charge to you;... - Page 37 Any loss, corruption or destruction of data while using a LaCie drive is the sole responsibility of the user, and under no circumstances will LaCie be held liable for the recovery or restoration of this data. To help prevent the loss of your data, LaCie highly recommends that you keep TWO copies of your data;...
-
Page 38: Service Doa
Within the 15 calendar days of purchase, should you experience an issue with your new LaCie product, we ask you to return the product to the place where it was originally bought. You will be required to give a proof of purchase. -
Page 39: Legal Information
LEGAL INFORMATION COPYRIGHTS Copyright © 2015 LaCie. All rights reserved. No part of this publication may be reproduced, stored in a retrieval system, or transmitted in any form or by any means, electronic, mechanical, photocopying, recording or otherwise, without the prior written consent of LaCie. -
Page 40: Canada Compliance Statement
This is a Class B product based on the standard of the Voluntary Control Council for Interference from Information Technology Equipment (VCCI). If this is used near a radio/TV receiver, it may cause radio interference. Install the equipment according to the manual. This statement does not apply to the LaCie CloudBox.
Need help?
Do you have a question about the d2 Quadra USB 3.0 and is the answer not in the manual?
Questions and answers