Table of Contents
Advertisement
Available languages
Available languages
Quick Links
Advertisement
Table of Contents

Related Manuals for Turpone KPO-PZ300

Summary of Contents for Turpone KPO-PZ300
- Page 1 MANUAL & SAFETY INSTRUCTIONS Version No. KN-20220901 US-V01...
- Page 2 IMPORTANT! PLEASE READ THESE INSTRUCTIONS CAREFULLY BEFORE USING THE APPLIANCE! READ THE ASSEMBLY INSTRUCTIONS IN THIS MANUAL BEFORE REMOVING THE CONTENTS OF THIS CARTON FOR YOUR SAFETY FOR YOUR SAFETY If you smell gas: 1. Do not store or use gasoline or 1.
-
Page 3: Important Safety Instructions
SAFETY INSTRUCTIONS IMPORTANT: READ THE ASSEMBLY INSTRUCTIONS IN THIS MANUAL BEFORE REMOVING THE CONTENTS OF THIS CARTON IMPORTANT SAFETY INSTRUCTIONS • Turn all gas valves off including gas cylinder after use. This appliance must only be used in an above ground •... -
Page 4: Other Considerations
WARNING OTHER CONSIDERATIONS A strong gas smell or the hissing sound of gas • Strong winds and low temperatures can affect the indicates a serious problem with your gas pizza oven heating and performance of your gas pizza oven so or the gas cylinder. - Page 5 GAS CYLINDER SAFETY INFORMATION GAS TYPE Detach the regulator assembly from the Propane(LPG)ONLY cylinder valve by turning the quick coupling nut counterclockwise. WARNING Place dust cap for cylinder valve outlet • Please always keep the gas bottle in upright whenever the cylinder is not in use. Only position.
-
Page 6: Leak Testing
CONNECTING THE LIQUID PROPANE GAS CYLINDER This gas fitting is counterclockwise. Make sure that the tank is completely switched off and screw the 1. Add soap and water to spray bottle or regulator as far as possible into the gas tank valve. soapy water with brush NOTE.: •... -
Page 7: Lighting Procedure
LIGHTING PROCEDURE TO LIGHT WITH A MATCH 1. Connect the gas cylinder to the barbecue If burner will not light after several attempts following the instructions supplied with the using the control knob, the burner may be lit regulator. with a match. 2. - Page 8 PIZZA OVEN MAINTENANCE IMPORTANT INFORMATION • Keep appliance area clear and free from • This product is for outdoor use only. combustible materials, gasoline, and other • Do not use indoors. flammable vapors and liquids. • Do not use below ground level. •...
-
Page 9: Type Of Gas
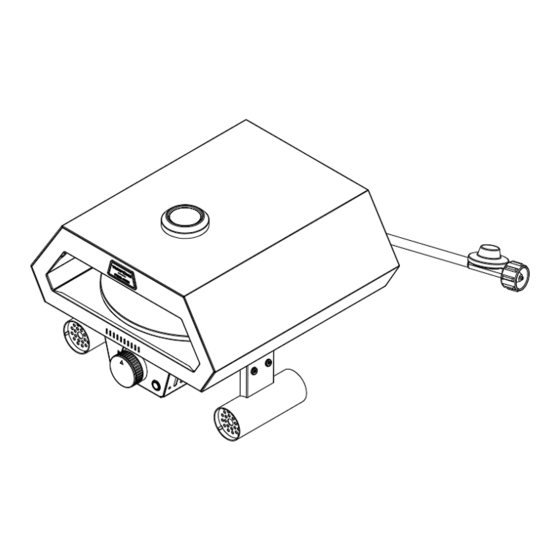
Turpone Group Inc. 6832 rue Jarry East, Montreal, Quebec, Canada H1P 1W3 CANADA PRODUCT NAME 12INCH GAS PIZZA OVEN MODEL NO. KPO-PZ300 TYPE OF GAS PROPANE(LPG) 5024615 GASS PRESSURE 2.74KPa INPUT RATE(MAIN) 12000BTU/HR ASSEMBLY INSTRUCTIONS ASSEMBLY TIPS • Remove all contents from packaging, and make sure all the parts are present before attempting to assemble! •... - Page 10 STEP 1 Install the 2x round feet to the gas pizza oven body STEP 2 Place 4x battery into the battery box its proper position. Note: The 4 batteries (size: AA, 1.5V ) are not supplied along this packaging.
- Page 11 STEP 3 Fix the rubber support feet on to the pizza oven body. STEP 4 Place the pizza plate in the pizza oven in its proper position. STEP 5 Follow the safety instruction to connect with the gas, and enjoy your pizza. Before ignite the pizza oven, make sure the leak test was done.
- Page 12 MANUAL & INSTRUCCIONES DE SEGURIDAD Versión No. KN-20220901 US-V01...
- Page 13 ¡IMPORTANTE! POR FAVOR, LEA ESTAS INSTRUCCIONES CUIDADOSAMENTE ANTES DE USAR ¡EL ELECTRODOMÉSTICO! LEA LAS INSTRUCCIONES DE MONTAJE DE ESTE MANUAL ANTES RETIRAR EL CONTENIDO DE ESTA CAJA PARA SU SEGURIDAD PARA SU SEGURIDAD Si huele a gas: 1. Cierre el gas del aparato. 1.
-
Page 14: Instrucciones De Seguridad
INSTRUCCIONES DE SEGURIDAD IMPORTANTE: LEA LAS INSTRUCCIONES DE MONTAJE DE ESTE MANUAL ANTES DE RETIRAR EL CONTENIDO DE ESTA CAJA INSTRUCCIONES SEGURIDAD IMPORTANTES • Apague todas las válvulas de gas, incluido el cilindro de Este aparato sólo debe utilizarse en una situación aérea al aire libre con ventilación natural, gas, después de su uso. -
Page 15: Otras Consideraciones
ADVERTENCIA OTRAS CONSIDERACIONES • Un fuerte olor a gas o el silbido del gas indica un Los fuertes vientos y las bajas temperaturas pueden problema grave con su horno de pizza de gas o el afectar el calentamiento y el rendimiento de su horno cilindro de gas. - Page 16 INFORMACIÓN DE SEGURIDAD DE CILINDROS DE GAS TIPO DE GAS Separe el conjunto del regulador de la válvula del Propano (GLP)SOLAMENTE cilindro girando la tuerca de acoplamiento rápido en sentido contrario a las agujas del reloj. ADVERTENCIA Coloque la tapa antipolvo para la salida de la •...
- Page 17 CONEXIÓN DEL CILINDRO DE GAS PROPANO LÍQUIDO Este accesorio de gas es en sentido contrario a las agujas del reloj. Asegúrese de que el tanque esté completamente 1. Agregue agua y jabón a la botella de apagado y atornille el regulador lo más lejos posible en spray o agua jabonosa con cepillo la válvula del tanque de gasolina.
- Page 18 PROCEDIMIENTO DE ILUMINACIÓN PARA ILUMINAR CON UNA CERILLA 1. Conecte el cilindro de gas a la barbacoa siguiendo Si el quemador no se enciende después de varios las instrucciones suministradas con el regulador. intentos usando la perilla de control, el 2.
- Page 19 MANTENIMIENTO DEL HORNO DE PIZZA INFORMACIÓN IMPORTANTE • Mantenga el área del aparato limpia y libre de • Este producto es solo para uso en exteriores. materiales combustibles, gasolina y otros vapores y • No usar en interiores. líquidos inflamables. •...
-
Page 20: Instrucciones De Montaje
Turpone Group Inc. 6832 rue Jarry East, Montreal, Quebec, H1P 1W3 CANADÁ NOMBRE DEL HORNO DE PIZZA A GAS DE 12 PULGADAS PRODUCTO MODELO NO. KPO-PZ300 TIPO DE GAS PROPANO(GLP) 5024615 PRESIÓN DEL GAS 2,74 KPa TASA DE ENTRADA 12000BTU/HR... - Page 21 STEP 1 Instale los 2x pies redondos en el cuerpo del horno de pizza de gas PASO 2 Coloque la batería 4x en la caja de la batería en su posición correcta. Nota: Las 4 baterías (tamaño: AA, 1.5V) no se suministran a lo largo de este embalaje.
- Page 22 PASO 3 Fije los pies de soporte de goma en el cuerpo del horno de pizza. PASO 4 Coloque el plato de pizza en el horno de pizza en su posición correcta. PASO 5 Siga las instrucciones de seguridad para conectarse con el gas y disfrute de su pizza. Antes de encender el horno de pizza, asegúrese de que se haya realizado la prueba de fugas.
- Page 23 MANUEL D’INSTRUCTION ET CONSIGNES DE SÉCURITÉ Version No. KN-20220901 FR-V01...
- Page 24 IMPORTANT! VEUILLEZ LIRE ATTENTIVEMENT CES INSTRUCTIONS AVANT D’UTILISER L’APPAREIL! LISEZ LES INSTRUCTIONS D’ASSEMBLAGE DE CE MANUEL AVANT DE RETIRER LE CONTENU DANS LA BOITE. POUR VOTRE SÉCURITÉ POUR VOTRE SÉCURITÉ Si vous sentez du gaz : 1. Ne pas entreposer ni utiliser 1.
-
Page 25: Consignes De Sécurité
CONSIGNES DE SÉCURITÉ IMPORTANT : LISEZ LES INSTRUCTIONS D’ASSEMBLAGE DE CE MANUEL AVANT DE RETIRER LE CONTENU DE CE CARTON INSTRUCTIONS DE SÉCURITÉ IMPORTANTES • Éteignez toutes les vannes de gaz, y compris la Cet appareil ne doit être utilisé que dans une bouteille de gaz après utilisation. -
Page 26: Autres Considérations
AVERTISSEMENT AUTRES CONSIDÉRATIONS Une forte odeur de gaz ou d’envasement de gaz • Les vents forts et les basses températures indique un problème grave avec votre four à pizza ou peuvent affecter le chauffage et les performances bouteille de gaz. Le non-respect immédiat des étapes de votre four à... - Page 27 RENSEIGNMENTS DES BOUTEILLES A GAZ TYPE DE GAZ 3) Détachez l’ensemble régulateur de la soupape de la Propane SEULEMENT bouteille en tournant l’écrou d’accouplement rapide dans le sens antihoraire. AVERTISSEMENT 4) Placez le bouchon à poussière pour la sortie de la •...
- Page 28 CONNEXION BOUTEILLE PROPANE LIQUIDE Cette connexion au gaz se fait dans le sens antihoraire. Assurez-vous que le réservoir est complètement éteint et 1. Ajouter de l’eau et du savon au flacon vissez le régulateur autant que possible dans la vanne du pulvérisateur ou de l’eau savonneuse réservoir d’essence.
- Page 29 PROCÉDURE D’ÉCLAIRAGE 1. Connectez la bouteille de gaz au four en suivant les POUR ALLUMER AVEC UNE ALLUMETTE instructions fournies avec le régulateur. Si le brûleur ne s’allume pas après plusieurs 2. Tournez le bouton au position « OFF ». tentatives à...
-
Page 30: Renseignements Importants
L’ENTRETIEN DU FOUR RENSEIGNEMENTS IMPORTANTS • Gardez la zone de l’appareil libre et exempte • Ce produit est destiné à une utilisation en plein air de matériaux combustibles, d’essence et uniquement. d’autres vapeurs et liquides inflammables. • Ne pas utiliser à l’intérieur. •... -
Page 31: Instructions D'assemblage
Turpone Group Inc. 6832 rue Jarry East, Montreal, Quebec, Canada H1P 1W3 CANADA 12INCH GAS PIZZA OVEN MODEL NO. KPO-PZ300 TYPE PROPANE(LPG) 5024615 PRESSION 2.74KPa 12000BTU/HR INSTRUCTIONS D’ASSEMBLAGE CONSEILS D’ASSEMBLAGE • Retirez tout le contenu de l’emballage et assurez-vous que toutes les pièces sont présentes avant de tenter de les assembler! •... - Page 32 ÉTAPE 1 Installez les 2x pieds ronds sur le corps du four à pizza à gaz ÉTAPE 2 Placez la batterie 4x dans la boîte de batterie sa position appropriée. Remarque: Les 4 batteries (taille: AA, 1.5V) ne sont pas fournies le long de cet emballage.
- Page 33 STEP 3 Visez le support pied en caoutchouc sur le bas du four. ÉTAPE 4 Placez l’assiette à pizza dans le four à pizza dans sa bonne position. ÉTAPE 5 Suivez les instructions de sécurité pour vous connecter au gaz et dégustez votre pizza. Avant d’enflammer le four à...
Need help?
Do you have a question about the KPO-PZ300 and is the answer not in the manual?
Questions and answers