Table of Contents
Advertisement
Quick Links
Advertisement
Table of Contents

Related Manuals for Sonetonix LC-RL-8-D


Summary of Contents for Sonetonix LC-RL-8-D
- Page 1 User Manual LC-RL-8-D DIN rail 8 CH RELAY Controller...
- Page 2 LC-RL-8-D User Manua Preface Read this user manual carefully before using this product. Pictures shown in this manual is for reference only, different model and specifications are subject to real product. This manual is only for operation instruction only, not for any maintenance usage. The functions described in this version are updated till January 2016.
- Page 3 LC-RL-8-D User Manua SAFETY PRECAUTIONS To insure the best from the product, please read all instructions carefully before using the device. Save this manual for further reference. Unpack the equipment carefully and save the original box and packing material for possible future shipment ...
-
Page 4: Table Of Contents
LC-RL-8-D User Manua Contents 1. PRODUCT OVERVIEW..............................1 1.1 Key Features.................................. 1 1.2 Override Input................................2 1.3 Front panel..................................2 1.4 Loads....................................2 1.5 S-NET....................................2 2. TECHNICAL SPECIFICATIONS............................3 2.1 Electrical Specifications..............................3 2.2 Power Requirements..............................3 2.3 Connections..................................3 2.4 Controls and Indications...............................3 2.5 MECHANICAL SPECIFICATIONS..........................4 2.5.1 Enclosure................................4... -
Page 5: Product Overview
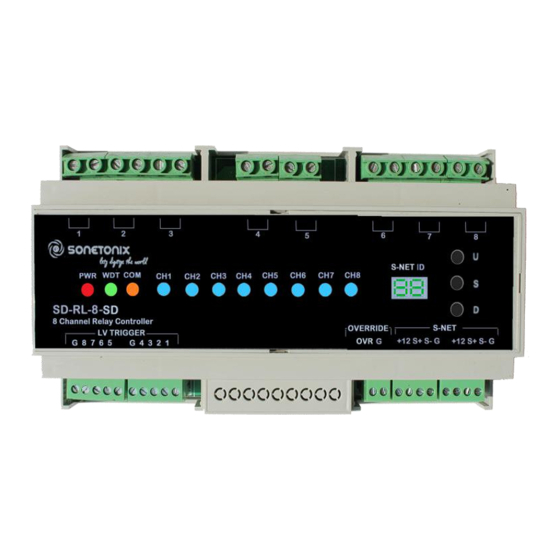
Watchdog LED on front panel blinking @1 sec Indicates normal working condition of the Device Status indication LEDS for each channel S-NET Communication, using S-NET protocol enables the relay Controller to be connected with other SONETONIX Lighting/ Dimming modules for a complete Automation Solution Easy installation with DIN rail mounting Sonetonix... -
Page 6: Override Input
Pin 2 and connect to Load Live. 1.5 S-NET The LC-RL-8-D communicates with all Sonetonix products or third party units via S- NET. A pair of S-NET terminal blocks, allow for easy daisy-chaining of several DIN rail Series automation control modules. -
Page 7: Technical Specifications
LC-RL-8-D User Manua 2. Technical Specifications 2.1 Electrical Specifications Parameter Value Unit Operating Voltage(@50hz) 220-240 Max Power per channel 2200 Max Load current per channel Module Total current Operating Temperature 0 – 45 °C Table1. Electrical specifications 2.2 Power Requirements S-NET Power Usage: 6 Watt (0.5A @12Volts) -
Page 8: Mechanical Specifications
LC-RL-8-D User Manua 2.5 Mechanical specifications 2.5.1 Enclosure 9M wide DIN rail mounting with light grey polycarbonate housing 2.5.2 Environmental Operating Temperature: 0° to 45°C Heat Dissipation: 18 BTU/hr 2.5.3 Dimensions and weight Parameter Value Unit Height 3.71 Inches Width 6.26... -
Page 9: Application And Wiring Diagram
LC-RL-8-D User Manua 3. Application and wiring diagram Sonetonix... -
Page 10: Manual Control
LC-RL-8-D User Manua 4. Manual Control 4.1 Programming the S-NETID For any communication to take place with the Halogen/Incandescent Dimmer, it needs to be programmed with a unique S-NET ID (1 to 230). The S-NET ID can be set manually using the following procedure... -
Page 11: S-Net Communication
Parity None Data Bits Stop Bits 5.2 S-NET Commands Using the S-NET protocol command codes, various features of the LC-RL-8-D can be controlled and used. The device control commands and channel control commands are described here under. Command Description Response Get Device Info <ID>... -
Page 12: Examples
LC-RL-8-D User Manua 5.3 Examples Command Description Get Device Info for ID 2 $02 $F2 Set New Device ID to ID 3 as 8 $FE $03 $F3$08 $FD Force Set Device ID of a new ID to 01 $FE $F4 $01 $00 $FD... -
Page 13: Troubleshooting
LC-RL-8-D User Manua 6. Troubleshooting Trouble Cause Corrective Action Load a) Check the VAC (230VAC Mains @50Hz) Input to the module b) Check the +12VDC Loads are in OFF input to the module. Condition c) Check the RS485 cabling of S+ and S-... -
Page 14: After-Sales Service
LC-RL-8-D User Manua 7. After-sales Service If there appear some problems when running the device, please check and deal with the problems reference to this user manual. 1) Product Limited Warranty: We warrant that our products will be free from defects in materials and workmanship for three years, which starts from the first day the product leaves warehouse (check the SN mark on the product).
Need help?
Do you have a question about the LC-RL-8-D and is the answer not in the manual?
Questions and answers