
Related Manuals for DèLonghi ECAM35 55 Series


Summary of Contents for DèLonghi ECAM35 55 Series
- Page 1 ECAM35X.55 BEAN TO CUP ESPRESSO AND CAPPUCCINO MACHINE Instruction for Use Instructions videos available at: http://ecam35055.delonghi.com...
- Page 2 page 6...
-
Page 6: Table Of Contents
CONTENTS 13. DELIVERING HOT WATER ......16 1. FUNDAMENTAL SAFETY WARNINGS .....7 14. CLEANING..........16 14.1 Cleaning the machine .........16 2. SAFETY WARNINGS ........8 14.2 Cleaning the machine's internal circuit ..16 2.1 Symbols used in these instructions ....8 14.3 Cleaning the coffee grounds container ..17 2.2 Designated use ..........8 14.4 Cleaning the drip tray and condensate tray .17 2.3 Instruction for Use .........8... -
Page 7: Fundamental Safety Warnings
1. FUNDAMENTAL SAFETY WARNINGS • The appliance is not intended for use by persons (including children) with reduced physical, sensory or mental capabilities, or lack of experience and knowledge, unless they have been given supervision or instruction concerning use of the appliance by a person responsible for their safety. -
Page 8: Safety Warnings
• When not in use and before putting on or taking off parts or cleaning, always unplug the appliance. Surfaces marked with this symbol become hot during use (the symbol is present in certain models only). 2. SAFETY WARNINGS 2.2 Designated use 2.1 Symbols used in these instructions This appliance is designed and made to prepare coffee and heat beverages. -
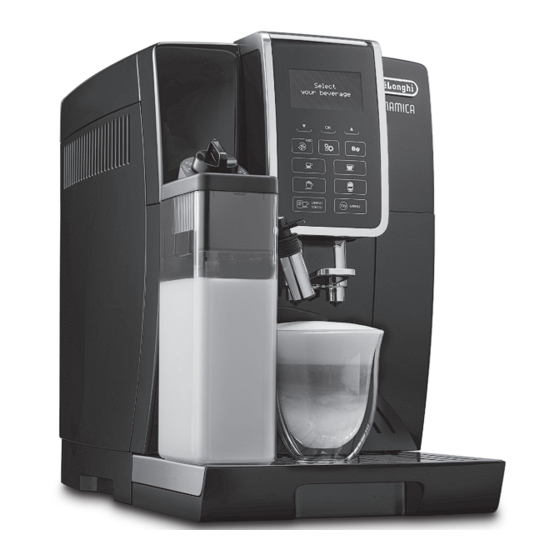
Page 9: Description
4. DESCRIPTION B12. : Beverage selection menu (other than direct- ly selected beverages): Espresso lungo, Ristretto, Long, 4.1 Description of the appliance Doppio+, Caffelatte, Flat white, Hot milk, 2xEspresso, 2 x (page 3 - A) Espresso lungo, 2x Ristretto, Hot Water A1. -
Page 10: Connecting The Appliance
• Arrange the cord (C7) in such a way that it cannot be dam- • When making the first 5-6 cappuccinos, it is normal to hear aged by sharp edges or contact with hot surfaces (e.g. elec- the noise of boiling water. After this, the noise becomes tric hot plates). -
Page 11: Menu Settings
4. Press the selection arrows to display the operation to be • first turn the appliance off by pressing the button performed; (fig. 6); 5. Press OK to confirm and perform the operations as de- • press the main switch (A22) (fig. 2). scribed in the corresponding sections. -
Page 12: Statistics
3. Press OK (B3) to confirm and select the required item with 4. Press OK. The current state ("Enabled" or "Disabled") and the selection arrows. Then follow the instructions for each the operation to be performed ("Disable?" or "Enable?") is setting. -
Page 13: Making Coffee
10.3 Making automatic recipes using coffee 1) To enable this function, press (B5). "RINSING" appears on the display (B1); beans 2) After a few seconds, hot water is delivered first from the Important! coffee spouts, then from the hot water spout (if inserted) Do not use green, caramelised or candied coffee beans as they to clean and heat the appliance’s internal circuit. -
Page 14: Temporarily Varying The Coffee Aroma
10.5 Making coffee using pre-ground coffee • While the machine is making coffee, delivery can be inter- rupted at any time by pressing the selection arrow corre- Important! sponding to "STOP" (B4). • Never add pre-ground coffee when the machine is off or it •... -
Page 15: Filling And Attaching The Milk Container
Directly selected beverages: container after use”, “14.10 Cleaning the milk container” and “14.11 Cleaning the hot water nozzle”. • : CAPPUCCINO (B10) • : Latte Macchiato (B11) 11.1 Filling and attaching the milk container Select by pressing (B12): 1. Remove the lid (D2) (fig. 12); •... -
Page 16: Programming And Selecting
ery manually, press the selection arrow corresponding to 12. “ ” PROGRAMMING AND SELECTING "STOP" (B4) again. you can select beverages customised to your per- sonal tastes. If the beverages have not yet been programmed, Please note: the appliance will request the customisation procedure before •... -
Page 17: Cleaning The Coffee Grounds Container
first coffee has been prepared. For the 72 hours to be calculated 1. Check regularly (about once a month) that the inside of correctly, the machine must never be turned off with the main the appliance (accessible after removing the drip tray, A15) switch (A22). -
Page 18: Cleaning The Milk Container
6. Use the brush (C5) to remove any coffee residues left in the 6. To descale the appliance later, press ESC (B5). The symbol infuser housing, visible through the infuser door; on the display reminds you that the appliance needs descaling. 7. -
Page 19: Setting Water Hardness
11. "Rinsing underway": hot water is delivered first from the 2. Immerse the paper completely in a glass of water for one coffee spouts, then from the hot water spout; second; 12. When the water in the tank has run out, empty the con- 3. -
Page 20: Replacing The Filter
If the coffee machine is left unused with the filter installed, it 13. The appliance begins hot water delivery and the message will last a maximum of three weeks. "Please wait" is displayed; 3. To activate the filter, run tap water through the hole in the 14. -
Page 21: Removing The Filter
This product complies with European regulation no. Please note! 1935/2004 on materials and articles intended to come After two months (see date indicator) or when the appliance has into contact with food. not been used for 3 weeks, you should replace the filter even if the message has not yet been displayed. - Page 22 Ground too fine The grinding is too fine and the coffee is deliv- Repeat coffee delivery and turn the grinding Adjust mill ered too slowly or not at all. adjustment dial (A5) (fig. 7) one click clockwise towards 7 while the coffee mill is in operation. If after making at least 2 coffees delivery is still too slow, repeat the correction procedure, turning the grinding adjustment dial another...
- Page 23 The tubes inside the milk container (D) must Turn the froth adjustment dial (D1) to CLEAN be cleaned. (fig. 19). The water softener filter (C4) is exhausted and Replace the filter or remove it as described in must be replaced or removed. section “17.
-
Page 24: Troubleshooting
21. TROUBLESHOOTING Below is a list of some of the possible malfunctions. If the problem cannot be resolved as described, contact Customer Services. PROBLEM POSSIBLE CAUSE REMEDY The coffee is not hot. The cups were not preheated. Warm the cups by rinsing them with hot water (Please note: you can use the hot water function). - Page 25 At the end of descaling, the During the two rinse cycles, the water tank has Follow the instructions displayed by the appli- appliance requests a third not been filled to the MAX level. ance, but first empty the drip tray to avoid the rinse water overflowing.
-
Page 26: Electrical Requirements
22. ELECTRICAL REQUIREMENTS Before using this appliance ensure that the voltage indicated on the product corresponds with the main voltage in your home, if you are in any doubt about your supply contact your local electricity company. The flexible mains lead is supplied connected to a B.S. 1363 fused plug having a fuse of 13 amp capacity. Should this plug not fit the socket outlets in your home, it should be cut off and replaced with a suitable plug, following the proce- dure outlined below.
Need help?
Do you have a question about the ECAM35 55 Series and is the answer not in the manual?
Questions and answers