
Related Manuals for JOSTechnik HK2

Summary of Contents for JOSTechnik HK2
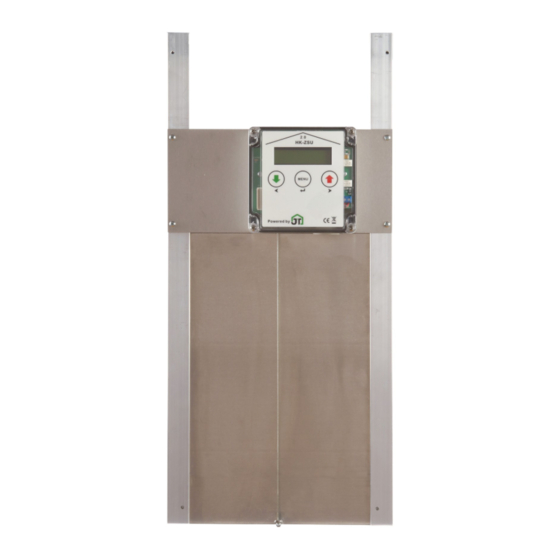
- Page 1 Original Operating Instructions Flap Actuator HK2 10/2020 Automatic Chicken Door Flap Actuator HK2 (standalone device) HK2-RH HK2-RE HK2-RG HK2-RB Description and Operating Instructions...
-
Page 2: Table Of Contents
Original Operating Instructions Flap Actuator HK2 10/2020 Table of Contents General Description.......................1 Installation Instructions......................2 HK2 - standalone device....................2 HK2 - R..........................2 Optional Modules.......................3 Operation and Settings......................4 General Structure.......................4 Settings and Changes.......................5 Factory Setting......................5 Main menu level “Flap actuator”..................6 Submenu Timer 1 / Timer 2..................6 Submenu Mode......................6... -
Page 3: General Description
It is used for the automated opening and closing of sliders to poultry houses. Sliders weighing approximately 400 g - max. 2.5 kg can be moved using the HK2.The slider must run smoothly, it must not rub or tilt. -
Page 4: Installation Instructions
Push the slider into the open position and now connect the separate cord to the opened slider. The minimum distance between the upper edge of the opened slider and the lower edge of the HK2 must be at least 10 cm. -
Page 5: Optional Modules
Original Bedienungsanleitung Klappensteller HK2 10/2020 Optional Modules Attractor light Remote display Remote key Plug-in Power External light Supply sensor *The pictures show the cable colours commonly used. The optional remote display indicates the status of the slider (OPEN/CLOSED) over a dis- tance of about 30 metres. -
Page 6: Operation And Settings
Radio receiver Slot for radio receiver Radio receiver plugged in Operation and Settings The HK2 flap actuator is operated using the timer display. Operation is menu-driven and is described below. General Structure Key < takes you to the previ- <... -
Page 7: Settings And Changes
Original Bedienungsanleitung Klappensteller HK2 10/2020 It is imperative that you exit the menu so that the device switches back to automatic mode. No functions are possible within the menu. The menu is structured and divided into the following main and sub-menu levels:... -
Page 8: Main Menu Level "Flap Actuator
Original Bedienungsanleitung Klappensteller HK2 10/2020 Parameter / Setting value Factory setting Adjustment range (specified) Light duration 00 min 05 – 60 min Language German German, English, French, Dutch Main menu level “Flap actuator” Submenu Timer 1 / Timer 2 Setting the times for automatic opening (▲) and closing (▼) of the slider. Entering times is limited to the range between 3:00 am and 10:59 pm. -
Page 9: Submenu Delay
Submenu Castor When using the HK2 as a standalone device with a separate self-locking slider, the motor must continue to run after the slider has been attached until the locking lever has engaged. This is done by the castor function. -
Page 10: Main Menu Level "Time / Date
Original Bedienungsanleitung Klappensteller HK2 10/2020 < Castor > Note: No castor is required with the HK-ZSU-Rx. The locking mechanism is located directly in the control unit. Main Menu Level “Time / Date” The device is delivered from the factory with the current time and date. If you are in a dif - ferent time zone, if the clock runs incorrectly after changing the battery or if you identify a rate deviation, you can set the time and date manually. -
Page 11: Main Menu Level "Reset
Start-up and Operation Start-up After the HK2 has been properly installed, connect the plug-in power supply into the mains socket. The device will automatically switch on and run a self-test. The background lighting of the display is switched on and the following display appears. -
Page 12: Operating Displays
Original Bedienungsanleitung Klappensteller HK2 10/2020 Operating Displays Various operating data, parameters and settings are shown in the display. Top line: Weekday Current time Standard time / Summer-time (but not deactivated) Bottom line alternately: Current brightness Open brightness Close brightness Software version... -
Page 13: Troubleshooting And Service
Original Bedienungsanleitung Klappensteller HK2 10/2020 Closed Green (flashing) Key ▲ Switch to automatic mode Open Red on Explanation: If the automatically closed slider is opened again manually in the evening, it remains OPEN until the slider is closed again manually or the automatic forced closing is activated at 11:00 pm and the device is switched to automatic mode. -
Page 14: Technical Data
Note! The guarantee is not valid if you are not able to provide proof of purchase. Technical data Data Description HK2 and HK-ZSU-Rx flap actuators Connection 230 V ~ 1.5 A via plug-in power supply to 12 V = internal Power consumption approx. -
Page 15: Declaration Of Conformity
In the event of any change to the machine that has not been agreed with us, this declaration loses its validity. Manufacturer/Authorised representative: JOSTechnik owner Ilka Jost Martha-Brautzsch-Str. 26a, 04838 Doberschütz Germany Tel.: +49 (0) 34244/59566 Description of the machine •... -
Page 16: Changes, Additions And Extensions
Original Bedienungsanleitung Klappensteller HK2 10/2020 Changes, Additions and Extensions Seite 14 von 14...
Need help?
Do you have a question about the HK2 and is the answer not in the manual?
Questions and answers