Table of Contents
Advertisement
Advertisement
Table of Contents

Related Manuals for Vivitar DVR5K


Summary of Contents for Vivitar DVR5K
- Page 1 DVR5K INSTRUCTION MANUAL...
- Page 2 Important Safety Precautions When using your Vivitar 4K Digital Camcorder, basic safety precautions should always be followed, including the following: 1. READ ALL INSTRUCTIONS BEFORE USING YOUR CAMCORDER. 2. Do not use your camcorder near water. Shut down immediate and remove the battery if it is exposed to water or short circuiting.
-
Page 3: Table Of Contents
Accessing Menus ..................19 Setting Menu (For Video Mode) ............20 Setting Menu (For Photo Mode) ............21 ..........22 Setting Menu (Camcorder Settings) .................... . 23 Maintenance and Care ................23 FCC Compliance Statement ............... 24 Vivitar Warranty Card ................25-26... -
Page 4: Introduction
Introduction Thank you for purchasing your Vivitar 4K Digital Camcorder, item DVR5K. You can use your camcorder to capture high quality videos and photos. In order to get the best results when using Features -3” Touch Screen, 270° Rotatable Display -Real 4K Ultra HD Video Recording -Max. -
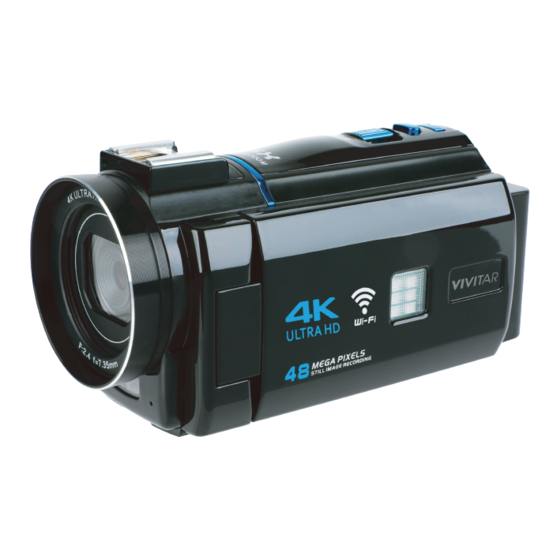
Page 5: A Quick Look At Your Camcorder
A Quick Look at Your Camcorder Lens FRONT VIEW Remote Signal Receiver IR+LED Microphone Charging Activity Indicator Light Indicator Light Video Button Battery Compartment REAR VIEW... - Page 6 A Quick Look at Your Camcorder (cont.) Battery Lock BOTTOM VIEW Tripod Mount Memory Card Cover Power/Light Button Menu Button SIDE VIEW Display/Wi-Fi Button USB Port HDMI Port External Microphone Jack TOP VIEW Zoom Cold Shoe Mode Button Speaker Photo Button...
-
Page 7: Button Functions
Button Functions Power/Light Button -Press to power on the camcorder. -Press and hold to power o the camcorder. -Once powered on, press to turn on night vision (3 red LED lights), press again to switch to the LED light (3 white LED lights), then press again to exit.. -
Page 8: Inserting A Memory Card
Inserting a Memory Card Before powering on your camcorder, insert an SD memory card into the memory card slot. An SD memory card is required in order to store recorded photos and videos. To ensure smooth performance, it is recommended to use a memory card rated class 10 or above, with a capacity between 16-128GB. -
Page 9: Attaching & Charging The Battery
Attaching & Charging the Battery A rechargeable battery is included with your camcorder. Insert the battery into the camcorder’s battery compartment. To do so, push the battery towards the battery compartment, and then slide it upwards, making sure the contacts of the battery connect to the contacts of the battery compartment. -
Page 10: Using The Remote Control
Using the Remote Control You can control your camcorder using the included remote control. View the graphic below to see the remote’s button Photo Button Record Button In photo mode, takes photo. In video mode, press to In video mode, pause/continue start/stop video recording video recording Turns on/off night vision and... -
Page 11: Powering On & Off
Powering On & Off Powering On To power on your camcorder, press the Power/Light button. Powering Off Press and hold the Power/Light button to power off your camcorder. NOTES: 1. Your camcorder will also power on or power off by opening or closing the screen. -
Page 12: Switching Modes
Switching Modes Your camcorder has four different video modes for recording video, four photo modes for taking photos, and playback mode to review photos and videos you have taken. Selecting a Mode Press the MODE button on top of your camcorder to enter the mode select menu. -
Page 13: Video Mode/Recording Videos
Video Mode/Recording Videos After powering on your camcorder, press the MODE button on top of your camcorder to enter the mode select menu. Slide the Zoom left and right to make a selection, and press the PHOTO button on top of your camcorder to select one of the four video modes. -
Page 14: Photo Mode/Taking Photos
Photo Mode/Taking Photos After powering on your camcorder, press the MODE button on top of your camcorder to enter the mode select menu. Slide the Zoom left and right to make a selection, and press the PHOTO button on top of your camcorder to select one of the four photo modes. -
Page 15: Playback Mode
Playback Mode To enter playback mode, press the playback mode icon the lower left hand corner of the photo mode or video mode display screen. Once in playback mode, use the Zoom to toggle through videos or photos. Press the PHOTO button on your camcorder to play or pause videos. -
Page 16: Playback On A Tv
Playback on a TV 1. Connect one of the included HDMI cable to the HDMI port on your camcorder. 2. Connect the other end to the HDMI In port on your television. 3. Set the TV input to HDMI in. 4. -
Page 17: Connecting To A Computer
Connecting to a Computer 1. Connect one end of the included USB-C cable into the USB port on your camcorder. 2. Connect the other end to an available USB port on your computer. Once connected your camcorder’s battery can be card to your computer. -
Page 18: Attaching An External Microphone
Attaching an External Microphone For even higher quality sound, you can attach an external microphone to your camcorder. 1. Connect the microphone’s 3.5mm plug into the External Microphone jack on your camcorder. 2. If you are using a cold shoe microphone, then it can slide into the camcorder’s cold boot and then be tightened securely. -
Page 19: Wi-Fi Connection
Wi-Fi Connection Use your camcorder’s built-in Wi-Fi functionality to download photos or video from the camcorder to your smartphone. Download the App “ELooK Pro” Search for “Roadcam” on Google Play (Android) or on the Apple App Store (iOS) to download the app. The app can also be downloaded by scanning the followng QR codes: Android Once your camcorder is powered on, press... -
Page 20: Accessing Menus
Accessing Menus After powering on the camcorder, press the MENU button to open the settings menu. Press the MODE button to shift between camera/video setting, general camcorder settings or to exit the settings menu. Use the ZOOM to switch between settings. Press the CAMERA button once a setting is highlighted to Press the MENU button to return to a previous menu. -
Page 21: Setting Menu (For Video Mode)
Setting Menu (For Video Mode) The following video settings can be changed when in video mode. Normal Record Slowly Record Loop Record Time Lapse Settings Settings Settings Record Settings Recording Resolution Recording Resolution Slowly Recording Same as Normal 8k 30fps 4k 30fps 1080P 2X Record Mode... -
Page 22: Setting Menu (For Photo Mode)
Setting Menu (For Photo Mode) The following photo settings can be changed when in photo mode. Normal Picture Auto Picture Continue Picture Time Picture Settings Settings Settings Settings Pixel Setting Same as Normal Same as Normal Same as Normal 48MP 8000x6000 Picture Mode Record Mode Record Mode... -
Page 23: Setting Menu (Camcorder Settings)
Setting Menu (Camcorder Settings) Beep Set (beeping volume) High, Middle Low, Turn O Wi-Fi Turn On/o Light Source Frequency Auto, 50Hz, 60Hz Timing Off Turn o , 3 minutes, 5 minutes, 10 minutes Language English, Français, Español, Português, Deutsch, Italiano, 简体中文... -
Page 24: Maintenance And Care
Image Sensor CMOS Sensor Memory Expandable SD Card Slot up to 128gb Auto, 100, 200, 400. 800, 1600, 3200, 6400 Lens Fixed lens F:2.4, f=7 . 35mm Focal Distance Photo Format: JPEG Resolution Video Format: MP4 H.264 Yes, EIS anti-shake IR Night Vision supported Zoom... -
Page 25: Fcc Compliance Statement
FCC Compliance Statement responsible for compliance could void the user’s authority to operate the equipment. This device complies with Part 15 of the FCC Rules. Operation is subject to the following two conditions: (1) this device may not cause harmful interference, and (2) this device must accept any interference received, including interference that may cause undesired operation. -
Page 26: Vivitar Warranty Card
To Obtain Warranty Service and Troubleshooting Information: Call 1-800-592-9541 or visit our website at www.vivitar.com. To receive Warranty service along with the name and address of an authorized product service center, the original consumer purchaser must contact us for problem determination and service procedures. - Page 27 Vivitar One Year Warranty (continued) NO WARRANTIES, WHETHER EXPRESS OR IMPLIED, INCLUD- ING, BUT NOT LIMITED TO, ANY IMPLIED WARRANTIES OF MERCHANTABILITY OR FITNESS FOR A PARTICULAR PURPOSE, OTHER THAN THOSE EXPRESSLY DESCRIBED ABOVE SHALL APPLY. DISTRIBUTOR FURTHER DISCLAIMS ALL WARRANTIES AFTER THE EXPRESS WARRANTY PERIOD STATED ABOVE.
- Page 28 Windows and the Windows logo are registered trademarks of Microsoft Corporation. All other trademarks are the property of their respective companies. Keep All Relevant Information for Future Reference.
Need help?
Do you have a question about the DVR5K and is the answer not in the manual?
Questions and answers