Table of Contents
Advertisement
Air Conditioner with Heat Pump
Customer & Technical Support information
(Please contact us BEFORE returning product)
Website : www.bhiair.com
Contact Phone # : 1-626-427-3298
(Mon-Fri, 9am-5pm/PST)
Email: support@bhiair.com
help@bhiair.com
Energy Star 12,000 BTU
Ductless Mini Split
"BHI" Outdoor Unit has "Heating Belt" that works by Temperature Sensor, if
temperature lower than 32°F (0°C) degree, it would start to heat and when
over than 32°F (0°C) degree, would stop working automatically to ensure
that Outdoor Unit does not freeze, it's a great feature to use BHI Mini
Split AC at cold temperature region / area / season.
Advertisement
Chapters
Table of Contents
Troubleshooting

Related Manuals for BHI Energy Star 12,000 BTU

Summary of Contents for BHI Energy Star 12,000 BTU
- Page 1 32°F (0°C) degree, it would start to heat and when help@bhiair.com over than 32°F (0°C) degree, would stop working automatically to ensure that Outdoor Unit does not freeze, it’s a great feature to use BHI Mini Split AC at cold temperature region / area / season.
-
Page 3: Table Of Contents
CONTENTS ........................1 SAFETY PRECAUTIONS ..........................4 NAME OF PARTS ...........................6 REMOTE CONTROL ......................13 OPERATION INSTRUCTIONS ......................14 INSTALLATION PRECAUTIONS ......................15 INDOOR UNIT INSTALLATION .....................20 OUTDOOR UNIT INSTALLATION ..........................23 TEST OPERATION ..........................24 MAINTENANCE ........................26 TROUBLESHOOTING * The design and specifications are subject to change without prior notice for product improvement. Consult with the sales agency or manufacturer for details. -
Page 4: Safety Precautions
SAFETY PRECAUTIONS SAFETY RULES AND RECOMMENDATIONS FOR THE INSTALLER ead this guide before installing and using the appliance. uring the installation of the indoor and outdoor units, access to the working area should be forbidden to children. Unforeseeable accidents could happen. ake sure that the base of the outdoor unit is firmly fixed. - Page 5 SAFETY PRECAUTIONS SAFETY RULES AND RECOMMENDATIONS FOR THE INSTALLER o not try to install the conditioner alone, always contact specialized technical personnel. leaning and maintenance must be carried out by specialized technical personnel. In any case disconnect the appliance from the mains electricity supply before carrying out any cleaning or maintenance.
- Page 6 SAFETY PRECAUTIONS SAFETY RULES AND PROHIBITIONS o not bend, tug or compress the power cord since this could damage it. Electrical shocks or fire are probably due to a damaged power cord. Specialized technical personnel only must replace a damaged power cord. o not use extensions or gang modules.
-
Page 7: Name Of Parts
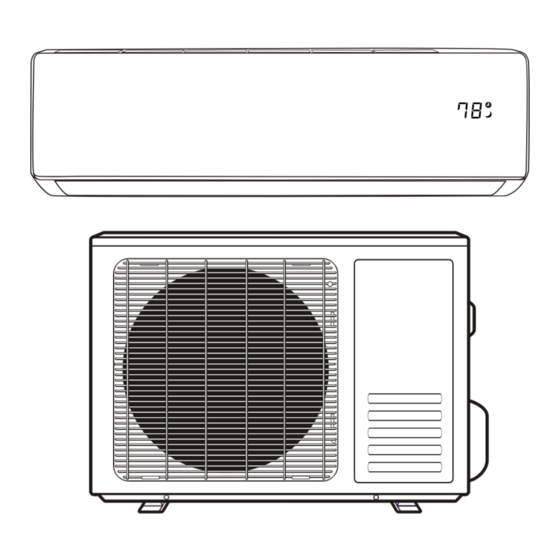
NAME OF PARTS Indoor Unit Mounting plate Air filter Air inlet Front panel Emergency button Air outlet Air deflector and flap Refrigerant connecting pipe Outdoor Unit Air inlet Wiring cover Air outlet Drainage pipe Connection wiring Valve protective cover Gas valve (Low pressure valve) Liquid valve (High pressure valve) - Page 8 NAME OF PARTS Indoor Display Indicator for Timer, temperature and Error codes. Lights up during Timer operation. SLEEP mode The shape and position of switches and indicators may be different according to the model, but their function is the same.
-
Page 9: Remote Control
REMOTE CONTROL Remote control DISPLAY Meaning Symbols Battery indicator Auto Mode Cooling Mode Dry Mode Fan only Mode Heating Mode ECO Mode Timer Temperature indicator Fan speed: Auto/ low/ low-mid/ mid/ mid-high/ high Mute function TURBO function Up-down auto swing Left-right auto swing SLEEP function Health function... - Page 10 REMOTE CONTROL Button Function To turn on/off the air conditioner . To increase temperature, or Timer setting hours. To decrease temperature, or Timer setting hours. To select the mode of operation (AUTO, COOL, DRY, FAN, HEAT). MODE To activate/deactivate the ECO function. Long press to activate/deactivate the 8 heating function (depending on models).
- Page 11 REMOTE CONTROL Replacement of Batteries Remove the battery cover plate from the rear of the remote control, by sliding it in direction as the arrow. Install the batteries according the direction (+ and -)shown on the Remote Control. Reinstall the battery cover by sliding it into place. Use 2 pieces LRO3 AAA (1.5V) batteries.
- Page 12 REMOTE CONTROL COOLING MODE HEATING MODE The cooling function allows the air The heating function allows the air COOL HEAT conditioner to cool the room and conditioner to heat the room. reduce Air humidity at the same To activate the heating function (HEAT), press the time.
- Page 13 REMOTE CONTROL TIMER function ---- TIMER ON SWING function To automatic switch on the SWING TIMER SWING appliance. When the unit is switch-off, you can set the 1. Press the button SWING to activate the louver, TIMER ON. 1.1 Press to activate the horizontal flaps SWING To set the time of automatic switch-on as below:...
- Page 14 REMOTE CONTROL MUTE function ECO function In this mode the appliance MUTE automatically sets the operation to save energy. 1. Press MUTE button to active this function, will appears on the remote display. Press the ECO button, the appears on the Do it again to deactivate this function.
- Page 15 REMOTE CONTROL Gentle Wind function (Optional) SELF-CLEAN function (Optional) Only optional for some heating pump inverter 1. Turn on the indoor unit, and change to COOL appliance. mode, then long press FAN and MUTE button To active this function, turn off the indoor unit together 3 seconds to active this function, SWING at first, then press...
-
Page 16: Operation Instructions
OPERATION INSTRUCTIONS Attempt to use the air conditioner under the temperature beyond the specified range may cause the air conditioner protection device to start and the air conditioner may fail to operate. Therefore, try to use the air conditioner in the following temperature conditions. Fixed air conditioner: MODE Heating... -
Page 17: Installation Precautions
INSTALLATION PRECAUTIONS Pipe Length and Additional Refrigerant Inverter Models Capacity (Btu/h) 9K-12K 18K-36K Length of pipe with standard charge 5m/16ft 5m/16ft 5m/16ft 5m/16ft Length of pipe with standard charge (Like: North American, etc.) 7.5m/24ft 7.5m/24ft 7.5m/24ft 7.5m/24ft Maximum distance between indoor and outdoor unit 15m/49ft 15m/49ft 25m/82ft... -
Page 18: Indoor Unit Installation
INDOOR UNIT INSTALLATION Step1: Select Installation location 1.1 Ensure the installation complies with the installation minimum dimensions (defined below) and meets the minimum and maximum connecting piping length and maximum change in elevation as defined in the System Requirements section. 1.2 Air inlet and outlet will be clear of obstructions, ensuring proper airflow throughout the room. - Page 19 INDOOR UNIT INSTALLATION Step2: Install Mounting Plate 2.1 Take the mounting plate from the back of indoor unit. 2.2 Ensure to meet the minimum installation dimension requirements as step 1, according to the size of mounting plate, determine the position and stick the mounting plate close to the wall . 2.3 Adjust the mounting plate to a horizontal state with a spirit level, then mark out the screw hole positions on the wall.
- Page 20 INDOOR UNIT INSTALLATION Step4: Connecting Refrigerant Pipe 4.1 According to the wall hole position, select the appropriate piping mode. There are three optional piping modes for indoor units as shown in the figure below: In Piping Mode 1 or Piping Mode 3, a notch should be made by using scissors to cut the plastic sheet of piping outlet and cable outlet on the corresponding side of the indoor unit.
- Page 21 INDOOR UNIT INSTALLATION Step5: Connect Drainage Hose 5.1 Adjust the drainage hose(if applicable) In some model, both sides of the indoor unit are provided with drainage ports, you can choose one of them to attache the drainage hose. And plug the unused drain port with the rubber attached in one of the ports.
- Page 22 INDOOR UNIT INSTALLATION Step7: Wrap Piping and Cable After the refrigerant pipes, connecting wires and drainage hose are all installed, in order to save space, protect and insulate them, it must be bundle with insulating tape before passing them through the wall hole.
-
Page 23: Outdoor Unit Installation
OUTDOOR UNIT INSTALLATION Step1: Select Installation Location Select a site that allows for the following: 1.1 Do not install the outdoor unit near sources of heat, steam or flammable gas. 1.2 Do not install the unit in too windy or dusty places. 1.3 Do not install the unit where people often pass. - Page 24 OUTDOOR UNIT INSTALLATION Step4: Install Wiring 4.1 Use a phillips screwdriver to unscrew wiring cover , grasp and press it down gently to take it down. 4.2 Unscrew the cable clamp and take it down. 4.3 According to the wiring diagram pasted inside the wiring cover , connect the connecting wires to the corresponding terminals, and ensure all connections are firmly and securely .
- Page 25 OUTDOOR UNIT INSTALLATION Step6: Vacuum Pumping 6.1 Use a spanner to take down the protective caps from the service port, low pressure valve and high pressure valve of the outdoor unit. 6.2 Connect the pressure hose of manifold gauge to the service port on the outdoor unit low pressure valve.
-
Page 26: Test Operation
TEST OPERATION Inspections Before Test Run Do the following checks before test run. Description Inspection method Check whether the power supply voltage complies with specification. Check whether there is any wrong or missing connection between the Electrical power lines, signal line and earth wires. safety inspection Check whether the earth resistance and insulation resistance comply with requirements. -
Page 27: Maintenance
TEST OPERATION 5. Observe the test run state of the air conditioner at least 30 minutes. 6. After the successfully test run, return the normal setting and press ON/OFF button on the remote controller to turn off the unit. 7. Inform the user to read this manual carefully before use, and demonstrate to the user how to use the air conditioner, the necessary knowledge for service and maintenance, and the reminder for storage of accessories. - Page 28 MAINTENANCE Opposite to the direction of taking out the filter <40 (104 ) Clean the Take out the filter Clean the filter with Replace the filter filter from the unit soapy water and air dry it Tip: When you find accumulated dust in the filter, please clean the filter in time to ensure the clean, healthy and efficient operation inside the air conditioner.
-
Page 29: Troubleshooting
TROUBLESHOOTING POSSIBLE CAUSES MALFUNCTION Power failure/plug pulled out. Damaged indoor/outdoor unit fan motor. Faulty compressor thermomagnetic circuit breaker. Faulty protective device or fuses. The appliance does Loose connections or plug pulled out. not operate It sometimes stops operating to protect the appliance. Voltage higher or lower than the voltage range. - Page 30 TROUBLESHOOTING ERROR CODE ON THE DISPLAY In case of error, the display on the indoor unit shown the following error codes: Display Description of the trouble Indoor room temperature sensor fault Indoor pipe temperature sensor fault Outdoor pipe temperature sensor fault Refrigerant system leakage or fault Malfunction of indoor fan motor Outdoor ambient temperature sensor fault...
- Page 32 Let's get start! Operation guideline. Please take below simple guideline instruction as reference. Operation Re-install APP Operation New Account Steps (registered before) Items Download and Step 1 Install APP Step 2 Activate APP Registration Step 3 Account Step 4 Login Step 5 Registered Device will remain.
- Page 33 CONTENTS Wi-Fi Module specification and basic information ..........1 Download and Install the App................2 Activate APP......................3 Registration......................4 Login........................6 Add device......................7 Air conditioner control..................10 Account management..................28 Trouble Shooting................30...
-
Page 34: Wi-Fi Module Specification And Basic Information
Wi-Fi Module specification and basic information 1. Minimum specifications on a Smart phone: Android 5.0 version or higher IOS 9.0 version or higher 2. Basic parameters for Wi-Fi module Parameters Details Network frequency 2.400 - 2.500GHz IEEE 802.11 b/g/n(channels 1-14) Standards of WLAN Protocol stack support IPv4/IPv6/TCP/UDP/HTTPS/TLS/MulticastDNS... -
Page 35: Download And Install The App
Download and Install the App SmartLife-SmartHome For Android smart phone Method1: Please scan the QR code with a browser scanner, download and install the APP. Method2: Open the Google "Play Store" on your smart phone and search "SmartLife-SmartHome" , ownload and install the APP. For IOS smart phone Method1: Please scan the QR code and follow the tips to get into "AppStore", download and install the APP. -
Page 36: Activate App
Activate APP The first time the app is used, it will need activating. 1. Launch the APP "SmartLife-SmartHome" on your smart phone. SmartLife-SmartHome 2. Method1:Tap button "Scan" and scan the right Activate QR code Method2: Tap "or Enter Activation Code" in bottom of the screen, then enter the activate code and tap "CONFIRM". -
Page 37: Registration
Registration 1.If you don't have any account please tap button "Register". 2.Read the Privacy Policy and tap "Agree". Privacy Policy ............................................................................................................Register Log in with existing account Privacy Policy Disagree Agree 3.Tap">"... -
Page 38: Login
Registration 6.Enter the verification code you received from e-mail. 7.Set the Password with 6-20 characters including characters and numbers. 8.Tap "Done". < < Set Password Enter Verification Code ****** * * * * * * 6-20 characters for password, including character, numbers The verification code is sent to your email: *****@****,Resend(55s) Done... - Page 39 Login The first time the APP is used, Create family is needed: 4.Tap "Create family". 5.Make name for the family. 6.Set the location. 7.Choose default rooms or add new rooms. 8.Tap "Done" and "Completed". Turn on your smart life Create family Log out Family created successfully View family...
-
Page 40: Add Device
Add device Forgot the password If you forgot the password or you want to reset the password, operate as below: 1.Tap "Forgot password". 2.Enter your account(e-mail address) and tap button "Obtain verification code". 3.Enter the verification code received by your e-mail. 4.Set the new password and tap button "Done". - Page 41 Add device There are 2 modes CF(Quick connection) and AP(Access Point) for adding device. CF mode 1.Power on the indoor unit, no need to launch the air conditioner. 2.Click "+" in the upper right corner of the "Home" screen or tap "Add device" on the room which has no device.
- Page 42 Add device There are 2 methods to add the device. 2-AP mode Work office 1.Power on the indoor unit, no need to launch the air conditioner. Welcome Home Set your home location for more 2.Click "+" in the upper right corner of the "Home" screen information or tap "Add device"...
-
Page 43: Air Conditioner Control
Air conditioner control The device control screen will pop up automatically after adding the device. The device control screen will pop up manually by tapping the device name on the home screen. my home Welcome home Set your home location, get more information All Devices Living Room... - Page 44 Air conditioner control Control form1 The main control interface Device details Back to the < Sample2 and management Home screen Turn ON/OFF the air conditioner Indicator of setting temperature Set Temperature Selected Mode/Wind Speed/ Functions indicator Increase the Decrease the setting temperature setting temperature Mode...
- Page 45 Air conditioner control Control form1-Mode setting 1.Tap Mode to pop up the Mode screen. 2.Select one of the mode Feel/Cool/Heat/Dry/Fan. 3.Tap anywhere around the setting temperature to cancel the Mode setting. < Sample2 Set Temperature Mode Cool Heat Feel Mode Function Timer Control form1-Select Wind Speed...
- Page 46 Air conditioner control Control form1-Function setting 1.Tap Function to pop up the Function screen. 2.Select one of the functions Sleep/Turbo/ECO. 3.Select UP-DOWN/LEFT-RIGHT for auto swing with direction of UP-DOWN/LEFT-RIGHT. 4.Tap anywhere around the setting temperature to cancel the Function setting. <...
- Page 47 Air conditioner control Control form1-Timer adding 3.Select the time, select the repeat days and Timer on/off. 4.Select the Mode/Fan Speed/Function and select the setting temperature for Timer on. 5.Tap Save to add the timer. Timer on Timer off Timer submit Timer cancel Cancel Add Timer...
- Page 48 Air conditioner control Control form2 The main control interface Back to the Sample1 Tips Home screen Name of the device Current mode Cool Increase the Decrease the setting temperature setting temperature Different background for different mode: Cool/Heat/Dry/Fan/Auto Selected Functions indicator Function Buttons Power on/off Note: it may appear slightly different ,...
- Page 49 Air conditioner control Control form2-Mode setting 1.Tap the Mode button. 2. There are 5 modes on the Mode screen, tap one button to set the Air conditioner working mode. 3.Tap the X button to back the main control screen. 4.The mode and background will change on the screen. Sample1 Sample1 Back...
- Page 50 Air conditioner control Control form2-Air Flow control 1.Tap the Precision Air Flow button or Swing Flow button. 2.Choose your desired air flow and tap it. 3.Tap the X button to back to the main control screen. 4.The selected air flow indicator will appear on the screen. Note: For some models without auto Left-Right wind, If you active it, you will hear a beep,but no any actions.
- Page 51 Air conditioner control Control form2-ECO function 1.For Eco function, just tap the button to activate the function, the button will be lighting and the indicator will appear on the screen. 2.Tap again to disable the function. 3.Temperature controlled for some air conditioner model: In Cooling mode, the new setting temperature will 78 .
- Page 52 Air conditioner control Control form2-Sleep function 1.Tap the Sleep button. 2.Choose your desired sleep mode and tap it. 3.Tap the X button to back to the main control screen. 4.The selected sleep mode indicator will appear on the screen. Mode Sleep enabled Sample1 Sample1...
- Page 53 Air conditioner control Control form2-Timer(on) setting 1.Tap the Timer button. 2.Tap + in the upper right corner of the Timer main screen. 3.Choose the Time/Repeat/Switch OFF then tap Save. 4.The timer(off) will appear on the Timer main screen. Sample1 < Timer Cool No Timer...
- Page 54 Air conditioner control Control form2-Timer(off) setting 1.Tap the Timer button. 2.Tap + in the upper right corner of the Timer main screen. 3.Set the Time/Repeat Date/Switch(ON)/Temperature/Mode/ Fan speed/Air Flow as your desired and then tap Save. 4.The timer will appear on the Timer main screen. <...
- Page 55 Air conditioner control Control form2-Timer management 1.Change the Timer setting: Tap anywhere of the timer list bar except the switch bar to get into the Timer setting screen, change the setting and then tap save. 2.Enable or Disable the Timer: Tap the left of the switch to disable the Timer.
- Page 56 Air conditioner control Control form2-More functions 1.Tap the More button to operate additional functions if it appears on the screen. < More Sample1 Cool Display Buzzer Anti-Mildew GEN Mode Health Reservation Electricity Electricity Self-diagnosis Management Monitoring Mode Fan Speed Precision ON/OFF Air Flow More...
- Page 57 Air conditioner control Control form2-More functions 7. Tap the "Electricity Monitoring" button if it is available on the screen. In this function, you can monitor the air conditioner electricity consumption. You can tap this button to Electricity monitoring Electricity monitoring pop up the calender then select the date.
- Page 58 Air conditioner control Control form2-More functions 11.Tap the "Self-diagnosis" button, if it is available on the screen. The air conditioner will automatically diagnosis itself and indicate the Error code and the problem instructions if possible. Self-diagnosis Self-diagnosis Checking Complete Self-diagnosis Error code: E0 Indoor and outdoor communication failure...
- Page 59 Air conditioner control Device details and management on control form1 or tap ... on control form2 , get into the device details screen. Here you can get some useful information and sharing the device to other accounts. Check the following pictures and instructions carefully. Control form1 Control form2 <...
- Page 60 Air conditioner control Device details and management How to share the devices to other accounts? 1. Tap "Device Sharing" and pop up Device Sharing screen. 2. Tap "Add Sharing". 3. Select the region and enter the account which you want to sharing. 4.
-
Page 61: Account Management
Account management Account Profile setting Profile my home Nick name > Welcome home Account****** Set your home location, get more information Home Management > All Devices Living Room Master Bed room Message Center > Sample1 Help Center > Turned off More Services >... - Page 62 Account management Home(Family) management 1.Tap the name of home at the left upper corner of the Home Screen and select the Home Management. Or tap Me and tap Home Management. 2. Tap one of the Homes in the Home list and get into Home Settings screen. <...
-
Page 63: Trouble Shooting
Notice 1. For technical update, there is maybe deviation of the actual items from what is on the manual. We express our apologies. Please refer to your actual product and APP. 2. Smart air conditioner APP can be altered without notice for quality improvement and also be deleted depending on the circumstances of manufacturing firms . - Page 64 TROUBLESHOOTING & WARRANTY BEFORE YOU CALL FOR SERVICE IF THE AIR CONDITIONER FAILS TO OPERATE: A) Check to make sure that the air conditioner is plugged in securely, if it is not, remove the plug from the outlet, wait 10 seconds and plug it in again securely. B) Check for a blown circuit fuse or a tripped main circuit breaker.
Need help?
Do you have a question about the Energy Star 12,000 BTU and is the answer not in the manual?
Questions and answers
Hello I’m inquiring where the horseshoe rubber dampeners are installed for the indoor unit.
The horseshoe rubber dampeners are placed onto the feet of the outdoor unit if it is subject to vibration.
This answer is automatically generated