Table of Contents

Related Manuals for Lauda LRZ 927


Summary of Contents for Lauda LRZ 927
- Page 1 Operation manual Interface module LRZ 927 / 928 LRZ 927 – Advanced contact module with single input and output (NAMUR) LRZ 928 – Advanced contact module with 3 inputs and outputs Read this manual prior to performing any task! V2R 5...
- Page 2 Manufacturer: LAUDA DR. R. WOBSER GMBH & CO. KG Laudaplatz 1 97922 Lauda-Königshofen Germany Telephone: +49 (0)9343 503-0 E-mail: info@lauda.de Internet: https://www.lauda.de Translation of the original operation manual Q4DA-E_13-022, 2, en_US 10/24/2022 © LAUDA 2022 replaces issue V2R4, V1R5 2 / 30...
-
Page 3: Table Of Contents
Interface functions............................... 19 7.2.1 Read commands............................20 7.2.2 Write commands............................21 7.2.3 Availability of the interface functions....................22 Maintenance..................................23 Faults....................................24 Decommissioning................................25 Disposal....................................26 Accessories................................... 27 Technical data..................................28 Interface module LRZ 927 / 928 3 / 30... - Page 4 Declaration of Conformity..............................29 Index..................................... 30 4 / 30 Interface module LRZ 927 / 928...
-
Page 5: General
Operation of the interface module is also permitted in combination with the LiBus module box (LAUDA catalog no. LCZ 9727). This operating manual also contains a description of how to install and connect up the module box. -
Page 6: Compatibility
This operating manual or parts thereof may not be modified, translated or used in any other capacity without the written consent of LAUDA. Violation of this may obligate the violator to the payment of dam- ages. Other claims reserved. -
Page 7: Contact Lauda
1.6 Contact LAUDA Contact the LAUDA Service department in the following cases: Troubleshooting Technical questions Ordering accessories and spare parts Please contact our sales department for questions relating to your specific application. Contact information LAUDA Service Phone: +49 (0)9343 503-350 Email: service@lauda.de... -
Page 8: Safety
This operating manual is applicable in combination with the operating manual of the constant temperature equipment in which the interface module is installed. Manuals for LAUDA products are available for download on the LAUDA website: https://www.lauda.de The warnings and safety instructions in this operating manual must be ... -
Page 9: Information About The Interface Module
Use only suitable cables of sufficient length for cable connections. Make sure that the protective screen on the cables and connec- tors complies with EMC regulations. LAUDA recommends using pre- assembled cables. Always lay cables correctly so that they do not pose a tripping hazard. ... -
Page 10: Unpacking
After installing the equipment, dispose of the packaging materials in line with environmental regulations, see Ä “Packaging” on page 26. If you discover any damage on the interface module, contact LAUDA Service immediately, see Ä Chapter 1.6 “Contact LAUDA” on page 7. 10 / 30... -
Page 11: Device Description
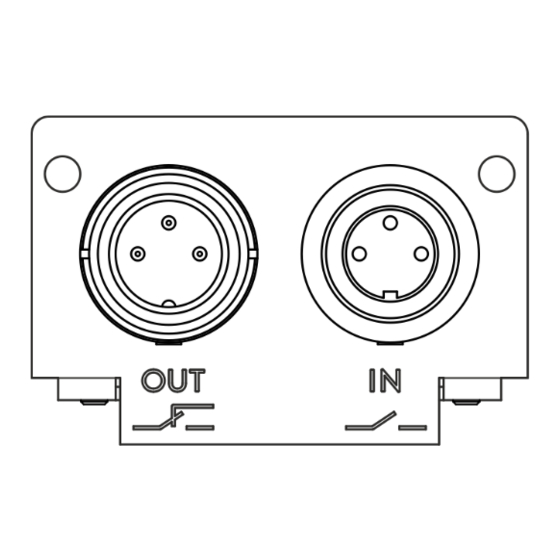
4.3 Structure Contact output ( OUT ) and contact input ( IN ) on interface module LRZ 927 are implemented using two 3‑pin connections. Cover with holes for M3x10 fastening screws Contact output, connector, 3-pin Contact input, socket, 3-pin Refer to Ä... - Page 12 2x D-Sub threaded bolts for securing the con- nector Refer to Ä Chapter 6.1.2 “Contact module with 3 inputs and outputs” on page 16 for more information on contact assignment. Fig. 2: Contact module LRZ 928 12 / 30 Interface module LRZ 927 / 928...
-
Page 13: Before Starting Up
Always observe safety measures against electrostatic dis- charge. The module installation description essentially applies to all LAUDA constant temperature equipment; the example diagrams here show the installation of an analog module in constant temperature equip- ment from the Variocool product line. - Page 14 (schematic diagram) Secure the cover to the casing using two M3 x 10 screws. The new interface on the constant temperature equipment is ready for operation. Fig. 6: Securing the cover (schematic dia- gram) 14 / 30 Interface module LRZ 927 / 928...
-
Page 15: Using The Module Box
5.2 Using the module box You can extend LAUDA constant temperature equipment by two additional module slots using the LiBus module box. The module box is designed for interface modules with a large cover and is connected to constant tem- perature equipment via a vacant LiBus socket. -
Page 16: Commissioning
3‑pin connection design. Fig. 8: Output / input contacts Fig. 9: Circuit diagram 6.1.2 Contact module with 3 inputs and outputs The connection on this interface module is designed as a 15‑pin D-Sub socket. Fig. 10: Socket / plug contacts Fig. 11: Circuit diagram 16 / 30 Interface module LRZ 927 / 928... -
Page 17: Software Update
Check whether a software warning appears on the display. Warning 510 - 532 SW update required or SW too old : Please contact LAUDA Service, see Ä Chapter 1.6 “Contact LAUDA” on page 7. No software warning: Operate the constant temperature equip- ... -
Page 18: Operation
The menu for configuring the interface is integrated in the main menu of the relevant constant temperature equipment: All operating units except for the master Menu Modules Switching contacts Fig. 12: Contact module menu 18 / 30 Interface module LRZ 927 / 928... -
Page 19: Interface Functions
ID. Depending on the technical configuration of your constant temperature equipment, the number and scope of the interface functions actually available may vary from the list shown here, see chapter "Availability of the interface functions". Interface module LRZ 927 / 928 19 / 30... -
Page 20: Read Commands
137 Error status [–] 140 Low-level alarm [–] 141 Overtemperature alarm [–] 153 Report compliance with the defined temperature range (inside / outside) [–] Table 3: Programmer ID Function Unit 82 Programmer status [–] 20 / 30 Interface module LRZ 927 / 928... -
Page 21: Write Commands
79 Pause programmer [–] 80 Continue programmer (after pause) [–] Table 7: Safety ID Function Unit 151 Specify external fault [–] Table 8: Temperature ID Function Unit 152 Specify two temperature set values alternately [–] Interface module LRZ 927 / 928 21 / 30... -
Page 22: 7.2.3 Availability Of The Interface Functions
ü ü ü ü ü ü ü ü ü ü ü ü ü ü ü ü ü ü ü ü ü ü ü ü * Equipment type as per rating label 22 / 30 Interface module LRZ 927 / 928... -
Page 23: Maintenance
When using compressed air: Always set a low working pressure to prevent mechanical damage to the connections. If you have any questions about technical modifications, please contact LAUDA Service, see Ä Chapter 1.6 “Contact LAUDA” on page 7. Interface module LRZ 927 / 928... -
Page 24: Faults
The procedure for rectifying a fault depends on the device. Follow the corresponding instructions in the operating manual accompanying the constant temperature equipment. If you are unable to rectify a fault, please contact LAUDA Service, see Ä Chapter 1.6 “Contact LAUDA” on page 7. 24 / 30... -
Page 25: Decommissioning
The storage location must meet the ambient conditions specified in the technical data. If you intend to dispose of the module, please read the information in Ä “Old device” on page 26 first. Interface module LRZ 927 / 928 25 / 30... -
Page 26: Disposal
Dispose of the device in accordance with the applicable disposal guidelines in your region. Comply with Directive 2012/19/EU (WEEE Waste of Electrical and Electronic Equipment) if disposing of the product takes place in a member state of the EU. 26 / 30 Interface module LRZ 927 / 928... -
Page 27: Accessories
12 Accessories The following LAUDA accessories are available for assembling the required connection cables: Table 9: Accessories Item Catalog number LiBus module box; extension of constant temperature equipment by up to two LCZ 9727 interface modules with large cover Contact module with single input and output (NAMUR) -
Page 28: Technical Data
Ambient temperature range [°C] 5 – 40 Temperature range during storage [°C] -20 – 60 and transport Degree of pollution according to [–] EN 60664-1 / VDE 0110-1 IP protection level [IP] 28 / 30 Interface module LRZ 927 / 928... - Page 29 Device type: Interface modules LRZ 926, LRZ 927, LRZ 928, LRZ 929, LRZ 930, LRZ 931, LRZ 932, LRZ 933 comply with all the relevant provisions of the Directives listed below, based on the design and type of the version we...
- Page 30 Unpacking ......10 30 / 30 Interface module LRZ 927 / 928...
- Page 32 Manufacturer: LAUDA DR. R. WOBSER GMBH & CO. KG ◦ Laudaplatz 1 ◦ 97922 Lauda-Königshofen Telephone: +49 (0)9343 503-0 E-mail: info@lauda.de ◦ Internet: https://www.lauda.de...
Need help?
Do you have a question about the LRZ 927 and is the answer not in the manual?
Questions and answers