
Subscribe to Our Youtube Channel
Related Manuals for Racepak 250-DS-IQ3SL


Summary of Contents for Racepak 250-DS-IQ3SL
- Page 1 IQ3 Street Logger Dash Installation Manual IQ3 Street Logger Dash Installation Manual IQ3 Street Logger Dash Manual Racepak, IQ3 Street Logger Dash and V-Net are trademarks of Racepak LLC. © Racepak LLC...
-
Page 2: Disclaimer
IQ3 Street Logger Dash Installation Manual Disclaimer Racepak LLC makes no representations or warranties of any type with respect to the contents in this manual. Racepak LLC disclaims any implied warranties or fitness for any particular purpose. Racepak LLC is not liable for any errors contained within or for incidental or consequential damages in connection with the supply, performance or use of the hardware and software or this manual. -
Page 3: Table Of Contents
IQ3 Street Logger Dash Installation Manual Disclaimer ....................2 Warranty ...................... 2 Manual Summary ..........................5 Manual Quick View ........................... 5 Items Included with the IQ3 Street Logger Dash Display Kit ............5 IQ3 Street Logger Dash Features ...................... 6 General Feature Overview........................ - Page 4 IQ3 Street Logger Dash Installation Manual DatalinkII Software Installation ..............34 Configuration Files ..................35 Stand Alone or with V-Net Sensors ....................35 Programming the Display Using the DataLink Software ......36 Com Port Settings ........................... 36 Reading/Syncing of the Configuration File ..................37 EFI Interface Programming ......................
-
Page 5: Manual Summary
PC software and IQ3 firmware. IQ3 Street Logger Dash firmware and DataLink updates can be found at http://www.racepak.com/downloads. As of this writing, the most current DataLink version is 4.8.0 and the most current IQ3 Street Logger Dash firmware version is 3.7. -
Page 6: Iq3 Street Logger Dash Features
It does not have a built-in data logger or accelerometers. It can be used as a standalone unit or with any Racepak V-Net capable data logger, such as the G2X, G2XPro and V300SD. All segments will light up for 1 second at power up. -
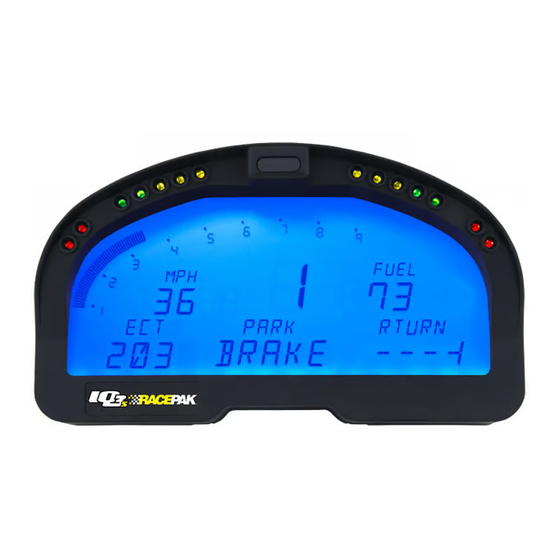
Page 7: Iq3 Street Logger Dash Displayed Features
IQ3 Street Logger Dash Installation Manual IQ3 Street Logger Dash Displayed Features Using the supplied components in the kit, data from the factory engine control unit (via the main harness connection) can be acquired for display purposes on the IQ3 Street Logger Dash. Below is a list of that information that is available to the end user. -
Page 8: Technical Specifications
IQ3 Street Logger Dash Installation Manual Technical Specifications Total Sensor Channels Available V-Net Data Channels (optional additions) Internal Channels as Defined Below IQ3 Internal Channel Voltage Processor Speed 20MHz Power & Current Input Voltage 9-18V Current Draw 350mA - Without indicator and shift LED’s active Reverse Voltage Protection Operating Temperature... -
Page 9: Iq3 Street Logger Dash Functions
V-Net Channel: Any sensor that is connected to the V-Net port of the IQ3 Street Logger Dash. V-Net: Racepak exclusive that allows multiple sensors (analog or digital) to transmit their data over a single cable, back to the IQ3 Street Logger Dash. -
Page 10: Hardware Features
IQ3 Street Logger Dash Installation Manual Hardware Features External Dimensions 2.1 ” (5.3cm) 4.1 ” (10.5cm ) 7.3 ” (18.6cm) 1 ” (2.54cm) External Features – Front Shift Lights Shift Lights Warning Light High Beam Left Turn Right Turn Shift Lights Fully programmable sequential shift lights Pre-set warning lights for high engine temperature >210°F Warning Light... - Page 11 IQ3 Street Logger Dash Installation Manual External Features – Rear 34 Pin Connector USB Cable Connector Mounting Studs / Nuts (3 total) V-Net Connector V-Net Connector Provides input for external sensor(s) V-Net cable Amp 34 Pin Connector Provides input for power / ground / programming buttons USB Cable Connector Provides input for USB programming cable supplied with package Mounting Studs &...
-
Page 12: Mounting Dimensions
IQ3 Street Logger Dash Installation Manual Mounting Dimensions Mounting template for printing and drilling. Verify printed dimensions on Racepak unit before drilling... -
Page 13: General Mounting Requirements
IQ3 Street Logger Dash Installation Manual Installation The design of the IQ3 Street Logger Dash kit greatly simplifies the installation process, as there is no external data logger or related components necessary. However, there are basic guidelines that must be followed in order to ensure correct operation of the product. General Mounting Requirements The IQ3 Street Logger Dash is designed to be utilized in a typical street car environment and is designed as such. -
Page 14: Iq3 Street Logger Dash Wiring Pinout
IQ3 Street Logger Dash Installation Manual IQ3 Street Logger Dash Wiring Pinout Connector Pinout Description Color Function / Wiring Position Connect this input to a fused power source that is hot only when the ignition switch is on. We recommend using a 3 to 5 amp fuse when making this Battery Positive power connection. - Page 15 IQ3 Street Logger Dash Installation Manual Connect to the parking brake switch on the vehicle. Parking Brake White Grounding this input will cause the parking brake indicator on the dash to turn on Connect to the high beam circuit on the vehicle. Applying High Beam Brown power to this input will cause the high beam indicator to turn...
- Page 16 IQ3 Street Logger Dash Installation Manual RELAY REQUIRED (Do Not Connect to Fan Directly) Optional, if a cooling fan control is desired. Connect to the negative side of cooling fan relay; typically pin Cooling Fan Violet/White 86 on a standard automotive relay. This output controls ground to the circuit when cooling fan on/off value is met.
-
Page 17: External Programming Button And Fan Output Wiring Diagram
IQ3 Street Logger Dash Installation Manual Not Used Not Used Not Used Optional, if an external remote warning light is desired. Connect to the negative side of the remote warning light. External Warning Apply a fused 12 volt power source that is hot only when the Orange/Yellow Light ignition switch is on to other terminal on warning light. -
Page 18: External V-Net Sensor Connection (Optional Add Ons)
External V-Net Sensor Connection (optional add ons) When installing any optional additional sensors to the IQ3 Street Logger Dash, it will utilize the Racepak V- Net (CAN bus) for input. These added sensors are connected using “stackable” modules that connect to the round 5 pin V-Net port on the rear of the dash. -
Page 19: Factory Default Display Settings
IQ3 Street Logger Dash Installation Manual Factory Default Display Settings The IQ3 Street Logger Dash is shipped with factory pre-programmed display pages. To modify these display pages, you must use a PC, programming cables and the Datalink program. This is outlined in the Programming the Display Using the DataLink Software area of this manual. - Page 20 IQ3 Street Logger Dash Installation Manual From the factory, Page 3 of the IQ3 Street Logger Dash is programmed to display the following items From the factory, Page 4 of the IQ3 Street Logger Dash is programmed to display the following items...
-
Page 21: External Programming Buttons
PC to the dash. Instead of mounting the programming buttons directly in the dash, Racepak provides the ability to remote mount the two programming buttons for better driver access. -
Page 22: Button Functions In Normal Display (Stationary) Mode
IQ3 Street Logger Dash Installation Manual Button Functions in Normal Display (Stationary) mode While the IQ3 Street Logger Dash is in normal display mode, the programming buttons will perform the following functions: Button Short Press (1 flash) Medium Press (2 flashes) Long Press (3 flashes) Button 1 Advance to Next Display Page... - Page 23 IQ3 Street Logger Dash Installation Manual Setting as Programming Accept and Accept and Program Displayed on Command Advance Exit Setting Description Dash Resets all dash settings to factory default values N = No Short Press Button 2 Y = Yes to toggle between Short Press Long Press...
- Page 24 IQ3 Street Logger Dash Installation Manual Setting as Programming Accept and Accept and Program Displayed on Command Advance Exit Setting Description Dash External shift light Brightness: 1 = Minimum Brightness EXT SHIFT Short Press Button 2 Short Press Long Press BRIGHT 10 = Maximum Brightness to increase value...
- Page 25 IQ3 Street Logger Dash Installation Manual Short Press Button 2 Type of Oil Pressure Sensor Short Press Long Press SENS - OIL P changes type of Factory Default is 2-Wire 100 PSI Button 1 Button 1 sensor Type of Coolant Temperature Short Press Button 2 Sensor Short Press...
- Page 26 IQ3 Street Logger Dash Installation Manual Setting as Programming Accept and Accept and Program Displayed on Command Advance Exit Setting Description Dash Low oil pressure warning value Short Press Button 2 Increases by 1 WARN - Value to be used for control of Short Press Long Press OIL PRESS...
-
Page 27: Oil Pressure, Water And Transmission Temperature Sensor Installation
3000 PSI 0 - 3000 psi Racepak #810-PT-3000HP 5v powered, .5v=0 4.5v=3000 Vacuum - KPA 0 - 30 Vac kPa Racepak #810-PT-VB 5v powered, 1.8v=0 .5v=105 15 PSI - KPA 0 - 103 kPa Racepak #810-PT-0015GVT 5v powered, .5v=0 4.5v=103.42... -
Page 28: Water Temperature Sensor Settings
GM/Delphi Two Wire #12146312 Ω style with 499 Ohm pull-up GM DEG-F 0 - 300 °F -18 - 121 °C Racepak Single Wire #800-TR-250 Ω style with 499 Ohm pull-up RP DEG-C -18 - 149 °C Racepak Two Wire #800-TR-300 Ω style with 4.42K Ohm pull-up RP DEG-C -18 - 149 °C GM/Delphi Two Wire #12146312 Ω... -
Page 29: Fuel Level
IQ3 Street Logger Dash Installation Manual Fuel Level The table below shows the (8) eight different types of fuel senders supported. If you are not sure of the type you are using you will have to measure the resistance with an ohms meter or for best accuracy use the custom setting. -
Page 30: Speedometer Sensor Interface
IQ3 Street Logger Dash Installation Manual Speedometer Sensor Interface The IQ3 Street Dash requires an electrical speedometer output signal from the transmission. There are two different types of speedometer sender input settings, Variable Reluctance (Zero Crossing Sine Wave) and Hall Effect. The dash is defaulted for Variable Reluctance (two wire) sensor type. - Page 31 IQ3 Street Logger Dash Installation Manual Gear Position Indicator Calibration (Manual Transmission only): The gear position can be set using a calculation and then using the Datalink software while connected to a PC. See page 32 for programming via Datalink software. To calibrate the gear follow the below procedure.
-
Page 32: Obdii And Efi Interface
IQ3 Street Logger Dash Installation Manual OBDII and EFI Interface: The IQ3 Street Logger has a CAN interface module built directly into the circuitry from the factory. This interface is used to convert the CAN bus data stream found in most new vehicles, as well as some popular aftermarket ECUs into CAN bus data that is compatible the IQ3. - Page 33 IQ3 Street Logger Dash Installation Manual...
-
Page 34: Datalinkii Software Installation
To install the software 1. Close all/any programs before beginning the DatalinkII installation 2. Insert Racepak USB Memory Flash Drive a USB port of the Laptop/PC 3. After a few seconds, the installation program should automatically start 4. “Welcome to the Install Wizard for DatalinkII”. Click Next 5. -
Page 35: Configuration Files
IQ3 Street Logger Dash Installation Manual Configuration Files The IQ3 Street Logger Dash unit is shipped from Racepak, with factory default settings. To modify the settings of the IQ3 Street Logger Dash unit, most basic settings can be modified through the use of the programming buttons;... -
Page 36: Programming The Display Using The Datalink Software
Racepak unit. If found, DataLink will automatically configure the proper COM port setting for you. If a Racepak unit was not found, and you are using a USB to Serial Port adapter, ensure that you have properly installed the device adapter driver on your PC. -
Page 37: Reading/Syncing Of The Configuration File
5. A dialog box (shown right) will appear asking if you wish to make this configuration the default configuration file. If this is the only Racepak system you will be programming, select the top option to make it the default. If using this PC to program more than one Racepak system, select the second box. -
Page 38: Efi Interface Programming
6. A dialog box (shown right) may appear asking if you wish to make this configuration the default configuration file. If this is the only Racepak system you will be programming, select the top option to make it the default. If using this PC to program more than one Racepak system, select the second box. - Page 39 IQ3 Street Logger Dash Installation Manual 9. Click on the OK button. a. If the ECU interface was turned on using the pushbuttons/Setup Mode 1 you should now see a new channel buttons (boxes) for each channel. b. If the ECU interface was not previously enabled, you can do so using the pushbuttons/Setup Mode 1, and then repeat the Read process after which the new ECU channels will appear.
-
Page 40: Programming The Display Pages
IQ3 Street Logger Dash Installation Manual Programming the Display Pages Right click over the IQ3 Street Channel Button. This action opens the following window: A view representing the current programming of all four display pages is obtained by selecting the Display Pages tab. - Page 41 IQ3 Street Logger Dash Installation Manual Bar Graph (Sweep Tach) Function Description KPH MPH RPM Selection defines channel name on dash Channel to Pull down arrow selects channel for bar graph Display data Averaging Filter Smooths displayed data. 10 is default Minimum Value Determines starting point for bar graph Maximum Value...
-
Page 42: Programming The Warnings
IQ3 Street Logger Dash Installation Manual Programming the Warnings The IQ3 Street Logger Dash provides the ability to program up to four individual warning channels. The face of the dash contains four warning lights. Each warning light is associated with a single warning channel. -
Page 43: Example Warning Setup
IQ3 Street Logger Dash Installation Manual Example Warning Setup As noted in the previous section, the dash warning setup allows the user to trigger a warning light based on one sensor channel or two sensor channels. In addition, a specific text warning may be programmed to display when the warning parameters are met. -
Page 44: Shift Lights
IQ3 Street Logger Dash Installation Manual Shift Lights To program the shift lights, simply determine the RPM Channel to activate the shift lights (typically Engine RPM) then select the shift point for each gear. Finally, select the RPM Interval between each shift light. -
Page 45: Datalink Ii Logging And Downloading
IQ3 Street Logger Dash Installation Manual DataLink II Logging and Downloading Data Download Path The key to understanding the DataLink software utilized by the IQ3 Street Logger Dash is to understand the relationship between the downloaded data, the IQ3 Street Configuration file and the DataLink software. -
Page 46: Setting The Correct Time And Date Inside Your Iq3 Street Logger Dash
IQ3 Street Logger Dash Installation Manual Setting the Correct Time and Date inside Your IQ3 Street Logger Dash A new data file (.ddf extension) is created on the SD memory card each time a new recording is initiated. Each file is time stamped with the time and date the recording was started to allow for easy identification of the data files upon uploading to your PC. -
Page 47: Clearing Data Files From The Memory Card
IQ3 Street Logger Dash Installation Manual Next, insert the memory card in the memory card reader. Now click on the button labeled Set IQ3 Time and Date and follow the online instructions. This procedure writes a file that contains the current time and date on the memory card. For the time to be set accurately, you must immediately remove the memory card from your PC’s card reader, place it back in to the IQ3 Street Logger Dash and turn on the power for at least 5 seconds. - Page 48 IQ3 Street Logger Dash Installation Manual 2) This will open your car configuration file. Next, click on the Organize Pane icon on the left tool bar. This should bring up the run log pane as shown below. 3) Next, insert the memory card in the memory card reader. Now click on the button labeled Clear Data Files From Memory Card.
-
Page 49: Initiating A Recording With The Iq3 Street Logger Dash
The staff at RacePak will have setup your data logger to start recording via pushbutton by pressing and holding either of the pushbuttons until REC appears on the dash display. The warning lights will typically flash at least 3 times before REC appears. -
Page 50: Configuring The Record Parameters
IQ3 Street Logger Dash Installation Manual Configuring the Record Parameters The first step to programming the record parameters to your data logger is to connect your data logger to your PC using the serial communications cable supplied with your data logger. Once the logger is connected turn on power to your data logger. - Page 51 IQ3 Street Logger Dash Installation Manual Setting the Start Record Channel The record enable channel is the data channel used to start or trigger the recording process. When the IQ3 Street Logger Dash data logger is programmed at the factory, the Start Record Channel will have been set to Disabled = x0 as shown below.
- Page 52 IQ3 Street Logger Dash Installation Manual Setting the Record Length Locate the Max Number of Seconds to Record option, and select it as described above. The options edit box will now display the currently programmed number of seconds to record. Enter the new desired value in the edit box.
-
Page 53: Uploading Recorded Data To Your Pc From The Iq3 Street Logger Dash
Data from your IQ3 Street Logger Dash data logger can be uploaded to your PC for data viewing and analysis using the RacePak DataLink II program. Follow the instructions below to upload data from the SD memory card to your PC. - Page 54 IQ3 Street Logger Dash Installation Manual Now you should be able to see the data files that were recorded by your IQ3 Street Logger Dash. The first file recorded would be named 1.ddf, the second 2.ddf, the third 3.ddf and so on. If you would like to see the time and date the data files were created, you will need to click on the details icon in the upper corner.
- Page 55 IQ3 Street Logger Dash Installation Manual This information will be used to name the data file. The dialog box is shown below. If you need help on filling out the dialog box, click on the help icon in the upper left hand corner of the dialog box.
-
Page 56: Viewing Real Time Data On Your Pc
IQ3 Street Logger Dash Installation Manual Viewing Real Time Data on your PC Real Time data from your IQ3 Street Logger Dash data logger can be displayed and recorded on your PC computer using the DataLink II program. Before you can view the data however, you must first setup the real time parameters in your data logger. -
Page 57: Setting Up The Logger Real Time Telemetry Parameters
IQ3 Street Logger Dash Installation Manual Setting up the Logger Real Time Telemetry Parameters This section will contain two lists. The list on the left-hand side of the telemetry section will include all of the data channels currently being monitored by your data logger. The list on the right-hand side of the telemetry sections includes all those channels that will be displayed during a real time telemetry session. -
Page 58: Starting A Telemetry Session
IQ3 Street Logger Dash Installation Manual The first parameter Circular Buffer Length is used to set the amount of data to record in seconds. The Recording Mode is used to determine whether the recording will stop when the maximum record time is reached or whether the oldest data will be overwritten. -
Page 59: Datalink Ii Help Files
IQ3 Street Logger Dash Installation Manual To stop the data acquisition, left click on the Stop Data Acquisition icon located at the bottom of the tool bar. The real time data acquisition session will be suspended. If you wish to continue the real time data acquisition, simply click on the Start Data Acquisition icon. -
Page 60: Dash Info Tab
IQ3 Street Logger Dash Installation Manual Dash Info Tab The Dash Info contains setup parameters specific to the dash. Locate the Custom Programming Options area. This is found on the left side of the page. To change any of the following parameters, place the mouse cursor on the desired text line and left click. -
Page 61: Dim Back Light Channel
Used to set channel to activate LED back light dimming. Several LED back light options can be viewed and modified in this dialog. Dash Model Model number of unit. Serial # Serial number of unit. Firmware Version Firmware version for connected product. Updates, when available, are posted at http://www.racepak.com/downloads/... -
Page 62: Troubleshooting And Faq
D. Locate Ports (COM & LPT) in the list E. Select the + or ▼to expose dropdown list F. Ensure the Racepak USB Device is listed and a COM number is listed i. If no listing is found, check power on dash and ensure the DataLink software was properly installed as the USB driver is installed during the software installation. -
Page 63: Conclusion
IQ3 Street Logger Dash Installation Manual Conclusion We hope this manual has proved helpful to your entry into the usage of the Racepak IQ3 Street Logger Dash. While the knowledge gained from our data system will provide a benefit to any race team. Taking the time and effort to learning how to utilize the system will prove most beneficial.
Need help?
Do you have a question about the 250-DS-IQ3SL and is the answer not in the manual?
Questions and answers