Handicare 2000 User Manual
Hide thumbs
Also See for 2000:
- Quick reference manual (45 pages) ,
- User manual (184 pages) ,
- User manual (8 pages)
Advertisement
Quick Links
Advertisement

Related Manuals for Handicare 2000


Summary of Contents for Handicare 2000
- Page 1 HANDICARE 2000 U S E R M A N U A L Smart seat Simplicty seat Style seat...
- Page 3 FOREWORD CONTENT USER MANUAL Thank you for choosing a Handicare stairlift. This manual is for the HANDICARE 2000 lift OPTIONS type, and includes instructions for the standard features and optional upgrades. IMPORTANT INFORMATION FAULT FINDING ATTACHMENTS A. Reminders B. Emergency operation C.
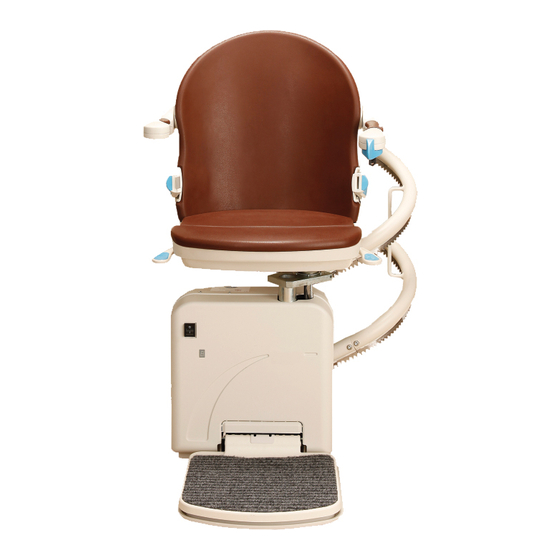
- Page 4 SMART SEAT OPTIONS Automatic Swivel Powered Footrest Folding hinge [1]Diagnostic Display The illustration above shows the features used to operate [2]Joystick the SMART seat. The SMART seat can be upgraded with the [3]Emergency stop Automatic Swivel seat, Powered Footrest and the Folding [4]Seat belt hinge, options to create even more seat comfort and user-friendliness.
- Page 5 SIMPLICITY SEAT OPTIONS Powered Footrest Folding hinge [1]Diagnostic Display The illustration above shows the features used to operate [2]Joystick the SIMPLICITY seat. The SIMPLICITY seat can be upgraded [3]Emergency stop with the Automatic Swivel seat, Powered Footrest and the [4]Seat belt Folding hinge, options to create even more seat comfort and user-friendliness.
- Page 6 STYLE SEAT OPTIONS Automatic Swivel Powered Footrest Folding hinge [1]Diagnostic Display The illustration above shows the features used to operate [2]Joystick the STYLE seat. The STYLE seat can be upgraded with the [3]Emergency stop Automatic Swivel seat, Powered Footrest and the Folding [4]Seat belt hinge, options to create even more seat comfort and user-friendliness.
- Page 7 FOLD DOWN Ensure that the on/off switch is set in the 'ON' position. The diagnosic display will be illuminated when switched on. Fold down the footplate, the armrests and seat. page 12 > OPTIONAL POWERED FOOTREST PLACE FEET Place your feet on the footplate. Ensure that both feet are completely on the plate.
-
Page 8: Safety First
SAFETY FIRST CLICK! Fasten the seat belt securely, ensuring that it clicks into the holder. Put the key in the switch and turn it ninety degrees clockwise. Check that the chair is in the locked position. RIDE Move and hold the joystick in the desired direction of travel. The display shows a “8/9”, the lift will beep 3 times and start slowly after 1 second. -
Page 9: Emergency Stop
EMERGENCY STOP In an emergency, press the emergency stop once. The lift stops straight away. The emergency stop can be released by turning the emergency button. SWIVEL CLICK! The lift stops automatically at the end of the rail. You should now swivel the seat manually, making it easier to get on and off. - Page 10 LOOSEN BELT Unfasten the seat belt. STAND UP Stand up from the seat. 8 USER MANUAL...
- Page 11 FOLD UP CLICK! Fold up the armrests, footplate and seat {A}. Push the handle, located to the left or right under the seat, downwards {B}. Swivel the seat until you hear a 'click'. The seat is now in the locked position. PARK Press and hold the up or down button on the remote control until the lift reaches a charge point.
- Page 12 CHARGE 15 sec. There are charge points for recharging the lift's batteries at the top and bottom of the rail (there may be additional charge points). If the lift is not in the correct position at the charge point, the lift beeps for 15 seconds and the display shows a “2”.
- Page 13 OPTIONS AUTOSWIVEL page 11 POWERED FOOTREST page 12 HINGED RAIL page 12 AUTOSWIVEL CLICK! The AUTOMATIC SWIVEL SEAT option lets you swivel the seat automatically to face the direction you are going to walk. To do this, push and hold the joystick in the direction of travel.
- Page 14 POWERED FOOTREST To operate a POWERED FOOTREST press the switch under the armrest[1] or fold up the seat[2].The stairlift should beep whilst folding the footrest. Always ensure the footplate is in the down position during travel. HINGED RAIL With the FOLDING HINGE option, the seat stops just above the hinged rail. Move the joystick up or down to fold or unfold the rail.
- Page 15 HINGED RAIL [CHARGING] Do not leave the lift on the hinged rail after use. Use the remote control to move the lift to a charge point and recharge the batteries. The first stopping point is a charge point. USER MANUAL 13...
- Page 16 14 USER MANUAL...
- Page 17 FOREWORD Your Handicare 2000 stairlift is a sophisticated product that has been specifically developed to carry one person (max 115 kg/18.1 stone/253 lbs) sitting on the seat (heavy duty type: max 137 kg/21.5 stone/301 lbs). Before using your Handicare 2000 stairlift please read this manual thoroughly to familiarise yourself with how to operate your stairlift.
- Page 18 Neither Handicare nor its authorised dealers may be held responsible for the suitability of the structures which surround and support the installation.
- Page 19 Installation and servicing should only be carried out by dealers or installers/service engineers authorised by the manufacturer in accordance with local regulations. The wall mounted remote controls operate on a radio frequency; Handicare is unable to accept responsibility for system inoperability in the unlikely event of interference from signals external to this stairlift.
-
Page 20: Diagnostic Display
FAULTFINDING DIAGNOSTIC DISPLAY page 18 CHAIR POSITION page 19 EMERGENCY STOP page 19 ARMREST page 20 page 20 BATTERIES RC page 21 POWER page 21 OBSTACLE page 22 SWITCH page 22 DIAGNOSTIC DISPLAY The stairlift is fitted with a diagnostic display that displays a code to help diagnose faults. - Page 21 CHAIR POSITION CLICK! C A U S E S O L U T I O N Problem: the lift does not travel in either direction and the display shows a “0”. Cause: the seat is not locked and is in a swivelled position. Solution: swivel the seat using the handle located to the left or right under the seat, until it “clicks”...
- Page 22 ARMREST C A U S E S O L U T I O N Problem: the lift does not travel in either direction and the display shows a “-”. Cause: an armrest has not been folded down. Solution: fold down the armrest fully. C A U S E S O L U T I O N Problem: the lift does not travel in either direction and the display shows a “0”.
- Page 23 FAULTFINDING BATTERIES RC RED light C A U S E S O L U T I O N Problem: the lift does not travel in either direction and the LED on the remote control does not light up when the remote control is operated. Cause: the batteries in the remote control are flat.
- Page 24 OBSTACLE C A U S E S O L U T I O N Problem: the lift travels in one direction only and the display shows a “4/6”. Cause: there is an obstacle between the lift and the stairs. Solution: move the lift in the opposite direction {A} and remove the obstacle {B}. SWITCH C A U S E S O L U T I O N...
- Page 25 ATTACHMENTS REMINDERS page 23 EMERGENCY OPERATIONS page 24 DIAGNOSTIC CODES page 27 SPAREPARTS page 30 REMINDERS POWERED FOOTREST [A]Remove the key from the switch whenever you leave the lift. [B]Never remove the lift plug from the wall socket. [C]It is recommended that the keys be stored close to the stairlift by hanging a key on the handset wall bracket.
- Page 26 EMERGENCY OPERATION >TRACK STOP [B.1]When the stairlift stops unexpectedly and no longer moves any further, the hand winder can be used to move the lift to a charging point. [B.2]Turn off the lift. [B.3]Remove the cap from the unit with a screwdriver. [B.4]Turn the hand winder as indicated on the winder.
- Page 27 EMERGENCY OPERATION >SMART SEAT CLICK! [C.1]If the power swivel is not functioning it can be swivelled manually. Do this only in an emergency. [C.2]Insert a coin in the button on the side of the seat. [C.3]Swivel the seat manually. [C.4]The seat must be returned to the start position.
- Page 28 EMERGENCY OPERATION >STYLE SEAT CLICK! [D.1]If the power swivel is not functioning it can be swivelled manually. Do this only in an emergency. [D.2]Press the release button. [D.3]Swivel the seat manually. [D.4]The seat must be returned to the start position.Do this before you use the lift again.
- Page 29 DIAGNOSTIC If the mentioned action does not help, call Handicare. CODES Display Action Display Action Write down the diagnostic code when you call Handicare for help. No display Charging, but the lift does not drive F A U L T...
- Page 30 Display Action Display Action Display Action Low battery voltage Joystick activated Joystick activated F A U L T Display Action Display Action Display Action IR address fail The main power relay not The main power not closed open F A U L T F A U L T F A U L T Display...
- Page 31 Display Action Display Action Display Action Power supply fault during Power supply fault during Power supply fault when charging charging battery on float F A U L T F A U L T F A U L T Display Action Display Action Display...
- Page 32 SPAREPARTS SIM30019 - BACKREST CUSHION ONSA - SIMPLICITY SHORT ARM ONSSBR3 - SEAT BASE RH ONSSBL3 - SEAT BASE LH SIM30051 - SEAT CUSHION MKII SIM30700 - ARMREST ASSEMBLY CONTROL 641016.52004 - CAP ARMREST SIM33700 - KEY AND KEYSWITCH SIM30029 - SPRING SEAT RELEASE SIM30046 - SEAT STEM BRG COVER SIM31150 - LOOM SEAT SWITCH SIM30047 - SEAT SWIVEL BUSH...
- Page 33 SPAREPARTS SMART SEAT UPHOLSTERY OPTIONS ORCPUCO - COCOA ORCPUJA - JADE ORCPURU - RUBY ORCPUSA - SAND ORCPUSP - SAPPHIRE SMART SEAT EXTENDED UPHOLSTERY OPTIONS ORCPUEJA - JADE ORCPUERU - RUBY ORCPUECO - COCOA ORCPUESA - SAND ORASKSSD - ARM SPACERS ORCPUESP - SAPPHIRE DOUBLE SIZE ORASKSS - ARM SPACERS...
- Page 34 SPAREPARTS STYLE SEAT 32 USER MANUAL...
- Page 35 SPAREPARTS 172001.52032S - IR HANDSET S/LINE WITH BATTERIES 172001.52027S - RF HANDSET S/LINE WITH BATTERIES USER MANUAL 33...
- Page 36 Handicare Monte-escaliers 4 Rue des Piverts ZAC de l’ Aunaie 91610 Ballancourt-sur-Essonne France Tel: +33 (0) 1 69 46 86 10 Fax: +33 (0) 1 69 46 86 19 monte-escaliers@handicare.fr Handicare GmbH Hausberger Straße 16 32457 Porta Westfalica Deutschland Tel: +49 (0) 571 973398-55 Fax: +49 (0) 571 973398-56 data@handicare.com...
Need help?
Do you have a question about the 2000 and is the answer not in the manual?
Questions and answers