Table of Contents
Advertisement
Available languages
Available languages
Quick Links
INFORMATION . . . . . . . . . . . . . 3
CONTROLS . . . . . . . . . . . . . . . . . 4
CARE AND CLEANING . . . . . . . 7
INSTRUCTIONS . . . . . . . . . . . . . 9
TROUBLESHOOTING . . . . . . . 15
WIFI SETUP . . . . . . . . . . . . . . . 16
LIMITED WARRANTY . . . . . . . .17
CONSUMER SUPPORT . . . . . . .18
Before you begin
(on some models)
Record the GE module number and
password for wifi setup. To locate
this information, see page 14.
GE Module Number #____________
Password #____________________
Write the model and serial
numbers here:
Model # _________________
Serial # _________________
Find these numbers on a label on
the side of the air conditioner.
GE is a trademark of the General Electric Company. Manufactured under trademark license.
OWNER'S MANUAL
AND INSTALLATION
INSTRUCTIONS
APCD07
APWD07
APCD08
APWD08
APSD08
APCD10
APWD10
APXD10
APLS07
APLS08
APLS10
APLH10
49-5000544 Rev. 4 10-23
Advertisement
Chapters
Table of Contents

Related Manuals for GE APLS07


Summary of Contents for GE APLS07
-
Page 1: Table Of Contents
Write the model and serial numbers here: Model # _________________ Serial # _________________ Find these numbers on a label on the side of the air conditioner. GE is a trademark of the General Electric Company. Manufactured under trademark license. 49-5000544 Rev. 4 10-23... - Page 2 THANK YOU FOR MAKING GE APPLIANCES A PART OF YOUR HOME. Whether you grew up with GE Appliances, or this is your first, we’re happy to have you in the family. We take pride in the craftsmanship, innovation and design that goes into every GE Appliances product, and we think you will too.
-
Page 3: Important Safety Information
• The appliance shall be stored in a room without qualified in the use of flammable refrigerants. continuously operating ignition sources (for example: • GE Appliances does not support any servicing of the open flames, an operating gas appliance or an air conditioner. -
Page 4: Controls
Controls Features and appearance will vary. Lights next to the buttons on the air conditioner control panel indicate the selected settings. A. Control Panel Display F. Timer Button Displays the Set Temperature in degrees Fahrenheit or degrees Celsius, or the hours remaining in a Time Delay. conditioner to turn Off or On. - Page 5 Controls The display will always default to show the room temperature. When the air conditioner is turned on, it will automatically start in the last mode and fan settings selected. Cool Mode Use the Cool mode for cooling. NOTE: while set to Cool, it will take approximately 3 minutes for To set the Cool mode: the compressor to start and cooling to begin.
- Page 6 Controls Features and appearance may vary. WiFi Swing Fan Speed Cool Heat REMOTE CONTROL D. FAN SPEED The FAN SPEED can be adjusted from Low, Medium, to 2. Aim the remote control at the signal receiver on the High speed when the air conditioner is in operation. control panel to operate the air conditioner.
-
Page 7: Care And Cleaning
Care and Cleaning CLEANING 1. Unplug or disconnect power. WARNING 2. Use only a soft cloth dampened with water to clean the cabinet. NOTE: •Do not use a liquid or spray cleaner to clean the air conditioner. •DO NOT use chemicals, abrasives, ammonia, Electrical Shock Hazard chlorine bleach, concentrated detergents, solvents or scouring pads. - Page 8 Care and Cleaning Internal Water Tank The Water Full indicator (“FL” on the control panel filled with condensed water. The unit will not cool until the tank has been emptied to prevent overflow and possible damage to the floor under the AC. To Empty the Internal Water Tank: 1.
-
Page 9: Installation Instructions
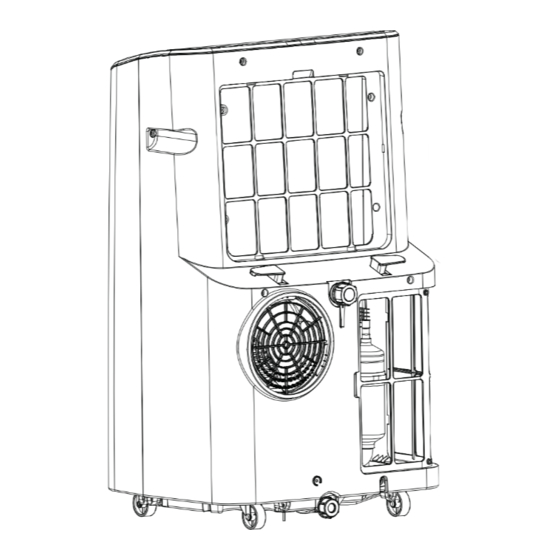
Installation Instructions Questions? Call GE Appliances at 866.907.1655 or visit our Website at: GEAppliances.com. BEFORE YOU BEGIN Location Requirements Read these instructions completely and carefully. • Place the air conditioner on a flat, level surface. For optimal performance place portable 20” from exterior IMPORTANT •... - Page 10 Installation Instructions PARTS INCLUDED (Appearance may vary) 1. Auto Swing Louver 8. Lower Drain 2. Controls 3. Built-in Handle 11. Lower Filter Panel 5. Upper Filter Panel 12. Power Cord 6. Top Continuous Drain 13. Remote Control 7. Exhaust Vent 14.
- Page 11 Installation Instructions Window Panel Combinations to fit window openings (Appearance may vary) Window Kit Window Opening 20” Center Panel Only Window Opening 34”- 41” Window Opening 41”- 48” 49-5000544 Rev. 4...
- Page 12 Installation Instructions UNPACK AIR CONDITIONER Assemble Exhaust Hose Assembly and Mount to Back WARNING of Unit Extend the exhaust hose approximately 4” from Excessive Weight Hazard each end. Screw the adapters onto the ends of the Use two or more people to move and install air conditioner.
- Page 13 Installation Instructions Install Main Window Panel and Install Main Window Panel and Extension Panels Extension Panels (cont) NOTE: Measure the window opening and use the For vinyl windows only. extension panels as referenced on page 11 to fit your Skip to step 6 for wood windows. window.
- Page 14 Installation Instructions Install Main Window Panel and Extension Panels (cont) 6. Place the window panel assembly in the window, and using the screws provided, fasten the assembly to the window sill and window frame. 7. Using one pointed screw, install the Security bracket to the window.
-
Page 15: Troubleshooting
Troubleshooting Tips Problem Possible Causes Solution Unit does not start or Power supply cord is not plugged into an Plug the power cord into a grounded 3 prong operate outlet. outlet. Power supply cord has tripped. Press and release the RESET button on the power supply cord. -
Page 16: Wifi Setup
GE Appliances SmartHQ Enabled* on the outside as shown below, your AC is GE Appliances SmartHQ Enabled. A WiFi communication card is built into the product allowing it to communicate with your smart phone for remote monitoring, control and notifications. Please visit GEAppliances.com/connect to learn more about connected appliance features, and to learn what connected... -
Page 17: Limited Warranty
From the date of the original purchase for the remainder of your product’s original one-year warranty period. GE Appliances will, at its sole discretion, replace the product with a product of the same or comparable functionality and quality or refund the original retail price. -
Page 18: Consumer Support
Have a question or need assistance with your appliance? Try the GE Appliances Website 24 hours a day, any day of the year! You can also shop for more great GE Appliances products and take advantage of all our on-line support GEAppliances.com... - Page 19 # de Modelo _____________ # de Serie _______________ Puede encontrar estos números en una etiqueta en el costado del acondicionador de aire. GE es una marca registrada de General Electric Company. Fabricado bajo licencia de marca. 49-5000544 Rev. 4 10-23...
- Page 20 GRACIAS POR HACER QUE GE APPLIANCES SEA PARTE DE SU HOGAR. Ya sea que haya crecido usando GE Appliances, o que ésta es su primera vez, nos complace tenerlo en la familia. Sentimos orgullo por el nivel de arte, innovación y diseño de cada uno de los electrodomésticos de GE Appliances, y creemos que usted también.
- Page 21 (por inflamables. ejemplo: llamas abiertas, un electrodoméstico que funcione • GE no suministra servicio técnico para el acondicionador a gas o un calefactor que funcione a electricidad). de aire. • No perfore ni queme el tubo refrigerante. Tenga presente •...
-
Page 22: Controles
Controles Las luces al lado de las teclas de toque en el panel de control del acondicionador de aire indicarán los ajustes seleccionados. Las funciones y el aspecto pueden variar. (on some models) A. Pantalla del Panel de Control NOTA: Exhibe la Temperatura Configurada en grados Fahrenheit o se presionen al mismo tiempo, le permitirán realizar la en grados Celsius, o las horas restantes en Time Delay. - Page 23 Controles La pantalla siempre mostrará la temperatura del ambiente por omisión. Cuando el acondicionador de aire sea encendido, se iniciará de forma automática en las configuraciones de modo y ventilación que fueron usadas por última vez. Modo de Refrigeración NOTA: Si el acondicionador de aire está apagado y luego es encendido en la configuración COOL (Refrigeración), pasarán Para configurar el modo COOL (Refrigeración): aproximadamente 3 minutos hasta que el compresor se inicie y...
- Page 24 Controles Las luces al lado de las teclas de toque en el panel de control del acondicionador de aire indicarán los ajustes seleccionados. Las funciones y el aspecto pueden variar. WiFi Balanceo Enfriamiento Calor CONTROL REMOTO (Deshumidificar). 2. Apunte el control remoto al receptor de señal en el panel de control para operar el aire acondicionado.
-
Page 25: Cuidado Y Limpieza
Cuidado y Limpieza LIMPIEZA ADVERTENCIA 2. Útil solamente un paño dulce humedecido con agua para limpiar el gabinete. NOTA: • No use un limpiador líquido o con rociador para limpiar el acondicionador de aire. • No usar productos químicos, abrasivos, amoníaco, Riesgo de descarga eléctrica blanqueador con cloro, detergentes concentrados, solventes o estropajos de metal. - Page 26 Cuidado y Limpieza TANQUE DE AGUA INTERIOR El indicador de agua llena se ilumina cuando el tanque de agua interno está lleno de agua de condensación. La unidad no enfriará hasta que el tanque haya sido vaciado, a fin de evitar desbordes y posibles daños sobre el piso debajo del acondicionador de aire.
-
Page 27: Instrucciones De Instalación
Instrucciones de instalación ¿Preguntas? Llame a GE Appliances al 866.907.1655 o visite nuestro sitio web en: GEAppliances.com. Requisitos De Ubicación ANTES DE INICIAR Lea estas instrucciones completa y cuidadosamente. • Coloque el acondicionador de aire sobre una supercie plana y nivelada en una ubicación que esté... - Page 28 Pièces Et Caractéristiques PARTES INCLUIDAS (Apariencia puede variar) 8. Drenaje Inferior 2. Controles 9. Enchufe LDCI 3. Manija Incorporada 4. Rueditas (4) 6. Drenaje Superior Continuo Ensamble de la Manguera de Salida Destornillador d e Punta Tornillos de Punta (7) Plana para la boquilla de Soporte de Seguridad salida hacia el panel de...
- Page 29 Instrucciones de instalación Combinaciones del Panel de Ventana para calzar en las aberturas de ventana (Apariencia puede variar) Panel Central Únicamente 49-5000544 Rev. 4...
- Page 30 Instrucciones de instalación Desembale el Acondicionador Conecte el Ensamble de la de Aire Manguera de Salida y Monte el Mismo en la Parte Trasera de la ADVERTENCIA Unidad Riesgo de Peso Excesivo Extienda la manguera de salida aproximadamente Cuente con la ayuda de dos o más personas para trasladar e instalar el acondicionador de aire.
- Page 31 Instrucciones de instalación Instale el Panel de Ventana Principal y los Paneles Principal y los Paneles Extensibles (cont) Extensibles Para ventanas de vinilo únicamente Diríjase al paso 6 si se usarán ventanas de madera NOTA: Mida la abertura de la ventana y use los paneles Coloque los dos soportes de ventana superiores y los dos soportes de ventana inferiores donde mejor sostengan los que calcen en su ventana.
- Page 32 Instrucciones de instalación Instale el Panel de Ventana Principal y los Paneles Extensibles (cont) 6. Coloque el ensamble del panel de ventana en la ventana, y usando los tornillos provistos, ajuste el ensamble al alféizar de la ventana y al marco de la ventana. seguridad a la ventana.
-
Page 33: Solucionar Problemas
Solucionar problemas Problema Causas posibles Qué hacer La unidad no se pone en El cable de suministro de energía no está Conecte el cable eléctrico a un toma corriente de marcha ni funciona enchufado en un toma corriente. 3 terminales con conexión a tierra. El cable de suministro de energía se ha disparado. -
Page 34: Configuración Wifi
GE Appliances SmartHQ (Para clientes en Estados Unidos) GE Appliances SmartQ Habilitado* Si su acondicionador de aire posee una etiqueta de Información del Electrodoméstico Conectado ubicada en la parte externa como se muestra a continuación, su acondicionador de aire cuenta con GE SmartHQ Habilitado. -
Page 35: Garantía Limitada
Autorizado del Servicio Técnico de GE Appliances, usted será responsable por el costo de un viaje o se podrá requerir que traiga limitada excluye el costo de envío o llamadas del servicio técnico a su hogar. -
Page 36: Soporte Al Cliente
También puede enviar una carta en la tarjeta de inscripción pre-impresa que se incluye con el material embalado. GEAppliances.com/register Servicio Programado El servicio de reparación de expertos de GE Appliances está a sólo un paso de su puerta. ¡Conéctese a través de Internet y GEAppliances.com/service durante el horario comercial habitual.
Need help?
Do you have a question about the APLS07 and is the answer not in the manual?
Questions and answers