Table of Contents
Advertisement
Quick Links
INSTRUCTIONS FOR
2.5kVA/2.5kW
Petrol Generator
Stock No.87088
Part No.PG28W
IMPORTANT: PLEASE READ THESE INSTRUCTIONS CAREFULLY TO ENSURE THE SAFE AND
EFFECTIVE USE OF THIS PRODUCT.
GENERAL INFORMATION
These instructions accompanying the product are the original instructions. This document is part of the product, keep it
for the life of the product passing it on to any subsequent holder of the product. Read all these instructions before
assembling, operating or maintaining this product.
This manual has been compiled by Draper Tools describing the purpose for which the product has been designed, and
contains all the necessary information to ensure its correct and safe use. By following all the general safety instructions
contained in this manual, it will ensure both product and operator safety, together with longer life of the product itself.
AlI photographs and drawings in this manual are supplied by Draper Tools to help illustrate the operation of the product.
Whilst every effort has been made to ensure the accuracy of information contained in this manual, the Draper Tools policy
of continuous improvement determines the right to make modifications without prior warning.
Advertisement
Table of Contents

Related Manuals for Draper PG28W


Summary of Contents for Draper PG28W
- Page 1 AlI photographs and drawings in this manual are supplied by Draper Tools to help illustrate the operation of the product.
-
Page 2: Title Page
Commercial copying, redistribution, hiring or lending is prohibited. No part of this publication may be stored in a retrieval system or transmitted in any other form or means without written permission from Draper Tools Limited. In all cases this copyright notice must remain intact. -
Page 3: Table Of Contents
CONTENTS 2.1 CONTENTS Page content Page TITLE PAGE INTRODUCTION ....................2 REVISION HISTORY................... 2 UNDERSTANDING THIS MANUAL ..............2 COPYRIGHT NOTICE ..................2 CONTENTS CONTENTS ......................3 GUARANTEE GUARANTEE ..................... 4 INTRODUCTION SCOPE ....................... 5 SPECIFICATION ....................5 HANDLING & STORAGE ................... 5 HEALTH &... -
Page 4: Guarantee
This guarantee applies in lieu of any other guarantee expressed or implied and variations of its terms are not authorised. Your Draper guarantee is not effective unless you can produce upon request a dated receipt or invoice to verify your proof of purchase within the guarantee period. -
Page 5: Introduction
A. Unscrew the fuel tank cap, remove the filter screen and empty the fuel tank into an approved petrol container using a commercially available hand siphon (Draper Stock No.43650), re-install the filter screen and fuel tank cap. B. Loosen the carburettor drain screw and drain the carburettor into a suitable container. -
Page 6: Health & Safety Information
HEALTH & SAFETY INFORMATION 5.1 GENERAL SAFETY INSTRUCTIONS FOR GENERATOR USE NOTE: Generators are designed to give safe and dependable service if operated according to instructions. Read and understand this owners manual fully before operating this generator. You can help prevent accidents by being familiar with the generators controls and by observing safe operating procedures. - Page 7 HEALTH & SAFETY INFORMATION WARNING!: DO NOT OPERATE THIS MACHINE IN ANY HAZARDOUS LOCATION Such areas include when there is a risk of an explosion of petrol fumes, leaking gas or explosive dust. CAUTION: ENGINE SPEED HAS BEEN FACTORY SET TO PROVIDE SAFE OPERATION Tampering with the engine speed adjustment could result in overheating of attachments and could cause a fire.
-
Page 8: Technical Description
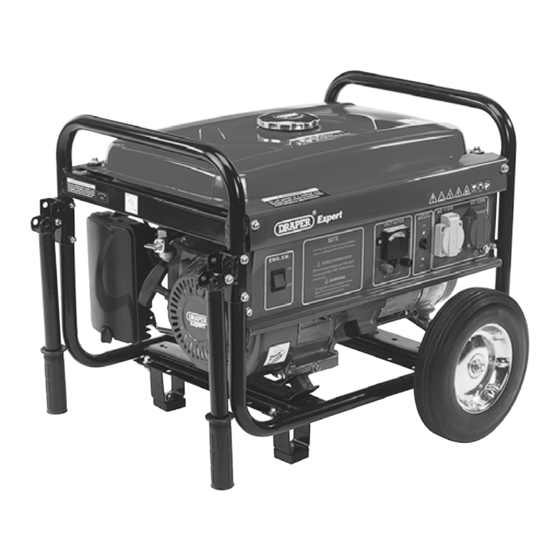
TECHNICAL DESCRIPTION 6.1 IDENTIFICATION (15) (18) (17) (18) (11) (13) (19) (10) (14) (12) (16) Fuel tank. (11) Exhaust/muffler. (2) Fuel tank cap. (12) Oil filler cap. (3) Voltmeter. (13) Wheels. (4) AC circuit breakers. (14) Transport handles. (5) Earth terminal. (15) Petrol gauge. -
Page 9: Main Component Descriptions
TECHNICAL DESCRIPTION 6.2 MAIN COMPONENT DESCRIPTIONS 2. Used to fill the fuel tank, also covers the fuel filter/strainer. 5. Earth point for connecting earth cable to earth/ground spike. 7. 230V and 110V outlets to power domestic and industrial equipment. 9. Pull to start engine, several pulls may be required. 10. -
Page 10: Unpacking & Checking
Lay the contents out and check them against the parts shown below. If any part is damaged or missing; please contact the Draper Helpline (the telephone number appears on the Title page) and do not attempt to use the machine. -
Page 11: Preparing The Generator
PREPARING THE GENERATOR Carefully remove everything from the packaging and compare it against the identification guide. If anything appears to be missing please contact the place of purchase. 8.1 CONNECTING WHEELS - FIGS. 1 - 2 Place axle through wheel and then through shaft on generator frame using washers and nyloc’s to tighten. -
Page 12: Setting The Generator
SETTING THE GENERATOR 9.1 AUTOMATIC VOLTAGE REGULATOR (AVR) This generator has been equipped with AVR technology which provides automatic voltage regulated power for continuous uninterrupted stable power supply. The AVR maintains a regulated AC output and reacts substantially quicker to rapid surges in voltage, therefore, preventing the possibility of damage to the FIG.4 generator and attached equipment. -
Page 13: Checking The Engine Oil
SETTING THE GENERATOR 9.4 CHECKING THE ENGINE OIL - FIGS. 8 - 9 The motor of this generator is not filled with oil. Prior to starting the motor ensure the crank case is filled with SAE 30/10W-40 stroke oil. Damage to the motor is not covered under warranty if the motor is run without oil. -
Page 14: Starting The Generator
SETTING THE GENERATOR 9.5 STARTING THE GENERATOR - FIGS. 10 - 13 FIG.10 Step1: Turn on the fuel tap (19) (Fig.10). Step 2: Turn on the engine switch (8) (Fig.11). Step 3: PULL choke lever (17) to the start (closed position. -
Page 15: Ac Circuit Breakers
SETTING THE GENERATOR NOTE: In most cases, operating the generator with both the 230V AC, 110V and the 12V DC at the same time, the DC Circuit breaker may open circuit. When charging batteries, only use the 12V DC outlet and leave the plug removed from the 230V AC outlet. -
Page 16: Safety Switch Tripping
SETTING THE GENERATOR 9.9 SAFETY SWITCH TRIPPING - FIG.14 FIG.14 If the safety switch (4) has tripped and cuts off the power, it may be due to substantial overloading. Marginal overloading may not switch off the safety switch but it will shorten the service life of the generator. -
Page 17: Maintenance
Make sure that the generator is not running when carrying out maintenance work. The ‘Draper’ generator has been designed to operate over a long period of time. Continuous satisfactory operation depends upon proper machine care, regular cleaning and by following the periodic maintenance schedule. -
Page 18: Periodic Maintenance
10. MAINTENANCE 10.4 PERIODIC MAINTENANCE Pre- Item Remarks Initial 1 Every 3 Every 6 Every 12 operation months months months months check or 20Hr or 50Hr or 100Hr or 300Hr (daily) Check condition, adjust gap Spark plug and clean. Replace if necessary. Check oil level. -
Page 19: Risk Of Electrocution And Fire
10. MAINTENANCE 10.5 RISK OF ELECTROCUTION AND FIRE HAZARD WHAT COULD HAPPEN HOW TO PREVENT IT Remove extension cord from the generator Extension cord can come into contact with Improper storage of hot engine parts resulting in damage. and store separately away from generator. extension cord. -
Page 20: Risk Of Fire
10. MAINTENANCE 10.6 RISK OF FIRE HAZARD WHAT COULD HAPPEN HOW TO PREVENT IT Attempting to fill the Fuel and fuel vapours can become ignited Turn engine off and allow it to cool before fuel tank while the by coming in contact with hot components adding fuel to the tank. -
Page 21: Risk Of Unsafe Operation
10. MAINTENANCE 10.9 RISK OF UNSAFE OPERATION HAZARD WHAT COULD HAPPEN HOW TO PREVENT IT Operation of generator All sources of energy include the potential • Review and understand all of the in careless manner. operating instructions and warnings in for injury. -
Page 22: Troubleshooting
11. TROUBLESHOOTING TROUBLE POSSIBLE CAUSE SUGGESTED REMEDY Contact with moving 1. Add fuel or oil 1. Low on fuel or oil content parts can result in 2. Ignition switch in “Off” position 2. Turn the ignition to the ‘START’ position serious injury. -
Page 23: Explanation Of Symbols/Pictograms
12. EXPLANATION OF SYMBOLS 12.1 EXPLANATION OF SYMBOLS Warning! Do not use in the wet. Read the instruction manual For outdoor use only. Caution! Do not expose to rain. Engine and exhaust Danger! become hot during use; Highly flammable liquid do not touch. -
Page 24: Disposal
13. DISPOSAL 13.1 DISPOSAL - At the end of the machine’s working life, or when it can no longer be repaired, ensure that it is disposed of according to national regulations. - Contact your local authority for details of collection schemes in your area. In all circumstances: •... - Page 25 NOTES...
- Page 26 NOTES...
- Page 27 NOTES...
- Page 28 - Sales Desk: (023) 8049 4333 - General Enquiries: (023) 8026 6355 - Service/Warranty Repair Agent For aftersales servicing or warranty repairs, please contact the Draper Tools Helpline for details of an agent in your local area. YOUR DRAPER STOCKIST KCMC0516...
Need help?
Do you have a question about the PG28W and is the answer not in the manual?
Questions and answers