Table of Contents
Advertisement
Quick Links
Advertisement
Table of Contents

Related Manuals for EasyLinkin G500

Summary of Contents for EasyLinkin G500
- Page 1 G500 Gateway User Manual...
-
Page 2: Package Content
1. Gateway Package 1.1 Package Content Each gateway is shipped with the following items: Item Photo Name Quantity Remarks G500 Gateway GPS Antenna GPS Feeder Ethernet version: 1 4G/WiFi Antenna 1 or 2 4Gversion: 2 Ethernet version: 1, 4G N Connector... -
Page 3: Unpacking The Gateway
The gateway and accessories are placed in two layers in the carton. Ensure that all items listed in the Package Contents section are included in the carton. Check each item for possible physical damage. If any item is damaged or missing, please notify EasyLinkin sales. ©2018 Easylinkin Co.,Ltd... -
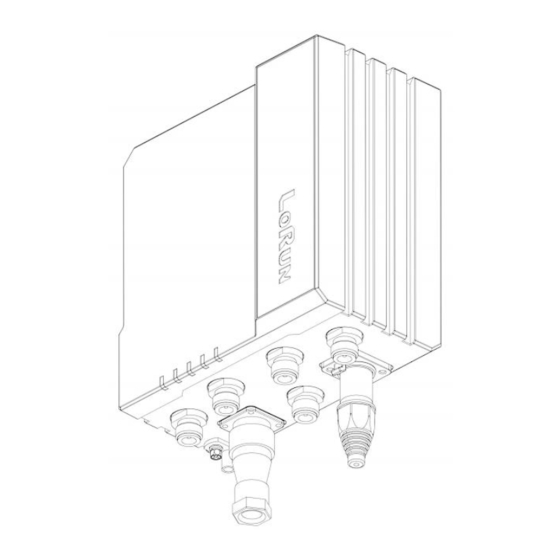
Page 4: Ports Introduction
2. Ports Introduction Ports: NOTE: For single-channel gateway, RF1 port is plugged up as shown below. (RF1 port with a red circle) Side panel: ©2018 Easylinkin Co.,Ltd... - Page 5 (Item 11), then mount two brackets to the pole through derrick. Gateway position can be adjusted flexibly according to deployment location. Wall mounting: Attach the gateway to bracket (item 9), then mount the bracket to the wall with expansion screws. Antenna can be installed separately. ©2018 Easylinkin Co.,Ltd...
- Page 6 Feeder: Double trimming N Female to N-Male, RG-58 impedance (50Ω). Follow these steps to connect GPS antenna to gateway: Step 1: Connect the N-Female of feeder to GPS antenna. Step 2: Connect the N-Male of feeder to gateway. ©2018 Easylinkin Co.,Ltd...
-
Page 7: Installation Instructions
When GPS antenna is installed on the top of the building, do not install the antenna in the position where the two sides of the floor intersect. GPS feeder requirements: Length is from 80m to 100m, choose 1/4" feeder Length is from 100m to 120m, choose 1/2" feeder ©2018 Easylinkin Co.,Ltd... - Page 8 N connector ( N-J to N- K 90°right-angle elbow connector) Follow these steps to connect 4G antenna to gateway: Step 1: Connect N Female of connector to 4G antenna. Step 2: Connect N Male of connector to gateway. ©2018 Easylinkin Co.,Ltd...
- Page 9 RF feeder should depend on the project requirement. No load at the ntenna port for high-power equipment is strictly forbidden, which will void the warranty and may cause severe damage to RF circuitry. ©2018 Easylinkin Co.,Ltd...
-
Page 10: Lora Antenna
Common choice: N-J to N-J, internal screw, SYV50-7 (50Ω). LoRa antenna and RF feeder in the standard package can be used directly for demo or test purpose. The selection of the antenna and RF feeder should depend on the site condition and project requirement. ©2018 Easylinkin Co.,Ltd... - Page 11 Power divider: (350-500MHz)/ 400MHz/433MHz/460MHz/ micro-strip 2 way power divider. Directional antenna: outdoor plate antenna, single polarized directional antenna. Feeder: N-J to N-J, internal screw, SYV50-7 (50Ω). Power Divider Single-polarized Directional Antenna Feeder ©2018 Easylinkin Co.,Ltd...
-
Page 12: Ethernet Port
4.5 Ethernet Port Ethernet waterproof connector The Ethernet connector for outdoor gateway is a special waterproof connector. Following these steps to assemble the Ethernet cable from the gateway to a cable or DSL modern (broadband Ethernet device) ©2018 Easylinkin Co.,Ltd... - Page 13 Waterproof Silicon Black Plastic Tube Cable pass through three parts in turn Step 2: Make crystal head for Ethernet cable, plug the crystal head into the socket. Step 3: Tighten the black plastic tube and crystal head socket. ©2018 Easylinkin Co.,Ltd...
- Page 14 Step 4: Connect the waterproof connector to the Ethernet port on gateway. Step 5: Connect the other end of the cable to the broadband device (cable or DSL modem) The complete Ethernet connection is as below: ©2018 Easylinkin Co.,Ltd...
-
Page 15: Power Port
Power port terminals: 1, 2 terminal: DC 12V+ 3, 4 terminal: DC 12V- The ground port is located on the left side of power port with a sign. Recommended grounding cable: Resistance is less than 5Ω ©2018 Easylinkin Co.,Ltd... -
Page 16: Power Supply
PoE Switch 5.2.1 Major PoE switches which comply with 802.3at protocol can be used. 5.2.2 PoE Power Adapter There are two optional PoE power adapters: 220V to 48V PoE adapter 48V to 48V PoE adapter ©2018 Easylinkin Co.,Ltd... - Page 17 If DC12V power is available, connect the connector end to the power port of gateway and the other end of power supply wire into external DC 12V power directly. 5.4 Other Power Supply For switching power supply or DIN-rail power supply, please refer to the actual project for gateway installation. ©2018 Easylinkin Co.,Ltd...
- Page 18 Switching Power Supply DIN-rail Power Supply Note: Cable assembly and installation shall be done by a professional electrician. 6. Power Supply 6.1 Portable Installation for Demo Purpose ©2018 Easylinkin Co.,Ltd...
-
Page 19: Wall Mounting
Install the RF feeder, GPS feeder, power cable and RJ45 Ethernet cable. Ground gateway by connecting a grounding cable to earth ground and then attaching it to the gateway ground port located on the left bottom of the device using a screw. ©2018 Easylinkin Co.,Ltd... -
Page 20: Pole Mounting
Please make sure mounting location is obstruction-free. Grounding is recommended for gateway and lightning protector installation. Waterproof should be considered on site. Gateway should be installed at a location convenient for personnel maintenance. ©2018 Easylinkin Co.,Ltd... -
Page 21: Troubleshooting
Status LED is always off indicates the gateway can not enter the If the problem persists, .return gateway to factory for maintenance. Notes: Diagnosis shall be done after power on for at least 3min (except for Issue 1). ©2018 Easylinkin Co.,Ltd... - Page 22 If you have any question or problem with our gateway, please contact us for support. Contact Information: Email: Service@EasyLinkin.com Phone: +86 0755 2692 5175 Website: www.EasyLinkin.com Address: Room 2404, Yisibo Mansion, Haitian 2nd Road, Nanshan District, Shenzhen,China. ©2018 Easylinkin Co.,Ltd...
Need help?
Do you have a question about the G500 and is the answer not in the manual?
Questions and answers