
Related Manuals for Crosswater SW928116

Summary of Contents for Crosswater SW928116
- Page 1 Installation and User Manual Electric Dual Fuel Heating Element Electric Dual Fuel Heating Element...
- Page 2 Please read these instructions is able to take the weight of the complete product. Please use the supplied wall fix- carefully before starting installa- ing bracket and follow the correct installa- tion and keep in a safe place for tion method. If the instructions are not fol- future reference.
- Page 3 User Manual Our products have been designed and manufactured in such a way to ensure that all quality, functionality and aesthetic requirements are met. Electric radiator Guide to safe installation and use. 1. Do not install the heater under an electrical socket point. 2.
- Page 4 Children aged 3 to 8 should only be allowed to operate the heater when it has been properly installed and connected. The child must be under adult supervision or have been trained to safely operate the device while understanding the risks. To ensure the safety of very small children, in- stall the electric dryer so that the lowest tube is at least 600 mm above the floor.
- Page 5 11. The device version labelled PB can be installed in bathrooms in zone 1, as defined by applicable law, subject to any additional regulations con- cerning electrical installations in wet areas. Other versions of the device can be installed in Zone 2 or beyond. 12.
- Page 6 Zone 1 Zone 2 Installation and User Manual — Electric Dual Fuel Heating Element...
-
Page 7: Electric Heating Element
Electric Heating Element Safety requirements — installation 1. Fitting and connection of the heating element should only be perform- er by a qualified installer. 2. Only connect the element to a suitably rated electrical mains supply (see the ratings on the element). 3. - Page 8 9. The pressure in the radiator should not exceed 10 atm. Ensure that an air cushion is preserved in electric radiators. In central heating systems, leave one valve open to prevent pressure build up due to the thermal expansion of the liquid. 10.
- Page 9 5. Do not use the heating element in heating systems where the water tem- perature exceeds 82° C. 6. The heating element and radiator can heat up to high temperatures. Please be cautious — avoid direct contact with the hot parts of the equipment.
-
Page 10: Technical Information
Intended use of device The heating element is an electric device Heating element power output should be intended solely for installation in radiators matched with radiator output for parame- (standalone or connected to the central ters of 75/65/20° C heating system). Technical information Model markings PB (Straight cable without plug) *... -
Page 11: Installation Or Removal
Installation or removal Detailed information demonstrating the dif- Before installation or first use: ferent ways of installing or removing a radi- ator heating element is available from the 1. Read the chapter Safety requirements manufacturer or importer (see footnotes at —... - Page 12 Notes prior to removal: 6. Do not switch the heating element on if it is not fully immersed in radiator heat- ing medium. 1. Before dismantling permanently, discon- nect the heating element from the mains 7. Make sure an adequate air cushion is pre- and ensure that the radiator is not hot.
- Page 13 Maintenance • Before performing any maintenance, always switch off the mains electrical supply. • Periodically check the fluid level in the radiator and ensure the heating element is completely submerged. • Clean the product with a dry or damp cloth. If necessary, use a very small amount of detergent, ensuring that it contains no solvents or abrasives.
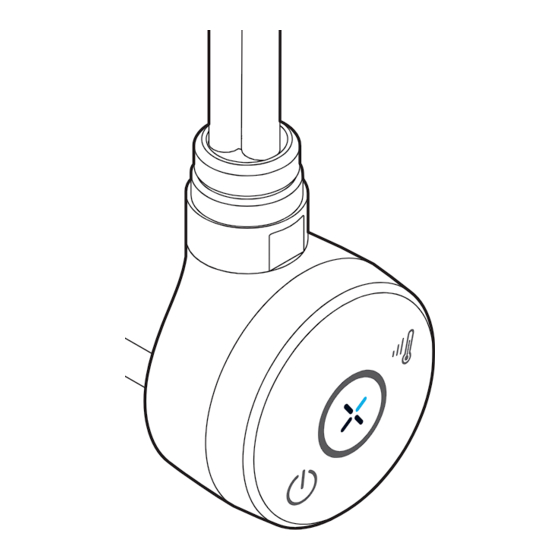
- Page 14 temperature regulation turn on/off button Turning the device on with the button will ode which shines constantly, indicates the result in the radiator heating up to the set current temperature. The remaining diodes temperature. After reaching the set temper- will start shining constantly on reaching sub- ature the device will turn off and on regular- sequent temperature levels.
- Page 15 to below 6° C, the device will switch on au- stays unchanged). This allows the user to tomatically. This is to prevent the heating achieve a maximum temperature which is agent inside the radiator from freezing. The higher than the standard or to effectively activation of Anti-freeze mode is indicated heat a space with the device during lower by the blinking of the middle diode.
- Page 16 Problem solving Problem Possible cause Solution The device is connected to Check the connection of Problem with the electrical supply in, no di- the electrical supply to the power supply connection. odes are on. element. Disconnect the device Temperature sensor has completely, wait until the been damaged.
-
Page 17: Warranty Terms And Conditions
Warranty terms & conditions 1. The subject of this warranty is an elec- — unqualified persons tampering with tric heating element with control head. the product, The product name and characteristics — customers after the purchase. are specified on the packaging. 6. - Page 18 Dual Fuel Radiator EN NEVER OPERATE THE HEATING ELEMENT WITH BOTH VALVES CLOSED. HINT: Do not turn on the heating element and your central heating at the same time. 230 V 50 Hz OPEN OPEN OPEN CLOSE OTWÓRZ OTWÓRZ OTWÓRZ ZAMKNIJ...
- Page 19 Electric only Radiator 230 V 50 Hz 0,5 h...
- Page 20 Crosswater Limited Lake View House, Rennie Drive, Dartford, Kent DA1 5FU Tel: +44 345 873 8840 technical@crosswater.co.uk MGKE-657 20230403 CIBTO...
Need help?
Do you have a question about the SW928116 and is the answer not in the manual?
Questions and answers