Table of Contents
Advertisement
Best /CRI1
FTSMRN
Owners Manual
\
o
o
Garage Door Opener
Model
139.53626SR
- I/2HP
Model
139.53515SR
- I/2HP
FASTEN
THIS MANUAL
NEAR THE GARAGE
DOOR AFTER
INSTALLATION.
PERIODIC
CHECKS
OF THE OPENER
ARE
REQUIRED
TO INSURE
SATISFACTORY
OPERATION.
FOR RESIDENTIAL
USE ONLY.
CAUTION
PLEASE READ THIS
MANUAL CAREFULLY
CONTENTS
PAGE
Safety Rules ..................
of Your Opener .......
Maintenance
Schedule
...
...........
............
Carton Check List .......
You'll Need Tools ........
....................
Installation
Information
.........
...................
.......
Safety Reveres Test ............
Code .........
Having a Problem ? ............
.....
........
2
3
3
4
4
4
5
5
6
9
10
17
18
19
20
22
22
23
How To Order Repair Parts ......
24
.......
24
Sears Warranty ................
24
Advertisement
Table of Contents

Related Manuals for Craftsman 139.53515SR - I/2HP


Summary of Contents for Craftsman 139.53515SR - I/2HP
-
Page 1: Table Of Contents
Best /CRI1 Owners Manual Garage Door Opener Model 139.53626SR Model 139.53515SR FASTEN THIS MANUAL NEAR THE GARAGE INSTALLATION. PERIODIC CHECKS REQUIRED TO INSURE SATISFACTORY FOR RESIDENTIAL USE ONLY. FTSMRN - I/2HP CONTENTS - I/2HP Safety Rules ... Operation Maintenance Features of Your Opener.. -
Page 2: Safety Rules
Start By Reading These Important THIS SAFETY ALERT SYMBOL MEANS CAUTION -- PERSONAL SAFETY OR PROPERTY DAMAGE INSTRUCTION, THIS GARAGE DOOR OPENER IS DESIGNED AND TESTED TO OFFER REASONABLY SAFE SERVICE PROVIDED IT IS INSTALLED AND OPERATED IN STRICT ACCORDANCE WITH THE FOLLOWING SAFETY... -
Page 3: Operation Of Your Opener
If the chain returns to the position described and illustrated in Step 5 page 9, DO NOT make ANY further adjustments. TRANSMITTER: than one garage door opener, if desired. The other push but- TO CORRECT tons may also be used to operate 53000 and 53000SR Series tight controls. -
Page 4: Features Of Your Opener
Limit device ... Limit adjustment ... Start circuit ... Length (overall) ... Headroom required .. 2 inches Hanging weight ... for your garage door opener. They are illustrated below with sears stock 53710 53717 53776 BRACKETS: The trolley halves reconnect... -
Page 5: Carton Check List
CARTON CHECK LIST SEARS has packaged your GARAGE DOOR OPENER In two cartons which contain all the parts and hardware Illustrated below and on Page 22. Co_r SEPARATE ALL HARDWARE FOR ASSEMBLY AND INSTALLATION ASSEMBLY HARDWARE l_readed Trolley Rod Lock'washer 5/16"... -
Page 6: Assembly
Tee Rail (End Se_on) SquareCarriage Cablepulley bracket attaches toFRONT ENDofteerail RAIL FRONT (TO DOOR) DO NOT RUN THE GARAGE DOOR OPENER UNTIL INSTRUCTED Tee Rail & Attach Cable TEE RAIL BACK Tee Rail (End Section) 1/4" Lodx Nut Br_. Rail PROCEDURE: surface for assembly. - Page 7 Assembly AS A TEMPORARY STOP, INSERT A SCREWDRIVER INTO HOLE IN FRONT END OF TEE RAIL AS SHOWN. 1. Attach threaded sha_ to trolley with Iockwasher as shown. 2. Slide trolley assembly along rail to screwdriver stop, NOTE: If trolley hits against the nut on Tee rail, center section was attached from wrong side and must be repositioned.
- Page 8 Assembly STEP 4 DO NOT REMOVE CHAIN AND CABLE FROM CARTON. Detach cable from side of carton. Remove master links from coin envelope.. MASTER LINK PROCEDURE: Insert pins of master link bar through cable loop and hole in front end of trolley (A) as shown.
- Page 9 Troll_ Base of Tee Rail ASSEMBLY OF YOUR GARAGE DOOR OPENER IS NOW COMPLETE. BEFORE YOU PROCEED WITH THE INSTALLATION OF YOUR GARAGE DOOR OPENER, ALL SAFETY RULES. KEEP GARAGE DOOR BALANCED. STICKING OR BINDING DOORS MUST BE REPAIRED. THE GARAGE DOOR,...
-
Page 10: Installation
Installation Position and Install Header Bracket STEP 1 Installation instructions THE HEADER BRACKET MUST BE RIGIDLY FASTENED TO THE HEADER WALL. REINFORCE THE WALL WITH A 2x4 IF NECESSARY. FAILURE TO COMPLY MAY RESULT IN IMPROPER OPERATION OF SAFETY REVERSE SYSTEM (SEE PAGE 18). - Page 11 Installation STEP Header Bracket Cle_s Pin 5/16"x2-3/4" STEP 3 Position Follow only those instructions TO PREVENT DAMAGE TO ALL LIGHTWEIGHT THE OPENER ON THE DOOR. INSTALLATION SECTIONAL & ONE-PIECE DOOR WITH TRACK NOTE: A 2x4 is convenient for setting to-Tee rail distance. It is not necessary where headroom is insufficient.
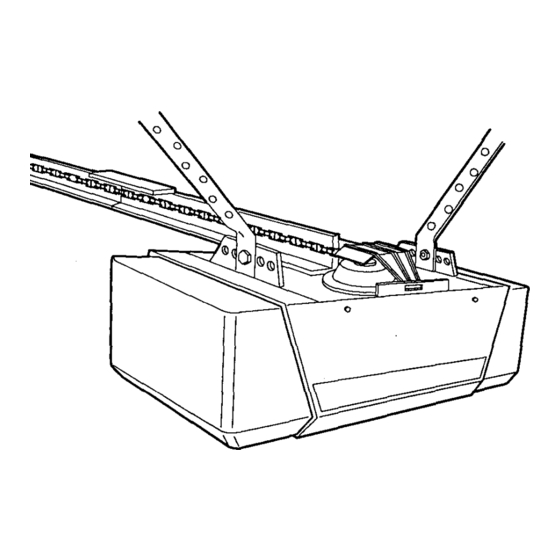
- Page 12 Installation THE OPENER CHASSIS MUST BE SECURELY FASTENED TO A STRUCTURAL Three representative Installations or crossed (Fig.2) to provide rigid support, On finished ceUings (Fig.3), attach a sturdy metal bracket (not supplied) to ceiling joists before installing opener. PROCEDURE: On EACH side of the opener measure the distance from chassis to the structural supports.
- Page 13 A convenient place is beside the service door and OUT OF REACH OF CHILDREN. Run the bell wire up the wall and across the ceiling to the garage door opener. Use insulated staples. The receiver terminals as well as the antenna ere located k Wall Control on the right side panel of the opener.
- Page 14 Installation STEP 7 Make sure antenna wire is bent down before installing lights and lenses. Install a 75 Watt maximum light bulb in each socket as shown. The lights will turn on and remain lit for 4-1/2 minutes when power i-sconnected. After 4-1/2 minutes they will turn off.
- Page 15 Installation STEP ALWAYS RE NFORCE THE TO PREVENT DAMAGE TO LIGHTWEIGHT BOARDS OR ANGLE IRON. The horizontal brace should be st least 6 feet long. The vertical brace should cover height of top panel. Check with your garage door manufacturer Sectional Header B_acket...
- Page 16 Installation STEP 10 Connect Follow only those instructions SECTIONAL Make sure garage door is closed tight. Pull the emergency release handle to disconnect the trolley. Manually move outer trolley back to the center of inner trolley as shown in Figures A, B and C. FIG A: Fasten straight door arm section to outer trolley with a clevis pin.
-
Page 17: Force & Limit Adjustment
Adjustment STEP 1 LIMIT ADJUSTMENT settings (left side panel) regulate the paints at which the door will stop when moving up or down, NOTE: Door STOPS in the UP direction interferes with door travel. Door REVERSES DOWN direction if anything interferes travel (including binding or unbalanced... -
Page 18: Safety Reveres Test
It uses an invisible beam which, when broken by an obstruction, causes a closing door to open and prevents an open door from closing. After the garage door opener has been completely installed and adjusted, the INFRARED REVERSING accessory can he installed. -
Page 19: Setting/Changing Code
1 or more of the following U.S. patents: RF.29,525; 4,037.201; Your 53000SR SERIES garage door opener (with RECEIVER 'SR' CODE BUTTON) has been factory set to operate with the LARGE push button on the transmitter. The 3-function transmitter(s) door openers... -
Page 20: Having A Problem
4. Check to be sure antenna on the right side panel of opener extends fully downward. 1. Is there a neighbor with a garage door opener using the same frequency code? Change your code. Review page 19. 2. Make sure none of the transmitter push buttons is stuck in the 'down' position. - Page 21 Having a Problem? (Continued) SITUATION DOOR REVERSES NO APPARENT REASON OPENER LIGHTS OPENER STRAINS OR MAXIMUM FORCE IS NEEDED TO OPERATE DOOR OPENER MOTOR HUMS BRIEFLY, THEN WON'T WORK OPENER WON'T OPERATE DUE TO POWER FAILURE CHAIN DROOPS OR SAGS OPENER NOISE |S DISTURBING IN LIVING QUARTERS OF HOME PROBABLE CAUSE &...
-
Page 22: Repair Parts, Rail Assembly
Repair Parts RAIL ASSEMBLY PARTS LIST INSTALLATION PARTS PART DESCRIPTION 41A3472 Wall Control assembly 10A14 12V battery 41A3476 Transmitter case essy. (Circuit board not included) 29C 128 Transmitter visor clip 41A2828 Emergency rope & handle assy. 217A209 4-strand bell wire 41A2829 Header bracket w/clevis pin and ring fastener... -
Page 23: Repair Parts, Chassis Assembly
Repair Parts PART DESCRIPTION 31C290 Sprocket cover 41A2827 Gear and sprocket assy, Complete with: Swing washer Thrust washer Retaining ring Bearing plato Roll pins (2) Ddve gear Worm gear Helical gear w/retainer Grease 41A2817 Drive/worm gear kit with grease & roll pins (2) 41B2991 Line cord... -
Page 24: How To Order Repair Parts
114A1276 HOW TO ORDER REPAIR PARTS Now that you have purchased your Sears Garage Door Opener, should a need ever exist for repair parts or service, simply contact any Sears Service Center and most Sears Roebuck and Co. stores. Be sure to provide all pertinent facts when you call or visit.