Sur La Table SLT-5801 - Multifunctional Induction Rice Cooker Manual
- Owner's manual (19 pages)
Advertisement
WHAT'S IN THE BOX

ALL ACCESSORIES ARE DISHWASHER SAFE
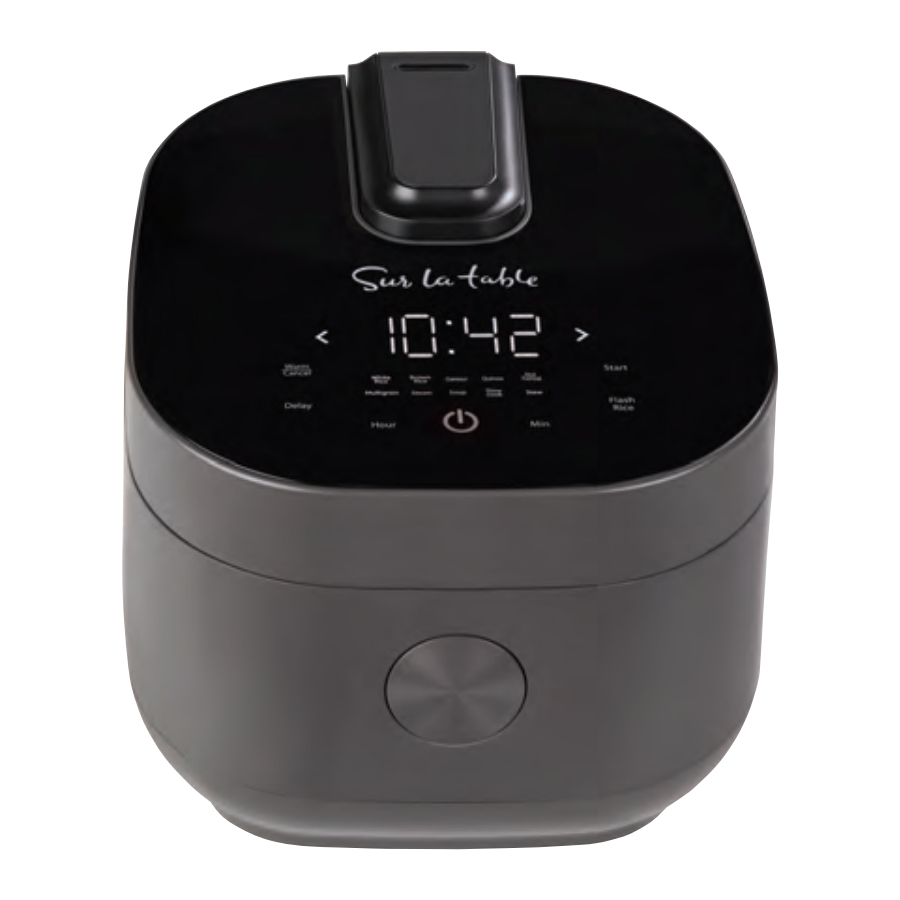
CONTROL PANEL

Figure A
![]() Power Button: Turns the cooker on/off.
Power Button: Turns the cooker on/off.
Warm/ Cancel: Manually enters Warm mode to keep food at a ready to serve temperature or cancels a current function.
White Rice, Brown Rice: Cooks fluffy, delicious rice automatically.
Oatmeal, Quinoa, Hot cereal: Prepares a quick and healthy breakfast with no need to stir or monitor.
Multigrain: Ideal for cooking brown rice and other tough-to-cook whole grains to perfection.
Steam: Using the included steam tray, steaming healthy sides and main courses has never been easier.
Soup, Stew: Stew function automatically.
Slow Cook: Slow cook meals for up to 8 hours.
OPERATION
Rice
- Measure the rice with level scoops don't overfill.
- Take rice from the measuring cup (as shown in Figure B), wash it and put it into the inner pot.

Figure B

BEFORE FIRST USE
- Read all instructions and important safeguards
- Remove all packaging materials and check that all items have been received in good condition.
- Tear up all plastic bags and dispose of them properly as they can pose a risk to children.
- Remove the inner pot from the cooker and clean with warm, soapy water. Rinse and dry thoroughly before returning to the cooker.
- Wash all accessories in warm, soapy water. Rinse and dry thoroughly.
- Wipe the cooker's body clean with a damp cloth.
INSTRUCTIONS FOR USE
- Wipe dry the exterior of cooking pot with cloth and place in the body; rotate the pot around for 2-3 times to ensure close attachment between the pot bottom and heating plate; press the lid until you hear a click.
- Do not place the cooking pot on other stoves for heating to avoid deformation due to high temperature; do not replace the cooking pot with other containers and operate on the heating plate.
![]()
- Plug in the power supply ensure plugs of the body and power source are properly connected.
- Press function button to select functions as you need and then press the "Start" button to start operation. Or press button of the selected function to directly enter operation mode.

COOKING RICE AND GRAIN
- Using the provided measuring cup, add the desired amount of rice or grain to a drainer. Rinse with water to remove excess starch and drain.
- Pour rice or grain into the inner pot.
- For white rice or brown rice, fill with water to the line that matches the number of cups of rice being cooked. For grains other than white rice or brown rice, see the ''Grain & Water Measurement Table".
- Close the lid securely.
- Plug the power cord into an available 120V AC wall outlet.
- Press the
![]() button to turn on the cooker.
button to turn on the cooker. - Press the "<" or ">" button(s) until White Rice or Multigrain is selected, depending on the type of grain being cooked. Once the correct function is selected, press the "Start" button.
- The respective cooking indicator light will illuminate and the unit will beep. The display will begin a chasing pattern to signify the beginning of the cooking cycle.
- The cooker will count down the final 12 minutes of cook time.
- Once the cycle has completed, the cooker will beep and automatically switch to Warm.
- When finished serving, turn the rice cooker off by pressing Warm/ Cancel followed by the Start button and unplug the power cord.
 button to turn on the cooker.
RICE & WATER
Measurement Table
| Uncooked Rice* | Water Line (Inside Pot) | Approx. Cooked Rice Yield* | Cooking Times |
| 2 Cups | Line 2 | 4 Cups | White Rice: 35-40 Min. Brown Rice: 64-70 Min. |
| 3 Cups | Line 3 | 6 Cups | White Rice: 37-42 Min. Brown Rice: 65-71 Min. |
| 4 Cups | Line 4 | 8 Cups | White Rice: 38-43 Min. Brown Rice: 66-72 Min. |
| 5 Cups | Line 5 | 10 Cups | White Rice: 40-45 Min. Brown Rice: 67-73 Min. |
| 6 Cups | Line 6 | 12 Cups | White Rice: 41-46 Min. Brown Rice: 68-74 Min. |
*Cups referenced are with the included measuring cup: 1 Rice Measuring Cup = U.S. Cup (6 oz.)
Note:
- Use provided rice spatula or non-metal utensil for serving to prevent scratching the nonstick inner pot. (Figure C)
![]()
- Brown rice, wild rice and other grains vary in their make-up. Some variations may require longer cooking times and/or additional water in order to achieve optimum results. Refer to the individual package instructions for cooking suggestions.
- Do not place more than 6 cups of uncooked white or brown rice into this appliance at one time. The maximum capacity of this unit is 6 cups of uncooked white or brown rice which yields 12 cups of cooked white or brown rice.

MULTIGRAIN & WATER
Measurement Table
| Grain | Uncooked Grain | Liquid | Approx. Cooked Grain Yield | Max. Uncooked Grain* | Function | Cooking Times |
| Barley | 1 Part | 2 Parts | 2.5 Parts | 3 Cups | Multigrain | 48-65 Min. |
| Bulgur | 1 Part | 1.5 Parts | 2.5 Parts | 3 Cups | Multigrain | 45-60 Min. |
| Couscous | 1 Part | 1 Part | 2 Parts | 5 Cups | White Rice/ Multigrain | 34-55 Min. |
| Quinoa | 1 Part | 1.2 Parts | 2.5 Parts | 4 Cups | Multigrain | 45-57 Min. |
| Oatmeal | 1 Part | 2.5 Parts | 2 Parts | 2 Cups | Oatmeal | 20-25 Min. |
*Cups referenced are with the included measuring cup: 1 Rice Measuring Cup = U.S. Cup (6 oz.)
Note:
- Cooking times are approximate. Altitude, humidity and external temperature will affect cooking time.
- When cooking brown rice or other grains, you must use the Multigrain function.
Flash Rice
- Using the provided measuring cup, add the desired amount of rice or grain to a drainer. Rinse with water to remove excess starch and drain.
- Pour rice or grain into the inner pot.
- Fill with water to the line that matches the number of cups of rice being cooked.
- Close the lid securely.
- Plug the power cord into an available 120V AC wall outlet.
- Press the
![]() button to turn on the cooker.
button to turn on the cooker. - Press the "Flash Rice" button is selected, depending on the type of rice being cooked. Once the correct function is selected, press the "Start" button.
- The respective cooking indicator light will illuminate and the unit will beep. The display will begin a chasing pattern to signify the beginning of the cooking cycle.
- The cooker will count down the final 12 minutes of cook time (Cooking time around 25~35minutes).
- Once the cycle has completed, the cooker will beep and automatically switch to Warm.
- When finished serving, turn the rice cooker off by pressing Warm/ Cancel followed by the "Start" button and unplug the power cord.
Oatmeal, Quinoa
- Using the provided measuring cup, add oatmeal to the inner pot.
- Fill with water according to packaging instructions. When an oatmeal/water ratio is not available, use a 1:3 ratio. In such cases, do not use more than 2 cups of oatmeal.
- Place the inner pot into the cooker and close the lid securely.
- Plug into an available 120V AC outlet.
- Press the
![]() button to turn on the cooker.
button to turn on the cooker. - Press the "<" or ">" button until Oatmeal is selected then press the "Start" button to begin cooking.
- The cooker will count down the final 12 minutes of cook time. Once cooking is completed, the cooker will automatically switch to Warm.
- When finished serving, turn the rice cooker off by pressing Warm/ Cancel followed by the
![]() button and unplug the power cord.
button and unplug the power cord.
Hot Cereal
- Using the provided measuring cup, add hot cereal to the inner pot.
- Fill with water according to packaging instructions. Please refer to the table below.
- When you put the hot cereal, water and condiment in the inner pot, you need to stir them well.
- Place the inner pot into the cooker and close the lid securely.
- Plug into an available 120V AC outlet.
- Press the
![]() button to turn on the cooker.
button to turn on the cooker. - Press the "<" or ">" button until Hot Cereal is selected then press the "Start" button to begin cooking.
- The default time of the function is 5 minutes (Cooking time can be adjusted for 5~20 minutes). Start working heating, and enter the countdown after boiling until it is completed. Once cooking is completed, the cooker will automatically switch to Warm.
- When finished serving, turn the rice cooker off by pressing Warm/ Cancel followed by the
![]() button and unplug the power cord.
button and unplug the power cord.
| Servings | Cereal | Water | Salt (Teaspoon) |
| 1 Serving | ¼ Cup | ¾ Cup | Pinch |
| 2 Servings | ½ Cup | 1½ Cups | 1/8 tsp |
| 3 Servings | ¾ Cup | 2¼ Cups | ¼ tsp |
| 4 Servings | 1 Cup | 3 Cups | ¼ tsp |
Note: The above table is for reference only.
STEAMING FOODS
- Using the provided measuring cup, add 3 cups of water to the inner pot.
- Place the inner pot into the rice cooker.
- Place the food to be steamed in the provided steam tray, place the tray into the rice cooker then close the lid securely.
- Plug the power cord into an available 120V AC outlet.
- Press the
![]() button to turn on the cooker.
button to turn on the cooker. - Press the "<" or ">" button until Steam is selected then press "Start". The cooker will begin steaming for its default time of 5 minutes.
- To input a custom steam time of up to 30 minutes, press the "Min" button to increase steam time by 1 minute. Once the desired steam time has been reached, press the "Start" button to begin steaming.
- Once the suggested amount of time has passed, carefully remove the lid and check food for doneness.
- To prevent over cooking, remove steamed food immediately once it is cooked. Wear a protective heat-resistant glove to prevent injury as the steam tray will be hot.
- Turn the rice cooker off by pressing Warm/ Cancel followed by the
![]() button and unplug the power cord.
button and unplug the power cord.
Note:
- Food should not be left in the rice cooker on Warm mode for more than 12 hours.
- Food can be steamed at any time while rice cooks, however for best results food should be steamed toward the end of the rice cooking cycle. This will allow for rice and steamed food to be ready at the same time. See the "Rice & Water measurement table" for approximate rice cooking times.
- Do not attempt to cook more than 4 cups (uncooked) of rice if steaming and cooking rice simultaneously.
USING THE DELAY TIMER
- Using the provided measuring cup, add the desired amount of rice or grain to a drainer. Rinse with water to remove excess starch and drain.
- Pour rice or grain into the inner pot.
- Refer to the "Rice/Grain & Water Measurement Tables" and fill with water accordingly.
- Close the lid securely.
- Plug the power cord into an available 120V AC wall outlet.
- Press the
![]() button to turn on the cooker.
button to turn on the cooker. - Press the "<" or ">" button until White Rice, Brown Rice, Oatmeal, Quinoa, Multigrain, Soup, Slow Cook, or Stew is selected, depending on the type of grain being cooked.
- Select Delay to set the amount of delay time.
- Press the Hour and Min buttons to increase the time accordingly. It may be set to have rice ready in 1 to 15 hours for White Rice, Oatmeal or Quinoa and 2 to 15 hours for Brown Rice, Multigrain or Soup and 4 to 15 hours for Slow Cook.
- Press "Start" to begin the timer The digital display will count down from the time selected.
- Once the allotted delay time has elapsed, the unit will beep and the respective cooking indicator light will illuminate. The display will show a chasing pattern to signify the beginning of the cooking cycle.
- The cooker will count down the final 12 minutes of cook time.
- Once the cycle has completed, the cooker will beep and automatically switch to Warm.
When finished serving, turn the rice cooker off by pressing Warm/ Cancel followed by the![]() button and unplug the power cord.
button and unplug the power cord.
CLEANING AND MAINTENANCE
- Detach the Inner Cover and Steam Valve from Lid by gently pulling it outward.
- Inner Pot, Inner Cover, and all Accessories are top-rack dishwasher safe.
- Wipe Body, Base, and Lid clean with a damp cloth.
- Thoroughly dry Body and Accessories. Reassemble for next use.
- DO NOT use harsh abrasive cleaners, scouring pads, or products that are not considered safe to use on nonstick coatings.
- If using the dishwasher, a slight discoloration to the Inner Pot and Accessories may occur.
This is cosmetic only and will not affect performance.
TROUBLESHOOTING
| PROBLEM | SOLUTION |
Rice is too dry/hard after cooking | If your rice is dry or hard when the cooker switches to Warm, additional water and cooking time will soften the rice. Depending on how dry your rice is, add ½ to 1 cup of water and stir thoroughly. Close the lid and select the White Rice function once more. When the cooker switches to Warm mode, open the lid and stir the rice to check the consistency. Repeat as necessary until rice is soft and moist. |
Rice is too moist/ soggy after cooking | If your rice is still too moist or soggy when the cooker switches to Warm, use the serving spatula to stir the rice. This will redistribute the bottom (moist) part of the rice as well as release excess moisture. Close the lid and allow the cooker to remain on Warm mode for 10-30 minutes as needed, opening the lid and stirring periodically to release. |
1 YEAR LIMITED WARRANTY
Customer Service: (877) 246-0990
ApplianceSupport@monchateau.us

Documents / ResourcesDownload manual
Here you can download full pdf version of manual, it may contain additional safety instructions, warranty information, FCC rules, etc.
Download Sur La Table SLT-5801 - Multifunctional Induction Rice Cooker Manual
Advertisement

Need help?
Do you have a question about the SLT-5801 and is the answer not in the manual?
Questions and answers