Table of Contents
Advertisement
Quick Links
Roger Access Control System
Installation guide for
HRT82AC air conditioning control panel
Firmware version: 1.1.2.39 or newer
Hardware version: 1.1
Document version: Rev. F
© 2016 ROGER sp. z o.o. sp.k. All rights reserved. This document is subject to the Terms of Use in their current version published at
the
www.roger.pl
website of the Roger sp. z o.o. sp.k. company (hereinafter referred to as ROGER).
Advertisement
Table of Contents

Summary of Contents for Roger HRT82AC
- Page 1 Hardware version: 1.1 Document version: Rev. F © 2016 ROGER sp. z o.o. sp.k. All rights reserved. This document is subject to the Terms of Use in their current version published at www.roger.pl website of the Roger sp. z o.o. sp.k. company (hereinafter referred to as ROGER).
-
Page 2: Description And Specification
• Functional description of HRC series controllers • Installation guide for HRC series controllers In order to acquire the first one it is necessary to obtain Roger consent and sign non-disclosure agreement (NDA). The second one is available at www.roger.pl. -
Page 3: Installation
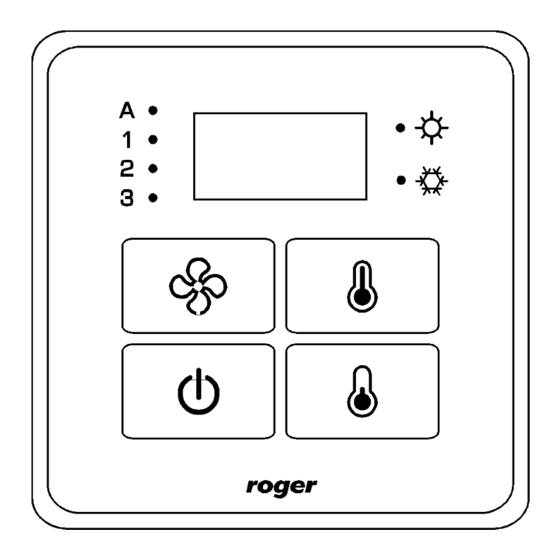
HRT82AC Installation Guide Rev.F 2023-10-06 3. I NSTALLATION 3.1 Terminals and connection diagram Fig. 1 HRT82AC air conditioning control panel Table 2. HRT82AC terminals Term. Description Term. Description 12VDC power supply RACS CLK/DTA bus Ground Tamper RACS CLK/DTA bus Tamper Fig. -
Page 4: Power Supply
Fig. 3 Connection to controller without 12VDC power supply output 3.2 Power supply HRT82AC requires 12VDC nominal power supply. The power must be connected to 12V and GND terminals. Additionally, the GND terminal is used as reference potential for the RACS CLK/DTA bus. -
Page 5: Touch Buttons
30 s of device idleness. LED indicators In the top part of HRT82AC panel there are located six LED indicators. Their functions are explained in table 4. Table 4. LED indicators... - Page 6 • It is recommended to install device on Ø60mm flush mounting box • In case of HRT82AC-F base it is necessary to make cut in the wall below temperature detector (hole in fig. 5) and under glass panel and additionally install the panel in a distance of 1-2mm from wall to ensure air circulation at the detector •...
- Page 7 HRT82AC Installation Guide Rev.F 2023-10-06 Fig.4 HRT82AC latches and surface mounting 7/12...
- Page 8 HRT82AC Installation Guide Rev.F 2023-10-06 Fig.5 HRT82AC-F flush mounting 8/12...
-
Page 9: Device Programming
ONFIGURATION 4.1 Device programming The address of factory new HRT82AC is ID=7 and such device is ready to communicate with HRC series controller requiring no additional configuration. The same address is used by HRT82TS temperature sensor module. Therefore particular controller can operate with only one of mentioned devices using ID=7 address. -
Page 10: Firmware Update Procedure
RST pins or switch power supply off and on) 4.3 Memory reset In order to restore HRT82AC factory default settings place jumper on MEM pins and then restart the device either by placing and removing jumper on RST pins or by switching power supply off and on. -
Page 11: Troubleshooting
HRT82AC Installation Guide Rev.F 2023-10-06 5. T ROUBLESHOOTING Table 7. Troubleshooting Issue Visual indication Acoustic Solution indication All LED indicators are 1. Check if RACS CLK/DTA bus is communication blinking. properly connected, wires are with controller undamaged and the bus does not exceed 150 m. - Page 12 HRT82AC Installation Guide Rev.F 2023-10-06 This symbol placed on a product or packaging indicates that the product should not be disposed of with other wastes as this may have a negative impact on the environment and health. The user is obliged to deliver equipment to the designated collection points of electric and electronic waste.
Need help?
Do you have a question about the HRT82AC and is the answer not in the manual?
Questions and answers