Advertisement
Quick Links
USA office: Fontana
AUS office: Truganina
GBR office: Ipswich
If you're having difficulty, our friendly
customer team is always here to help.
FRA office: Saint Vigor d'Ymonville
USA:cs.us@costway.com
AUS:cs.au@costway.com
GBR:cs.uk@costway.com
FRA:cs.f r @costway.com
Portable Fish Table
Table de Poisson Portable
NP11269
THIS INSTRUCTION BOOKLET CONTAINS IMPORTANT SAFETY INFORMATION. PLEASE READ AND KEEP FOR FUTURE REFERENCE.
Advertisement

Subscribe to Our Youtube Channel
Related Manuals for Costway NP11269


Summary of Contents for Costway NP11269
- Page 1 GBR office: Ipswich FRA office: Saint Vigor d'Ymonville USA:cs.us@costway.com If you're having difficulty, our friendly AUS:cs.au@costway.com customer team is always here to help. GBR:cs.uk@costway.com THIS INSTRUCTION BOOKLET CONTAINS IMPORTANT SAFETY INFORMATION. PLEASE READ AND KEEP FOR FUTURE REFERENCE. FRA:cs.f r @costway.com...
-
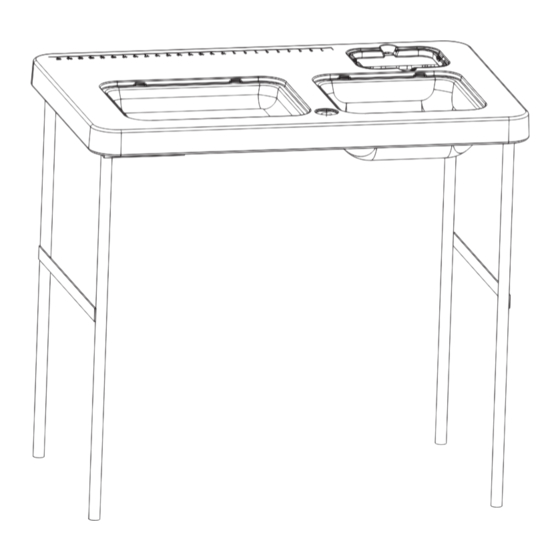
Page 2: Before You Start
Step by step instructions: Step 1: Remove product from the box and position it on the ground as illustrated below. Before You Start Open up each leg set and lock into place. (MAKE SURE LEGS ARE COMPLETELY LOCKED IN POSITION Please read all instructions carefully. - Page 3 Step 2: Faucet and Drain Assembly. a) Faucet Connection: Connect faucet to the plastic net, and then connect 3/4”(1.9 cm) female hose end to the faucet end. The 1"(2.5 cm) female end is connected to a standard garden hose. b) Drain Connection: The metal drain, screw and rubber washer are placed on the station's top side.
-
Page 4: Instructions Étape Par Étape
Instructions étape par étape: Étape 1 : Sortez le produit de la boîte et placez-le sur le sol comme illustré ci-dessous. Ouvrez chaque jeu de pieds et verrouillez-les en place. (ASSUREZ-VOUS QUE LES PIEDS SONT COMPLÈTEMENT VERROUILLÉS EN POSITION AVANT L'UTILISATION) Au-dessus de la cuve de l'évier Sous la cuve de l'évier... - Page 5 Étape 2 : Assemblage du Robinet et du Drain. a) Connexion du Robinet : Connectez le robinet au filet en plastique, puis connectez l'extrémité du tuyau femelle de 3/4" (1,9 cm) à l'extrémité du robinet. L'extrémité femelle de 1" (2,5 cm) est Return / Damage Claim Instructions connectée à...
Need help?
Do you have a question about the NP11269 and is the answer not in the manual?
Questions and answers