Table of Contents
Advertisement
Advertisement
Table of Contents

Related Manuals for MDB GREEN CLIMBER LV600

Summary of Contents for MDB GREEN CLIMBER LV600
- Page 2 Manual Version Rev. 09 of 24/08/2020...
-
Page 3: Table Of Contents
Operations and Maintenance Manual TABLE OF CONTENTS FOREWORD ......................….4 1. GENERAL INFORMATION ................ 5 1.1 IDENTIFICATION OF THE DOCUMENT “OPERATIONS AND MAINTENANCE MANUAL” ..................5 PURPOSE OF THE MANUAL ............... 5 STORAGE ....................6 GENERAL INFORMATION ................6 WARRANTY AND INFORMATION REGARDING RESPONSIBILITY ..9 MANUFACTURER ID .................. - Page 4 3.1.4 TRACK MAINTENANCE ................... 77 TECHNICAL ASSISTANCE ................ 80 3.2.1 RELAY AND FUSE POSITION DIAGRAM ............85 3.2.2 PROBLEM SOLVING GUIDE ................89 3.2.3 MDB AUTHORISED WORKSHOPS ..............93 ATTACHMENT A ..................96 ATTACHMENT B ..................97 B.1 FOREWORD ......................98 B.2 APPLYING EQUIPMENT TO THE MACHINE............
-
Page 5: Foreword
Manual FOREWORD This MDB S.r.l. would like to thank you for choosing this machine. manual contains the description of the functions and the instructions required to correctly perform the main operations of use and maintenance, both routine and occasional, of the LV600 machine. -
Page 6: General Information
1.1 “OPERATIONS AND MAINTENANCE MANUAL” IDENTIFICATION The “Operation and Maintenance Manual” is a document issued by MDB S.r.l. and must be considered an integral part of the machine. COPYRIGHT MDB S.r.l. owns the copyright of this operation and maintenance manual. This manual is intended for the personnel who use the LV600 . -
Page 7: Storage
Use the manual in such a way that it is not damaged in any manner; Do not remove, add, change or write in any part of the manual; updates may be carried out only by MDB S.r.l. Keep the manual in an area protected against damp, so that its lifetime is not compromised;... - Page 8 ➢ Due to changes, variations and/or installation of accessories not authorised by MDB S.r.l. ➢ MDB S.r.l. may not be held responsible for damage caused by: Natural disasters; Revolts and riots; Lack of maintenance or incorrect maintenance;...
- Page 9 Operations and Maintenance Manual Replacing a part at the right time, not only allows the machine’s operation to meet expectations, but also prevents more serious damage and/or personal injuries. Using original spare parts maintains the machine’s quality over time and entitles you to the product’s WARRANTY for the period for which it is provided.
-
Page 10: Warranty And Information Regarding Responsibility
Items not covered by the warranty are: - Items that are part of the machine, but that are not manufactured by MDB (such as: tracks, transmission belts, bearings, gearboxes, etc.): these are only covered by the warranty provided by their respective manufacturers. - Page 11 Warranty request A warranty request must be made in writing to MDB by the dealer, within 4 weeks from the fault, specifying: name and address of the user; type, model, serial number, date of sale, date of the fault, number of hours of operation, circumstances and alleged causes.
-
Page 12: Manufacturer Id
Operations and Maintenance Manual MANUFACTURER IDENTIFICATION Name: MDB S.r.l. Head office: C.da Sant’Onofrio, 6/A – LANCIANO (CH) - ITALIA +39 0872.50221 Phone: +39 0872.50231 Fax: E-mail: info@mdbsrl.com VAT number: 01960690699 1.6.1 TECHNICAL ASSISTANCE Technical assistance is always provided by the manufacturer. For further information, please call: +39 0872.50221... -
Page 13: Machine Id
Operations and Maintenance Manual Maintenance Manual MACHINE IDENTIFICATION The LV600 is identified by the CE mark, drawn in accordance with the specifications given in the 2006/42/EC European Directive, in Italian Legislative Decree No. 17/2010, which implements the Machine Directive, and in the Legislative Decree 81/08 and subsequent amendments and additions. -
Page 14: Description Of The Machine
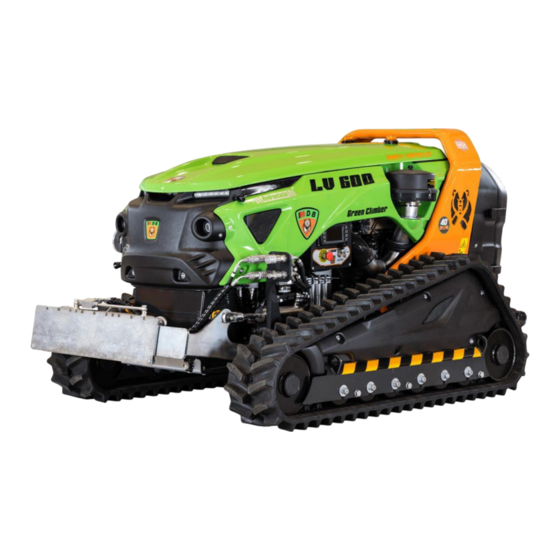
Operations and Maintenance Manual DESCRIPTION OF THE MACHINE 1.8.1 TECHNICALDATA DESCRIPTION Machine height 1100 mm Min. machine width 1360 mm Max. machine width 1760 mm Machine length 2160 mm Machine weight 1292 kg Maximum working slope with open 56° tracks Engine type and model LOMBARDINI KOHLER KDI1903TCR/26B... -
Page 15: Work Environment
Operations and Maintenance Manual 1.8.2 WORK ENVIRONMENT LIGHTNING The machine has two lighting devices at the front to improve the machine’s visibility in the work area and not to light the work area at night. The machine must only be used during the day, with sufficient visibility for the operator to see the work area for a radius of at least 100 m. -
Page 16: General Description Of The Machine And Operations
Operations and Maintenance Manual 1.8.3 GENERAL DESCRIPTION OF THE MACHINE AND ITS OPERATION The LV600 is made up of: S355 and S700 steel base frame. Welded structure; Tracks; Hydraulic oil reservoir; Diesel tank; Bonnet; Roll-bar; Rear cover panel; Air filter; Exhaust assembly;... - Page 17 Operations and Maintenance Manual LV600 14 1 The LV600 is made up of components fixed to a welded steel frame. It is moved by rubber tracks. The vehicle’s gauge is variable and configurable by means of the radio remote control system. The diesel engine drives the machine’s hydraulic circuit by means of hydraulic pumps.
- Page 18 Operations and Maintenance Manual hooking only equipment designed and manufactured by MDB. The equipment authorised by MDB to be used with the LV600 is: TF 130 & GD 6DQW·2QRIULR $ 66034 Lanciano (CH) – ITALY Tel. (+39) 0872.50221 – Fax (+39) 0872.50231 E-mail: info@mdbsrl.com...
- Page 19 Operations and Maintenance Manual Tiller CS-135 Sprayer BV300 Stump grinder FTR400 C.da Sant’Onofrio, 6/A 66034 Lanciano (CH) – ITALY Tel. (+39) 0872.50221 – Fax (+39) 0872.50231 E-mail: info@mdbsrl.com – Web: www.mdbsrl.com 18 of 123...
- Page 20 Operations and Maintenance Manual Snow blower DS-14 Finishing mower SRM-215 Trencher MT-1200 C.da Sant’Onofrio, 6/A 66034 Lanciano (CH) – ITALY Tel. (+39) 0872.50221 – Fax (+39) 0872.50231 E-mail: info@mdbsrl.com – Web: www.mdbsrl.com 19 of 123...
-
Page 21: Operating Conditions
1.8, the customer must request authorisation from MDB’s technical department, that will perform the necessary checks and reply, confirming the application or otherwise. If any equipment not intended by MDB for use with the LV600 is applied to it, without first requesting authorisation and receiving a formal reply, MDB is exempted from any constructional or functional liability for the machine. -
Page 22: Workstations
The operator in charge of operating the LV600 machine must be trained and informed by the MDB retailer/dealer before use. The end user is responsible for the application of the laws of the country of origin for the proper use of the equipment. -
Page 23: Reference Standards
Operations and Maintenance Manual 1.10 REFERENCE STANDARDS 1.8.1 ITALIAN LEGAL REGULATIONS LEGISLATIVE DECREE no. 81/2008 and subsequent amendments and additions; LEGISLATIVE DECREE no. 17/2010; LEGISLATIVE DECREE no. 262/2002; LEGISLATIVE DECREE no. 80/2016; LEGISLATIVE DECREE no. 86/2016 1.8.2 EUROPEAN STANDARDS ... - Page 24 Operations and Maintenance Manual 1.8.3 TECHNICAL HARMONISED STANDARDS EN ISO 12100:2010 – Safety of Machinery — General Principles for Design — Risk Assessment and Risk Reduction; EN ISO 4254-1:2015 – Agricultural machinery — Safety — Part 1: General Requirements;...
-
Page 25: Operating The Lv600
Operations and Maintenance Manual 2. HOW TO USE THE LV600 MACHINE TRANSPORT The LV600 is delivered to the buyer adequately protected against impact during transportation. On arrival at the destination, use the machine’s lifting points, located in the areas identified in the photos, to place it on the ground. C.da Sant’Onofrio, 6/A 66034 Lanciano (CH) –... -
Page 26: Operating The Machine
Operations and Maintenance Manual USING THE MACHINE The LV600 has a unique radio remote control system. To operate the machine, you must start its heat engine. First make sure that the red battery isolator lever (Fig. 1) has been turned clockwise Fig. - Page 27 Operations and Maintenance Manual CONTROL PANEL Use the key-operated selector switch to turn on the engine, by performing the following operations: Key inserted in the zero position. Turn the key clockwise to the 1st click in position (1). The engine of the LV600 machine can be powered up in two different ways: A.
- Page 28 Operations and Maintenance Manual POWERING UP THE ENGINE USING THE KEY FROM THE CONTROL PANEL Turn the key clockwise, until it clicks for the 2nd time and bring it to START position, releasing it when the engine has started (the key will return to position 1 automatically).
- Page 29 Operations and Maintenance Manual Caution! At first start-up, allow the engine to run idle for at least 15 minutes, while checking that the engine oil pressure is correct, that there are no diesel fuel or coolant fluid leaks and that the warning lights and/or indicators work correctly.
- Page 30 Operations and Maintenance Manual Fig. 3 Turn on the transmitter via the START button in fig. 4, waiting for the connection between the transmitter “TX” and the receiver “RX” to establish (to check if the connection was successful, check that the GREEN and the BLUE LEDs on the TX are flashing [Fig.
- Page 31 Operations and Maintenance Manual B. and D. IGNITION WITH RADIO TRANSMITTER The machine engine can now be started by pressing button “A” in fig. 5. Fig.5 It is forbidden to turn on the transmitter in places that do not allow full visibility of the machine operated by remote control. Activating the transmitter indoors or away from the receiver, does not allow to have real awareness of the manoeuvres that are being carried out, resulting in a situation of danger.
- Page 32 Operations and Maintenance Manual If the engine fails to start, refer to the dedicated section in this manual (PARAGRAPH 3.2.2 PROBLEM SOLVING) to solve the problem. Keep the engine running at idle speed for a variable time that depends on outside temperature, see the table below: Environmental temperature TIME 2 minutes...
- Page 33 Operations and Maintenance Manual RADIO REMOTE CONTROL LED INDICATORS The radio remote control is equipped with LEDs that signal the following to the user: • The operating status • Malfunctions • Type of fault TRANSMITTER The receiver is equipped with 3 LEDs informing the operator: The operating status Malfunctions...
- Page 34 Operations and Maintenance Manual RECEIVER The receiver is equipped with 7 LEDs indicating the use: The operating status Malfunctions Type of failure and diagnostic functions Status of power supply units Status of connections INDICATION Normally off during operation. Error B Red/green for the duration of the data error on (Red/green LED) channel B.
- Page 35 Operations and Maintenance Manual BATTERY CHARGE STATUS The battery charge status is indicated by the YELLOW LED. YELLOW LED off means that the battery is charged If the YELLOW LED is flashing regularly, it indicates that the battery is low, and the transmitter must be switched off to replace the battery with a charged one.
- Page 36 Operations and Maintenance Manual DRIVE FORWARD, TURN RIGHT DRIVE FORWARD, TURN LEFT REVERSE, TURN LEFT C.da Sant’Onofrio, 6/A 66034 Lanciano (CH) – ITALY Tel. (+39) 0872.50221 – Fax (+39) 0872.50231 E-mail: info@mdbsrl.com – Web: www.mdbsrl.com 35 of 123...
- Page 37 Operations and Maintenance Manual REVERSE, TURN RIGHT COUNTER ROTATION TO THE RIGHT COUNTER ROTATION TO THE LEFT C.da Sant’Onofrio, 6/A 66034 Lanciano (CH) – ITALY Tel. (+39) 0872.50221 – Fax (+39) 0872.50231 E-mail: info@mdbsrl.com – Web: www.mdbsrl.com 36 of 123...
- Page 38 Operations and Maintenance Manual RIGHT-HAND SIDE JOYSTICK FUNCTIONS – Y- LIFTING OF ATTACHMENT PLATE LOWERING OF ATTACHMENT PLATE LEFT SIDE SHIFTING OF ATTACHMENT PLATE C.da Sant’Onofrio, 6/A 66034 Lanciano (CH) – ITALY Tel. (+39) 0872.50221 – Fax (+39) 0872.50231 E-mail: info@mdbsrl.com –...
- Page 39 Operations and Maintenance Manual RIGHT SIDE SHIFTING OF ATTACHMENT PLATE CENTRAL CONTROL FUNCTIONS 1 ADJUSTING SPEED 2 SET MACHINE DIRECTION 3 INCREASE ENGINE RPM 1 - ADJUSTING THE SPEED TURN CLOCKWISE: MAXIMUM SPEED TURN ANTICLOCKWISE: MINIMUM SPEED 2 – SET MACHINE DIRECTION The direction function allows the machine to advance straight or more or less towards left or right, depending on how far knob n.
- Page 40 Operations and Maintenance Manual TURN ANTICLOCK LEFT DIRECTION WISE TURN THE ± KNOB ANTICLOCKWISE TO STEER THE MACHINE STRAIGHT WITH A DIRECTION TOWARDS THE LEFT POSITION “0” “0” POSITION THE MACHINE WILL GO STRAIGHT WITHOUT FOLLOWING ANY DIRECTION TURN CLOCKWISE RIGHT DIRECTION TURN THE KNOB ±...
- Page 41 Operations and Maintenance Manual 3 – ENGINE RPM TURN CLOCKWISE: MAX. ENGINE SPEED TURN ANTICLOCKWISE: MIN ENGINE SPEED LOWER CONTROL FUNCTIONS EQUIPMENT ON/OFF: ON SWITCHED ON – OFF SWITCHED OFF. Hold the switch in the ON position for at least 3 seconds to turn on the equipment. Blue led on indicates that the equipment is on.
- Page 42 Operations and Maintenance Manual Danger! If equipment is installed on the machine, do not operate it from the front, always stay behind it. Caution! With equipment installed on the machine, there is a hazard to the operator’s body and face from blunt objects being projected from the front area of the machine.
- Page 43 Operations and Maintenance Manual Caution! The radio signal between the transmitter and the receiver has been set for a maximum operating radius of 100 metres. If this distance is exceeded, the signal could be lost, which would block the machine and turn of the engine.
- Page 44 Operations and Maintenance Manual Avoid moving along the edge of sloping terrain or in rough terrain with one track on horizontal ground and the other on a slope. Always drive with the slides resting on the same level to avoid damaging the tracks.
- Page 45 Operations and Maintenance Manual Caution! Unless you are in an emergency situation, always remember not to turn off the engine suddenly, especially when it is running at high rpm or the machine is moving fast. Before turning off the engine, let it run idle for a short time and always deactivate any equipment using lever 1 on the LOWER CONTROL FUNCTIONS (page 31), until the blue LED goes off.
-
Page 46: How To Use The Hand Levers
Operations and Maintenance Manual 2.2.1 HOW TO USE THE MANUAL LEVERS Fig. 7 The four manual levers are positioned under the control panel, on the left side of the machine (fig. 7). As indicated by pictograms in these places, the levers have the following operations: AUXILIARY COMMAND (varies for each equipment. -
Page 47: Emergency Operations
Operations and Maintenance Manual 2.2.2 EMERGENCY OPERATION In the event of a radio remote control failure, repair the machine on site. If this is not possible, inform the breakdown services so that lifting equipment can be used to take the machine to the nearest authorised workshop. If the radio battery is flat, replace the battery with the spare one in the special container shown on page 16 of this manual and in fig. - Page 48 Operations and Maintenance Manual HOW TO CONNECT THE CABLE FROM THE TRANSMITTER TO THE RADIO RECEIVER Take the wiring cable shown in the figure. Turn the metal knob shown in the diagram above the receiver of the remote control counterclockwise, until it is completely disconnected.
- Page 49 Operations and Maintenance Manual Remove the yellow rubber coating at the end of the wiring cable by turning it counterclockwise. Take the end of the cable with 4 male connectors shown in the figure. Insert the end of the cable, making sure to match the 4 male connectors with the 4 female sockets of the connector located on the transmitter...
- Page 50 Operations and Maintenance Manual Open the first hood of the machine using the lever shown in the figure. Locate the radio receiver. Turn the metal knob shown in the diagram above the receiver of the remote control counterclockwise, until it is completely disconnected. Take the end of the cable with 4 male connectors shown in the figure.
-
Page 51: Emergency Intervention
Operations and Maintenance Manual Insert the end of the cable, making sure to match the 4 male connectors with the 4 female sockets of the connector located on the receiver of the radio control. 2.2.3 EMERGENCY INTERVENTION If, while using the machine, the operator needs to block the machine and is unable to do so using the normal radio remote control and/or control panel, the machine is equipped with 2 emergency buttons. - Page 52 Operations and Maintenance Manual When the emergency button is pressed, it remains down, and the machine’s engine is immediately turned off, blocking any movement. To start the machine again once safe working conditions have been restored: - Turn the red emergency button clockwise (fig. 10) Fig.
-
Page 53: Description Of The Control Panel
Operations and Maintenance Manual 2.2.4.1 DESCRIPTION OF THE CONTROL PANEL The control panel is located on the left side of the machine. Upon system start-up, the machine displays the welcome page for a short time The main work page appears after a few seconds. This page contains all information regarding the engine. - Page 54 Operations and Maintenance Manual Angle page This page will be displayed using the key. The angle of the machine can be monitored both horizontally and vertically; once it reaches a horizontal and/or vertical angle of 36 degrees, the alarm signal will appear over the image. To exit the page, use the key at bottom left.
- Page 55 Operations and Maintenance Manual Alarm page This page will automatically appear upon the occurrence of one or more conditions of engine alarm, colour may vary depending on the type of alarm: GREEN alarm type LOW, self-diagnosis of the control unit has detected anomalies which are then resolved automatically.
- Page 56 Operations and Maintenance Manual YELLOW alarm type MEDIUM Two beeps are emitted, and the display shows timed Message with YELLOW logo. The error message remains large on the display for a few seconds and then returns to normal size. This type of alarm is set for the following anomalies: 1) alternator faulty;...
-
Page 57: Refuelling
Operations and Maintenance Manual 2.2.5 REFUELLING DIESEL Once the fuel warning light on the control panel has come on (see paragraph 2.2.4 of this manual), immediate refuelling is recommended. Lift the first bonnet using the elastic pin shown in fig. 11 Fig. - Page 58 Operations and Maintenance Manual Fuel compatibility Compatible Warranty Engine Emissions coverage deterioration certification Caution! Do not use vegetable oil as biofuel for this engine. Caution! Damage caused by the use of fuels other than those recommended shall not be covered by warranty. Caution! Do not wait for the tank to empty completely, which would cause the engine to stop.
-
Page 59: Checking The Level, Topping Up And Changing Hydraulic Oil
Operations and Maintenance Manual Caution! Fuel fumes are highly toxic, refuelling must be carried out only outdoors or in well-aired environments. Do not get too close to the cap with your face so as to avoid inhaling harmful fumes. Danger! Top up only with the engine off. -
Page 60: Checking And Topping Up Coolant Fluid
Operations and Maintenance Manual To change the hydraulic oil completely, empty the tank with the engine warm, but stopped, so that the fluid drains away quickly and completely. Caution! Always wear protective gloves to protect the skin when carrying out these operations. Consult the safety data sheet of the oil you are using when choosing the right kind of gloves. - Page 61 Operations and Maintenance Manual Lift the cover as shown in fig. 15: Fig. 15 To top up, unscrew the plug, pour the coolant up to the maximum level, screw the plug back on. Caution! Continuing to use the machine if there is a leak in the cooling circuit or the liquid level is too low, could cause irreparable machine damage.
-
Page 62: Checking The Engine Oil Level And Topping Up
Operations and Maintenance Manual 2.2.8 CHECKING THE ENGINE OIL LEVEL AND TOPPING UP The engine oil level must be checked and refilled with the machine not on a slope and with the engine stopped and warm. After using the machine, stop the engine, wait at least 10 minutes before you begin the check and possible topping-up. - Page 63 Operations and Maintenance Manual Remove the oil level check dipstick B and check that the level is close but not beyond MAX. Refill if the level is not close to the MAX by unscrewing the oil filler plug A or the oil filler plug C if the plug A is not accessible.
- Page 64 Operations and Maintenance Manual Use only oil with the properties listed in the table below: Recommended oil Viscosity TCR/D TIER III or NOT CERTIFIED with specifications The oil viscosity must be adjusted to the temperature of the space in which the engine operates.
-
Page 65: Checking The Fuel Filter Cartridge
Operations and Maintenance Manual 2.2.9 CHECKING THE FUEL FILTER CARTRIDGE When there is water in the fuel filter cartridge the machine emits 3 beeps, the red alarm signal appears on the control unit and the engine shuts down. Locate the fuel filter cartridge on the left side of the machine, after lifting the first and the second hoods as shown in figures 11 and 16. - Page 66 Operations and Maintenance Manual LEGEND TO THE LABELS ON THE MACHINE WEAR PROTECTIVE WORK GLOVES CONSULT THE OPERATIONS AND MAINTENANCE MANUAL USE PROTECTIVE FOOTWEAR USE EAR PROTECTION EQUIPMENT USE A HARD HAT USE A PROTECTIVE FACE VISOR USE WORK CLOTHING C.da Sant’Onofrio, 6/A 66034 Lanciano (CH) –...
- Page 67 Operations and Maintenance Manual DANGER: WATCH YOUR HANDS DANGER: HIGH TEMPERATURE DANGER OF CRUSHING AND COLLISION DO NOT STAND NEAR THE MACHINE. DO NOT OPERATE THE MACHINE STANDING BELOW IT ON STEEPLY SLOPING TERRAIN, ALWAYS STAY ABOVE IT. DANGER OF CONTACT WITH MOVING WORKING PARTS.
-
Page 68: Maintenance And Technical Assistance
MDB does not assume any liability for damage to the machine or for accidents due to inadequate maintenance, inadequate technical assistance or failure to comply with the laws in force. -
Page 69: Maintenance
Operations and Maintenance Manual WORKING TIME COUNTER The MDB control unit has a working time counter. The machine must be taken to the nearest technical assistance centre to undergo routine maintenance. (*) The technical assistance centres authorised by MDB are indicated at the end of this manual. - Page 70 Operations and Maintenance Manual Only use only environmentally friendly, pH-neutral detergents that do not irritate the skin. This will protect the environment and avoid oxidising the device. Only clean in places that are suitable for washing (with oil separators). Do not use rags that could scratch or scrape.
- Page 71 Operations and Maintenance Manual Bearings or support points (dirt and lubricant must be removed from the bearing). Labels (they could be removed or become illegible). Caution! Clean and remove all residues that remain attached to the machine such as foliage, straw, grass and any other type of flammable material that could easily cause a fire at the end of each working day and after each use of the machine.
- Page 72 Operations and Maintenance Manual Caution! When the "G" cartridge is dirty, do not clean but replace cartridges "B" and "G" before 50 hours of operation. Once you have cleaned it, refit the filter element and close the protective cover with the two metal clips.
- Page 73 Operations and Maintenance Manual Fig. 18 The radiator exchange surface must be cleaned on both sides. Check the exchange surfaces of the radiator and clean the surfaces with a brush soaked in a suitable detergent if they are clogged. Caution! Wear protective goggles if using compressed air.
-
Page 74: Visual Inspection
Operations and Maintenance Manual 3.1.2 VISUAL INSPECTION Important! Missing, damaged or worn components must be replaced immediately. Carry out the following checks daily before each use: Clamping elements • Check the safety systems, the working condition of the screws, deformation of the bolts and the necessary safety conditions. - Page 75 Working with a defective emergency stop switch is gross negligence. Do not use the machine if the emergency button(s) does not work; contact the MDB assistance centre immediately. OPERATIONAL CHECK: •...
-
Page 76: Lubrication
- Sleeves for oil return circuit E. 3.1.3 LUBRICATION Grease every 8 hours and in any case after each wash. Important! MDB recommends using biodegradable lubricants. Do not mix different lubricants together. Even biodegradable greases must not be released into the environment. - Page 77 Operations and Maintenance Manual Lubrication process: • Thoroughly clean any old parts or parts covered in grease or impurities. Otherwise, any dirt from the old grease would be pressed onto the device’s surfaces. Caution! In this application, the presence of dirt can quickly lead to wear, machine downtime and high repair costs.
-
Page 78: Track Maintenance
Manual also a reduction in costs for the disposal of used oils and a reduction in pollution. Oil maintenance must be carried out each year by the MDB authorised support centre. Oil maintenance consists of the following: • Filtering the oil. - Page 79 Operations and Maintenance Manual • Check that there are no foreign bodies between the rollers and the tracks, between the idle wheels and the tracks, or between the drive wheels and the tracks. MONTHLY MAINTENANCE • Visually check the roller mountings. •...
- Page 80 Operations and Maintenance Manual Connect the grease pump to the track tensioner lubrication unit. Caution! The grease pump must be equipped with a pressure gauge with scale up to 200 bar (see picture below). Lubricate up to a pressure of 160 bar. C.da Sant’Onofrio, 6/A 66034 Lanciano (CH) –...
-
Page 81: Technical Assistance
Operations and Maintenance Manual TECHNICAL ASSISTANCE Important note! Technical assistance can only be carried out by MDB authorised assistance centres. Otherwise, any form of warranty is lost. See the machine operating time on the control unit display to schedule technical assistance. - Page 82 Operations and Maintenance Manual FIRST TECHNICAL ASSISTANCE AFTER 10 HOURS OF OPERATION OR 6 MONTHS Name Action Engine oil level Coolant level Air filter Rubber pipes Check the tension of the nuts and tighten them Tensioning of the tracks EVERY 10 HOURS OF OPERATION OR AT LEAST EVERY 6 MONTHS Name Action Air filter...
- Page 83 Operations and Maintenance Manual EVERY 250 HOURS OF OPERATION OR AT LEAST EVERY 6 MONTHS Name Action Radiator exchange and intercooler surface Alternator belt tensioning AFTER 500 HOURS OF OPERATION OR AT LEAST AFTER ONE YEAR Name Action Hydraulic oil Hydraulic oil filter cartridge EVERY 500 HOURS OF OPERATION OR AT LEAST ONCE A YEAR Name...
- Page 84 Operations and Maintenance Manual Control levers, control bars Rubber sleeves (air/coolant intake) Fuel pipes EVERY 1000 HOURS OF OPERATION Name Action Fuel tank Rubber air filter intake sleeves Hydraulic piping Hydraulic oil filter cartridge Coolant fluid Coolant sleeves EVERY 1500 HOURS OF OPERATION Name Action Fuel pipes...
- Page 85 Operations and Maintenance Manual EVERY 5000 HOURS OF OPERATION Name Action Starter engine Alternator TRACK TREAD HEIGHT ≤ 10 mm Description Action Tracks C.da Sant’Onofrio, 6/A 66034 Lanciano (CH) – ITALY Tel. (+39) 0872.50221 – Fax (+39) 0872.50231 E-mail: info@mdbsrl.com –...
-
Page 86: Relay And Fuse Position Diagram
Operations and Maintenance Manual 3.2.1 RELAY AND FUSE POSITION DIAGRAM C.da Sant’Onofrio, 6/A 66034 Lanciano (CH) – ITALY Tel. (+39) 0872.50221 – Fax (+39) 0872.50231 E-mail: info@mdbsrl.com – Web: www.mdbsrl.com 85 of 123... - Page 87 Operations and Maintenance Manual A – RELAYS AND FUSES – MISCELLANEOUS SERVICES COMPONENT “A” LEGEND: F1 (5A) DISPLAY F2 (5A) - HORN R1- LIGHTS F3 (5A) – CLEARANCE LIGHTS F4 (5A) - BATTERY CHARGER R2 - HEATER F5 (20A) CLEANER F6 (5A) –...
- Page 88 Operations and Maintenance Manual B-MOTOR RELAYS AND FUSES UP TO THE S/N *0246* MACHINE COMPONENT “B” LEGEND: F1 (20A) - MAIN R1 - MAIN F2 (20A) STARTER + A.C. PUMP F3 (5A) ECU B R2 - STARTER F3 (5A) - ECU B F4 (5A) - EGR F5 (15A) –...
- Page 89 Operations and Maintenance Manual C – FUSES – MISCELLANEOUS SERVICES COMPONENT “C” LEGEND: F1 (200A) – START MOTOR F2 (40A) – POWER SUPPLY OF LOMBARDINI SYSTEM F3 (30A) – POWER SUPPLY OF ELECTRIC SYSTEM C.da Sant’Onofrio, 6/A 66034 Lanciano (CH) – ITALY Tel.
-
Page 90: Problem Solving Guide
Operations and Maintenance Manual 3.2.2 PROBLEM SOLVING GUIDE REMOTE CONTROL PROBLEM CAUSE SOLUTION Flat battery Recharge the battery Radio remote control Connect transmitter - receiver connection not made Release the emergency button Emergency button pressed Radio remote control not Electronic key not inserted Insert the electronic key working Use a transmitter with the... - Page 91 Operations and Maintenance Manual TRACKS PROBLEM CAUSE SOLUTION Tracks excessively worn Replace the tracks Metal track structure broken Track has come off Insufficient track tension Tension the tracks Rubber worn Tension the tracks Insufficient track tension Tracks loose Tensioning system broken Contact the dealer BEEPER / HORN PROBLEM...
- Page 92 Operations and Maintenance Manual KOHLER ENGINE PROBLEM CAUSE SOLUTION Engine ECU has detected Please contact your authorised faulty operation KOHLER workshop Yellow LED on Battery terminals sulfation Clean the battery terminals Recharge the battery or Low battery voltage replace it Low fuel level Refill with fuel Contact Kohler...
- Page 93 Operations and Maintenance Manual Clogged air filter Replace with a new filter Replace the engine oil. Oil level in the cup high If the problem persists please Excessive consumption of fuel contact your authorised KOHLER workshop Clogged air filter Replace with a new filter Please contact your authorised Fuel pipes clogged KOHLER workshop...
-
Page 94: Mdb Authorised Workshops
Operations and Maintenance Manual 3.2.3 MDB AUTHORISED WORKSHOPS AUSTRALIA S.M.E pty ltd FRANCE FSI Franskan sas mstead@smemowers.com.au anthony@fsi-franskan.com AUSTRIA GERMANY VOGT gmbh Vogt gmbh service@vogtgmbh.com w.vogt@vogtgmbh.com m.wortmann@vogtgmbh.com BELGIUM Maaiers verschueren bvbaul JAPAN GIGA Solar Co. Ltd info@maaiers-verschueren.be yano@gigasolar.co.jp CANADA Industrial Machine Inc... - Page 95 Operations and Maintenance Manual NORWAY SPAIN Maskin Importören as I.L.A.G.A. SL post@maskinimp.no gustavo@ilaga.es NEW ZEALAND UNITED STATES OMC POWER EQUIPMENT Green Climber of North America msw@omc.net.nz marty@greenclimberna.com sales@omc.net.nz zoe@greenclimberna.com THE NETHERLANDS SWEDEN RBS Voertechniek BV Kenneth Andersson j.vandertol@machines4green.nl ostrahult@tele2.se PORTUGAL SWITZERLAND GREENPLACE LDA Builtec...
- Page 96 Operations and Maintenance Manual C.da Sant’Onofrio, 6/A 66034 Lanciano (CH) – ITALY Tel. (+39) 0872.50221 – Fax (+39) 0872.50231 E-mail: info@mdbsrl.com – Web: www.mdbsrl.com 95 of 123...
- Page 97 Operations and Maintenance Manual C.da Sant’Onofrio, 6/A 66034 Lanciano (CH) – ITALY Tel. (+39) 0872.50221 – Fax (+39) 0872.50231 E-mail: info@mdbsrl.com – Web: www.mdbsrl.com 96 of 123...
-
Page 98: Attachment A
Operations and Maintenance Manual ATTACHMENT A FACSIMILE DECLARATION OF CONFORMITY C.da Sant’Onofrio, 6/A 66034 Lanciano (CH) – ITALY Tel. (+39) 0872.50221 – Fax (+39) 0872.50231 E-mail: info@mdbsrl.com – Web: www.mdbsrl.com 97 of 123... -
Page 99: Attachment B
Operations and Maintenance Manual ATTACHMENT B HOW TO USE THE UTD-130 SHREDDER UTD-125 SHREDDER C.da Sant’Onofrio, 6/A 66034 Lanciano (CH) – ITALY Tel. (+39) 0872.50221 – Fax (+39) 0872.50231 E-mail: info@mdbsrl.com – Web: www.mdbsrl.com 98 of 123... -
Page 100: Foreword
18 can be applied to the LV600 . MDB declines any liability if equipment other than that listed in this manual, or in any case not authorised by MDB, is applied to the LV600 The LV600 can be delivered to the purchaser with the FLAIL already installed. Once arrived at destination, the attachment points on the machine must be used to position it, which are located in the areas indicated in the photos below. - Page 101 Operations and Maintenance Manual B.2 HOW TO FIX THE EQUIPMENT TO THE MACHINE If the LV600 is delivered with the FLAIL MOWER disconnected from the machine, proceed as follows to apply the FLAIL to the LV600: 1- align the LV600 to the flail mower following the steps in fig.
- Page 102 Operations and Maintenance Manual attach the hydraulic pipes as shown in Fig. Fig. 21 4- bring the orange plate (a) on the flail mower up to the plate on the LV600 (b), resting the guides on the flail mower plate (c) on top of the LV600 plate (Fig. 22); C.da Sant’Onofrio, 6/A 66034 Lanciano (CH) –...
-
Page 103: Using The Lv600 With The Txl-D Series Flail Mower
Operations and Maintenance Manual Fig. 22 5- lift the lever to lock the FLAIL to the LV600 plate (fig. 23); Fig. 23 The LV600 Shredder is now ready for use. C.da Sant’Onofrio, 6/A 66034 Lanciano (CH) – ITALY Tel. (+39) 0872.50221 – Fax (+39) 0872.50231 E-mail: info@mdbsrl.com –... - Page 104 Operations and Maintenance Manual To release the equipment from the LV600 , perform the above attachment operations in reverse order. B.3 HOW TO USE THE LV600 FLAIL MOWER SERIES UTD-130 The controls and operation of the LV600 with the UTD-130 Flail Mower are those described for the basic machine.
- Page 105 Operations and Maintenance Manual Danger! On steep terrain, never stand or manoeuvre the machine from a position in the area below it, as the machine could overturn in this area. Always stand or manoeuvre the machine from the area above it. Caution! With the equipment attached, there is danger of contact with moving parts at the front of the machine.
-
Page 106: Logbook
Operations and Maintenance Manual LOGBOOK ROUTINE MAINTENANCE MACHINE MODEL LV600 SERIAL NUMBER YEAR OF MANUFACTURE Date Maintenance after 10 hours of operation Performed by Signature and Stamp Date Maintenance after 50 hours of operation Performed by Signature and Stamp Date Maintenance after 500 hours of operation Performed by Signature and Stamp... - Page 107 Operations and Maintenance Manual Date Maintenance every 10 hours of operation Performed by Signature and Stamp 106 of 123...
- Page 108 Operations and Maintenance Manual 107 of 123...
- Page 109 Operations and Maintenance Manual 108 of 123...
- Page 110 Operations and Maintenance Manual 109 of 123...
- Page 111 Operations and Maintenance Manual 110 of 123...
- Page 112 Operations and Maintenance Manual Date Maintenance every 50 hours of operation Performed by Signature and Stamp 111 of 123...
- Page 113 Operations and Maintenance Manual 112 of 123...
- Page 114 Operations and Maintenance Manual 113 of 123...
- Page 115 Operations and Maintenance Manual Date Maintenance every 125 hours of operation Performed by Signature and Stamp 114 of 123...
- Page 116 Operations and Maintenance Manual 115 of 123...
- Page 117 Operations and Maintenance Manual 116 of 123...
- Page 118 Operations and Maintenance Manual Date Maintenance every 500 hours of operation Performed by Signature and Stamp 117 of 123...
- Page 119 Operations and Maintenance Manual Date Maintenance every 1000 hours of operation Performed by Signature and Stamp 118 of 123...
- Page 120 Operations and Maintenance Manual Date Maintenance every 1500 hours of operation Performed by Signature and Stamp 119 of 123...
- Page 121 Operations and Maintenance Manual Date Maintenance every 2000 hours of operation Performed by Signature and Stamp 120 of 123...
- Page 122 Operations and Maintenance Manual Date Maintenance every 5000 hours of operation Performed by Signature and Stamp 121 of 123...
-
Page 123: Unscheduled Maintenance
Operations and Maintenance Manual UNSCHEDULED MAINTENANCE Date Reason for the maintenance Performed by Signature and Stamp 122 of 123... - Page 124 Operations and Maintenance Manual Date Reason for the maintenance Performed by Signature and Stamp 123 of 123...
Need help?
Do you have a question about the GREEN CLIMBER LV600 and is the answer not in the manual?
Questions and answers
What type of Engine oil would you recommend for this machine and also where should I get Oil filter replacements at?
The recommended engine oil for the MDB GREEN CLIMBER LV600 is ENI OSO 46. Oil filter replacements and maintenance must be carried out by an MDB-authorized support center.
This answer is automatically generated