Advertisement
- 1 Feasures
- 2 Applications
- 3 Technical Specifications
- 4 Accessories
- 5 Optional accessories
- 6 Front Panel Descriptions
- 7 Power ON / OFF
- 8 Calibration
- 9 Measurement
- 10 Data Memorizing
- 11 Memory Recall
- 12 Delete data in memory
- 13 Download to PC
- 14 Auto Power Off
- 15 Power adapter and charging of battery
- 16 Documents / Resources
Feasures
Designed and manufactured in accordance with international standard ASTMD523, ASTMD1455, ASTMC346, ASTMC584, ASTMD2457, DIN ENISO2813, DIN67530, ENISO7668, JISZ8741, MFT30064, TAPPIT480, GB9754, GB/T13891, GB7706 and GB8807. Its technical parameters conform with JJG696-2002. Flexible use with its separate probe.
Applications
Widely used in Floor maintenance, Surface cleaning quality control, Stone and tile gloss measurement, Checking printed matter, Quality control of paint and ink, Polished metal surface, measurement (chrome plating), Inspection of paint protection and waxing, Auto-body paint inspection, Surface inspection of plastic moldings, Evaluation of detergents and washers, Checking masonry and building exteriors.
Technical Specifications
Measuring geometry:
GM-6: 60°
GM-26: 20° & 60°
GM-268: 20°, 60° & 85°
Range: 0.1 to 200 gloss units
Accuracy: ±1.0 gloss unit (against reference standard )
Resolution: 0.1 gloss unit
Repeatability: ± 0.5 GU (0... 99.9)
Measuring area: 7x14mm ellipse
Data memorized: 254 groups
Data output: RS 232C serial interface
Working condition:
Temperature range: 0°C- 40°C
Humidity: up to 85%
Power supply: Lithium Battery
Size: 140x45x75 mm
Weight: 305 g
Accessories
Carrying case 1pc
Operation manual 1pc.
Power adapter 1pc.
Holder with calibration standard 1pc.
Optic cleaning cloth 1pc.
Optional accessories
Cable & software for RS232C.
USB adaptor.
Bluetooth interface.
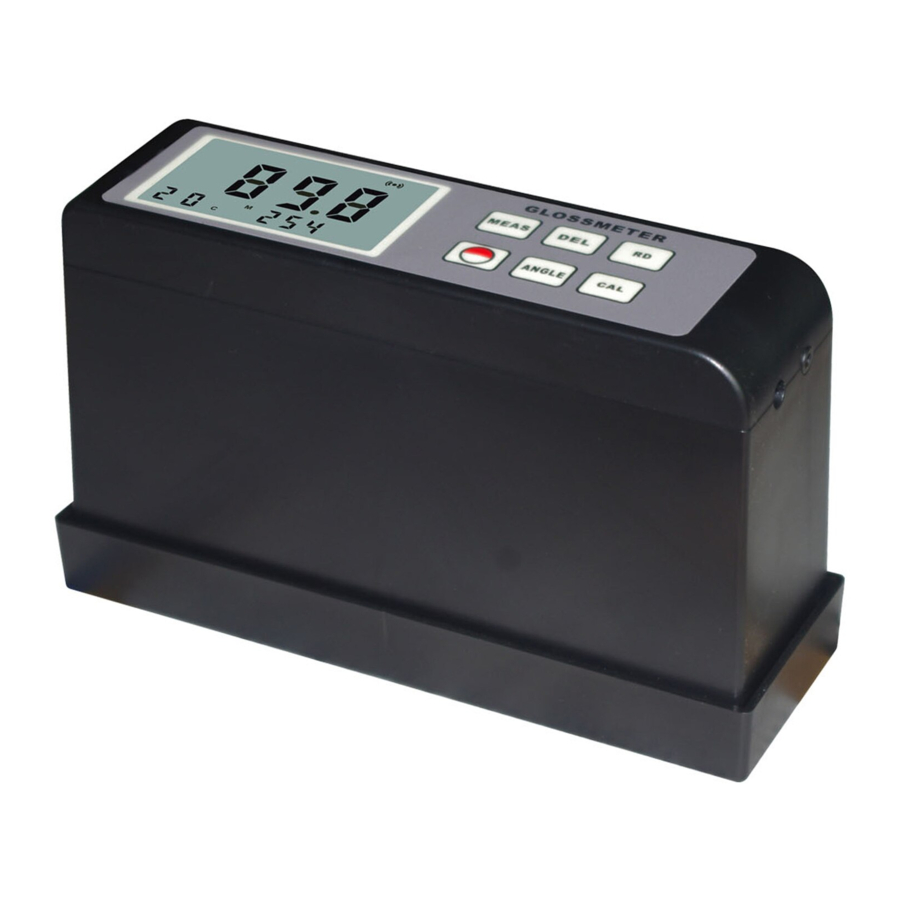
Front Panel Descriptions

3-1 Display
3-2 Measuring key
3-3 Delete key
3-4 Read key
3-5 Power key
3-6 Angle conversion key
3-7 Calibration key
Power ON / OFF
Press the key to power on the meter. To turn it off, just press this key again. This meter is powered with Lithium Battery. Use the battery adapter for charging.
Calibration
- Press the "ANGLE key" to select the vight measuring geometry
- Lay the main unit into the holder with calibration standard of high gloss black tile. Take a reading by pressing the "MEAS key." Compare the measured value with the value marked on the tile. If it matches the value on the tile holder, the instrument is within calibration and ready for use. If the measured value does not match the assigned value, just press the "CAL key."
It is necessary to inspect the condition of the calibration tile and instrument optics before each calibration. Any dust or debris on the optic should be blown from the lenses using dry clean air, the optics must not be touched. If there are any permanent marks or scratches on the lenses, the instrument is no longer suitable for measuring and should be returned to an authorized service center. The calibration tile must be perfectly clean from smears and scratches before attempting calibration. Fingerprints and dust can be removed with the supplied optic cleaning cloth.
Measurement
Remove the holder and lay the Measurement Aperture just against the position that you want to measure. Take a measurement by pressing the "MEAS key." The reading on the Display Screen within 2 seconds is the gloss value of that position. Meanwhile the result is stored into memory automatically.
When the instrument is placed on a sample the aperture is hidden, the centre of the measurement area can be pinpointed by the intersection of the arrows marked on the front of the instrument case with those on the side.
Data Memorizing
When taking measurements, all values will be stored automatically in memory and the number of stored reading is accordingly increased by
The gloss meter can store up to 254 g roups of data with measurement conditions. If the memory is full, the tester will auto save the new reading and discard the oldest one. That means the tester only hold the last 254 groups of data in memory.
Memory Recall
Under the measuring mode marked by 'M' on the display, press the "RD key" to enter into mode of viewing stored values marked by "R". Press "RD key" or "CAL key" to recall stored values forwards and backwards. To return to the measurement state, just press any key otherthan "RD key" or "CAL key".
Delete data in memory
In the measurement state marked by "M" on the display, the new reading can be deleted by pressing "DEL key", and the number of stored reading is accordingly decreased by
- To clear memory, just press and hold "DEL key" for 3 seconds till the number of stored reading becomes000.
Download to PC
This meter can communicate with a PC by optional USB or RS232 cable and software. All the memorized data can download to your PC every time when in a measurement state marked by "MENS" when you press "RD key" to enter the viewing memorized state.
Auto Power Off
The instrument features an auto power off function designed to conserve battery life. If the tool is idle (neither measuring nor any key operation) for 30 minutes, it will turn itself off.
Power adapter and charging of battery
When the battery appears on the display, the instrument should be charged as soon as possible. the power adapter should be plugged into the power socket of the instrument. The power adapter should be connected to100~220V 50Hz and charging of the battery will begin. Input voltage for power adapter is AC 100~220V with DC 5~7V of output, about 300mA of charging current, charging time of up to 5.0 hours.
This instrument uses a lithium ion chargeable battery. Charging can be fulfilled at any time without affecting the normal operation of the instrument.
Notes:
- The holder removed from the main unit should be kept in a safe and clean place to prevent from damage or pollution.
- While measuring please keep environment light from directly irradiating into the measurement aperture.
If necessary, especially under strong light, shade it with a piece of light-tight cloth. - A big temperature difference between environment and meter would badly affect measuring accuracy. In such a case, please wait for a period of time till the temperature get to a balance and then calibrate the meter again.
- If measurement operation lasts a long time, for example an hour or more, it is necessary to re calibrate the meter.
Documents / ResourcesDownload manual
Here you can download full pdf version of manual, it may contain additional safety instructions, warranty information, FCC rules, etc.
Advertisement


Need help?
Do you have a question about the GM-6 and is the answer not in the manual?
Questions and answers